Now that the basics of Linux Containers have been covered in the previous chapter, this chapter will demonstrate how to create and manage containers using the Podman, Skopeo, and Buildah tools on Rocky Linux 9. By the end of this chapter, you will have a clearer understanding of how to create and manage containers on Rocky 9. In addition, you will have gained a knowledge foundation on which to continue exploring the power of Linux Containers.
Installing the Container Tools
Before starting with containers, the first step is to install all of the container tools outlined in the previous chapter using the following command:
# dnf install container-toolsCode language: plaintext (plaintext)Pulling a Rocky 9 Container Image
The Rocky Linux 9.1 minimal image will be pulled from the registry for this example. Before pulling an image, however, information about the image repository can be obtained using the skopeo tool, for example:
# skopeo inspect docker://docker.io/library/rockylinux:9.1-minimal
{
    "Name": "docker.io/library/rockylinux",
    "Digest": "sha256:9da6a8917c8cc0d429eb08ed1a4ba8588ba81807664853cd86c642a75ca91cfe",
    "RepoTags": [
        "8",
        "8-minimal",
        "8.5",
        "8.5.20220308",
        "8.6",
        "8.6-minimal",
        "8.6.20220707-minimal",
        "8.6.20227707",
        "8.7",
        "8.7-minimal",
        "8.7.20221219",
        "8.7.20221219-minimal",
        "8.7.20230215",
        "8.7.20230215-minimal",
        "9",
        "9-minimal",
        "9.0",
        "9.0-minimal",
        "9.0.20220712",
        "9.0.20220712-minimal",
        "9.0.20220720",
        "9.0.20220720-minimal",
        "9.1",
        "9.1-minimal",
        "9.1.20221123",
        "9.1.20221123-minimal",
        "9.1.20221221",
        "9.1.20221221-minimal",
        "9.1.20230215",
        "9.1.20230215-minimal"
    ],
    "Created": "2023-02-21T20:34:38.90212936Z",
    "DockerVersion": "20.10.23",
    "Labels": null,
    "Architecture": "amd64",
    "Os": "linux",
    "Layers": [
        "sha256:9ac1c2cb2b146539d892b04ecc0eb4a0e49b1a51f21358458d63c8846b34a143"
    ],
    "Env": [
        "PATH=/usr/local/sbin:/usr/local/bin:/usr/sbin:/usr/bin:/sbin:/bin"
    ]
}Code language: plaintext (plaintext)
This image is the Rocky Linux 9 base image for building minimal operating system containers and will be used as the basis for the example in this chapter. To find other container images, using the podman search command as follows:
# podman search rockylinux
NAME                                                         DESCRIPTION
docker.io/library/rockylinux                                 The official build of Rocky Linux.
docker.io/rockylinux/rockylinux
docker.io/kasmweb/rockylinux-9-desktop                       Rocky Linux 9 desktop for Kasm Workspaces
docker.io/kasmweb/rockylinux-8-desktop                       Rocky Linux 8 desktop for Kasm Workspaces
.
. Code language: plaintext (plaintext)
Having verified that this is indeed the correct image, the following podman command will pull the image to the local system:
 |
You are reading a sample chapter from Rocky Linux 9 Essentials. Buy the full book now in eBook or Print format.
Full book includes 34 chapters and 290 pages. Learn more. |
# podman pull rockylinux:9.1-minimal
Resolved "rockylinux" as an alias (/etc/containers/registries.conf.d/000-shortnames.conf)
Trying to pull docker.io/library/rockylinux:9.1-minimal...
Getting image source signatures
Copying blob 9ac1c2cb2b14 done
Copying config 32cf891295 done
Writing manifest to image destination
Storing signatures
32cf8912950804a900dbfa188caddd69da993b1f32db98c2a7c4d516e904ad3eCode language: plaintext (plaintext)
Verify that the image has been stored by asking podman to list all local images:
# podman images
REPOSITORY                    TAG          IMAGE ID      CREATED       SIZE
docker.io/library/rockylinux  9.1-minimal  32cf89129508  2 months ago  121 MBCode language: plaintext (plaintext)
Details about a local image may be obtained by running the podman inspect command:
# podman inspect docker.io/library/rockylinux:9.1-minimalCode language: plaintext (plaintext)Running the Image in a Container
The image pulled from the registry is a fully operational image ready to run in a container without modification. To run the image, use the podman run command. In this case, the –rm option will be specified to indicate that we want to run the image in a container, execute one command and then have the container exit. In this case, the cat tool will be used to output the content of the /etc/ passwd file located on the container root filesystem:
# podman run --rm docker.io/library/rockylinux:9.1-minimal cat /etc/passwd
root:x:0:0:root:/root:/bin/bash
bin:x:1:1:bin:/bin:/sbin/nologin
daemon:x:2:2:daemon:/sbin:/sbin/nologin
adm:x:3:4:adm:/var/adm:/sbin/nologin
lp:x:4:7:lp:/var/spool/lpd:/sbin/nologin
sync:x:5:0:sync:/sbin:/bin/sync
shutdown:x:6:0:shutdown:/sbin:/sbin/shutdown
halt:x:7:0:halt:/sbin:/sbin/halt
mail:x:8:12:mail:/var/spool/mail:/sbin/nologin
operator:x:11:0:operator:/root:/sbin/nologin
games:x:12:100:games:/usr/games:/sbin/nologin
ftp:x:14:50:FTP User:/var/ftp:/sbin/nologin
nobody:x:65534:65534:Kernel Overflow User:/:/sbin/nologinCode language: plaintext (plaintext)
Compare the content of the /etc/passwd file within the container with the /etc/passwd file on the host system. Note that it lacks all of the additional users on the host confirming that the cat command was executed within the container environment. Also, note that the container started, ran the command, and exited within seconds. Compare this to the amount of time it takes to start a full operating system, perform a task, and shut down a virtual machine, and you begin to appreciate the speed and efficiency of containers.
To launch a container, keep it running, and access the shell, the following command can be used:
 |
You are reading a sample chapter from Rocky Linux 9 Essentials. Buy the full book now in eBook or Print format.
Full book includes 34 chapters and 290 pages. Learn more. |
# podman run --name=mycontainer -it docker.io/library/rockylinux:9.1-minimal /bin/bash
bash-5.1#Code language: plaintext (plaintext)
In this case, an additional command-line option has been used to assign the name “mycontainer” to the container. Though optional, this makes the container easier to recognize and reference as an alternative to using the automatically generated container ID.
While the container is running, run podman in a different terminal window to see the status of all containers on the system
# podman ps -a
CONTAINER ID  IMAGE                                     COMMAND     CREATED        STATUS                    PORTS       NAMES
dadf9cc5e5d0  docker.io/library/rockylinux:9.1-minimal  /bin/bash   2 minutes ago  Exited (0) 8 seconds ago              mycontainerCode language: plaintext (plaintext)
To execute a command in a running container from the host, use the podman exec command, referencing the name of the running container and the command to be executed. The following command, for example, starts up a second bash session in the container named mycontainer:
# podman exec -it mycontainer /bin/bash
bash-5.1#Code language: plaintext (plaintext)
Note that though the above example referenced the container name, the same result can be achieved using the container ID as listed by the podman ps -a command:
# podman exec -it dbed2car8975 /bin/bash
bash-5.1#Code language: plaintext (plaintext)
Alternatively, the podman attach command will also attach to a running container and access the shell prompt:
 |
You are reading a sample chapter from Rocky Linux 9 Essentials. Buy the full book now in eBook or Print format.
Full book includes 34 chapters and 290 pages. Learn more. |
# podman attach mycontainer
bash-5.1#Code language: PHP (php)
Once the container is up and running, additional configuration changes can be made and packages installed like any other Rocky Linux 9 system.
Managing a Container
Once launched, a container will continue to run until it is stopped via podman, or the command launched when the container was run exits. Running the following command on the host, for example, will cause the container to exit:
# podman stop mycontainerCode language: plaintext (plaintext)Alternatively, pressing the Ctrl-D keyboard sequence within the last remaining bash shell of the container would cause both the shell and container to exit. Once it has exited, the status of the container will change accordingly:
# podman ps -a
CONTAINER ID  IMAGE                                     COMMAND     CREATED        STATUS                     PORTS       NAMES
451f64a77962  docker.io/library/rockylinux:9.1-minimal  /bin/bash   3 minutes ago  Exited (0) 13 seconds ago              mycontainerCode language: plaintext (plaintext)
Although the container is no longer running, it still exists and contains all the configuration and file system changes. If you installed packages, made configuration changes, or added files, these changes will persist within “mycontainer”. To verify this, restart the container as follows:
# podman start mycontainerCode language: plaintext (plaintext)After starting the container, use the podman exec command again to execute commands within the container as outlined previously. For example, to once again gain access to a shell prompt:
 |
You are reading a sample chapter from Rocky Linux 9 Essentials. Buy the full book now in eBook or Print format.
Full book includes 34 chapters and 290 pages. Learn more. |
# podman exec -it mycontainer /bin/bashCode language: plaintext (plaintext)A running container may also be paused and resumed using the podman pause and unpause commands as follows:
# podman pause mycontainer
# podman unpause mycontainerCode language: plaintext (plaintext)
Saving a Container to an Image
Once the container guest system is configured to your requirements, there is a good chance that you will want to create and run more than one container of this particular type. To do this, the container needs to be saved as an image to local storage to be used as the basis for additional container instances. This is achieved using the podman commit command combined with the name or ID of the container and the name by which the image will be stored, for example:
# podman commit mycontainer myrocky_imageCode language: plaintext (plaintext)Once the image has been saved, check that it now appears in the list of images in the local repository:
# podman images
REPOSITORY                    TAG          IMAGE ID      CREATED         SIZE
localhost/myrocky_image       latest       d043bfebfbb0  36 seconds ago  121 MB
docker.io/library/rockylinux  9.1-minimal  32cf89129508  2 months ago    121 MBCode language: plaintext (plaintext)
The saved image can now be used to create additional containers identical to the original:
# podman run --name=mycontainer2 -it localhost/myrocky_image /bin/bashCode language: plaintext (plaintext)Removing an Image from Local Storage
To remove an image from local storage once it is no longer needed, run the podman rmi command, referencing either the image name or ID as output by the podman images command. For example, to remove the image named myrocky_image created in the previous section, run podman as follows:
 |
You are reading a sample chapter from Rocky Linux 9 Essentials. Buy the full book now in eBook or Print format.
Full book includes 34 chapters and 290 pages. Learn more. |
# podman rmi localhost/myrocky_imageCode language: plaintext (plaintext)Before an image can be removed, any containers based on that image must first be removed.
Removing Containers
Even when a container has exited or been stopped, it still exists and can be restarted anytime. If a container is no longer needed, it can be deleted using the podman rm command as follows after the container has been stopped:
# podman rm mycontainer2Code language: plaintext (plaintext)Building a Container with Buildah
Buildah allows new containers to be built from existing containers, an image, or entirely from scratch. Buildah also includes the ability to mount the file system of a container so that it can be accessed and modified from the host.
The following buildah command, for example, will build a container from the Rocky Linux 9 image (if the image has not already been pulled from the registry, buildah will download it before creating the container):
# buildah from docker.io/library/rockylinux:9.1-minimalCode language: plaintext (plaintext)The result of running this command will be a container named rockylinux-working-container that is ready to run:
 |
You are reading a sample chapter from Rocky Linux 9 Essentials. Buy the full book now in eBook or Print format.
Full book includes 34 chapters and 290 pages. Learn more. |
# buildah run rockylinux-working-container cat /etc/passwdCode language: plaintext (plaintext)Building a Container from Scratch
Building a container from scratch creates an empty container. Once created, packages may be installed to meet the requirements of the container. This approach is useful when creating a container that only needs the minimum of packages installed.
The first step in building from scratch is to run the following command to build the empty container:
# buildah from scratch working-containerCode language: plaintext (plaintext)After the build is complete, a new container will be created named working-container:
# buildah containers
CONTAINER ID  BUILDER  IMAGE ID     IMAGE NAME                       CONTAINER NAME
451f64a77962     *     32cf89129508 docker.io/library/rockylinux:... 451f64a7796293cdae186a16bc97898af9e52324eecbe9ca787b5e56bb5c0447
8804ea9985dc     *                  scratch                          working-containerCode language: plaintext (plaintext)
The empty container is now ready to have some packages installed. Unfortunately, this cannot be performed within the container because not even the bash or dnf tools exist. So instead, the container filesystem needs to be mounted on the host system, and the packages are installed using dnf with the system root set to the mounted container filesystem. Begin this process by mounting the container’s filesystem as follows:
# buildah mount working-container
/var/lib/containers/storage/overlay/20b46cf0e2994d1ecdc4487b89f93f6ccf41f72788da63866b6bf80984081d9a/mergedCode language: plaintext (plaintext)
If the file system was successfully mounted, buildah will output the mount point for the container file system. Now that we have access to the container filesystem, the dnf command can install packages into the container using the –installroot option to point to the mounted container file system. The following command, for example, installs the bash, CoreUtils, and dnf packages on the container filesystem (where <container_fs_mount> is the mount path output previously by the buildah mount command) :
 |
You are reading a sample chapter from Rocky Linux 9 Essentials. Buy the full book now in eBook or Print format.
Full book includes 34 chapters and 290 pages. Learn more. |
# dnf install --releasever=9.1 --installroot <container_fs_mount> bash coreutils dnfCode language: plaintext (plaintext)Note that the –releasever option indicates to dnf that the packages for Rocky Linux 9.1 are to be installed within the container.
After the installation completes, unmount the scratch filesystem as follows:
# buildah umount working-containerCode language: plaintext (plaintext)Once dnf has performed the package installation, the container can be run, and the bash command prompt can be accessed as follows:
# buildah run working-container bash
bash-5.1#Code language: plaintext (plaintext)
Container Bridge Networking
As outlined in the previous chapter, container networking is implemented using the Container Networking Interface (CNI) bridged network stack. The following command shows the typical network configuration on a host system on which containers are running:
# ip a
1: lo: <LOOPBACK,UP,LOWER_UP> mtu 65536 qdisc noqueue state UNKNOWN group default qlen 1000
    link/loopback 00:00:00:00:00:00 brd 00:00:00:00:00:00
    inet 127.0.0.1/8 scope host lo
       valid_lft forever preferred_lft forever
    inet6 ::1/128 scope host
       valid_lft forever preferred_lft forever
2: eno1: <BROADCAST,MULTICAST,UP,LOWER_UP> mtu 1500 qdisc fq_codel state UP group default qlen 1000
    link/ether 00:23:24:52:52:57 brd ff:ff:ff:ff:ff:ff
    altname enp0s25
    inet 192.168.86.35/24 brd 192.168.86.255 scope global dynamic noprefixroute eno1
       valid_lft 68525sec preferred_lft 68525sec
    inet6 fd7f:886f:716a:0:223:24ff:fe52:5257/64 scope global dynamic noprefixroute
       valid_lft 1619sec preferred_lft 1619sec
    inet6 fe80::223:24ff:fe52:5257/64 scope link noprefixroute
       valid_lft forever preferred_lft forever
3: veth15d7e073@if2: <BROADCAST,MULTICAST,UP,LOWER_UP> mtu 1500 qdisc noqueue master podman0 state UP group default qlen 1000
    link/ether 3e:3a:54:b8:d8:e1 brd ff:ff:ff:ff:ff:ff link-netns netns-658a3069-5c69-185f-ef34-621107da5a71
    inet6 fe80::3c3a:54ff:feb8:d8e1/64 scope link
       valid_lft forever preferred_lft forever
6: podman0: <BROADCAST,MULTICAST,UP,LOWER_UP> mtu 1500 qdisc noqueue state UP group default qlen 1000
    link/ether 3e:3a:54:b8:d8:e1 brd ff:ff:ff:ff:ff:ff
    inet 10.88.0.1/16 brd 10.88.255.255 scope global podman0
       valid_lft forever preferred_lft forever
    inet6 fe80::45e:83ff:fe68:4067/64 scope link
       valid_lft forever preferred_lft foreverCode language: plaintext (plaintext)
In the above example, the host has an interface named eno1 connected to the external network with an IP address of 192.168.86.35. In addition, a virtual interface has been created named podman0 and assigned the IP address of 10.88.0.1. Running the same ip command on a container running on the host might result in the following output:
 |
You are reading a sample chapter from Rocky Linux 9 Essentials. Buy the full book now in eBook or Print format.
Full book includes 34 chapters and 290 pages. Learn more. |
# ip a
1: lo: <LOOPBACK,UP,LOWER_UP> mtu 65536 qdisc noqueue state UNKNOWN group default qlen 1000
    link/loopback 00:00:00:00:00:00 brd 00:00:00:00:00:00
    inet 127.0.0.1/8 scope host lo
       valid_lft forever preferred_lft forever
    inet6 ::1/128 scope host
       valid_lft forever preferred_lft forever
2: eth0@if3: <BROADCAST,MULTICAST,UP,LOWER_UP> mtu 1500 qdisc noqueue state UP group default qlen 1000
    link/ether b6:fb:88:16:8b:5e brd ff:ff:ff:ff:ff:ff link-netnsid 0
    inet 10.88.0.8/16 brd 10.88.255.255 scope global eth0
       valid_lft forever preferred_lft forever
    inet6 fe80::b4fb:88ff:fe16:8b5e/64 scope link
       valid_lft forever preferred_lft foreverCode language: plaintext (plaintext)
In this case, the container has an IP address of 10.88.0.8. Running the ping command on the host will verify that the host and containers are indeed on the same subnet:
# ping 10.88.0.8
PING 10.88.0.8 (10.88.0.8) 56(84) bytes of data.
64 bytes from 10.88.0.28: icmp_seq=1 ttl=64 time=0.056 ms
64 bytes from 10.88.0.28: icmp_seq=2 ttl=64 time=0.039 ms
.
.Code language: plaintext (plaintext)
We can also use the podman network ls command to obtain a list of container networks currently available on the host system:
# podman network ls
NETWORK ID    NAME        DRIVER
2f259bab93aa  podman      bridgeCode language: plaintext (plaintext)
The following command can be used to display detailed information about a container network, in this case, the above podman network:
# podman network inspect podman
[
     {
          "name": "podman",
          "id": "2f259bab93aaaaa2542ba43ef33eb990d0999ee1b4b557b7be53c0b7a1bb9",
          "driver": "bridge",
          "network_interface": "podman0",
          "created": "2023-04-11T08:49:20.489892751-04:00",
          "subnets": [
               {
                    "subnet": "10.88.0.0/16",
                    "gateway": "10.88.0.1"
               }
          ],
          "ipv6_enabled": false,
          "internal": false,
          "dns_enabled": false,
          "ipam_options": {
               "driver": "host-local"
          }
     }
]Code language: plaintext (plaintext)
New container networks are created using the following syntax:
podman network create <network name>Code language: plaintext (plaintext)For example, to create a new network named demonet, the following command would be used:
 |
You are reading a sample chapter from Rocky Linux 9 Essentials. Buy the full book now in eBook or Print format.
Full book includes 34 chapters and 290 pages. Learn more. |
# podman network create demonetCode language: plaintext (plaintext)The presence of the new network may be verified using the podman network ls command:
# podman network ls
NETWORK ID    NAME        DRIVER
9692930055dc  demonet     bridge
2f259bab93aa  podman      bridgeCode language: plaintext (plaintext)
Once a network has been created, it can be assigned to a container as follows:
# podman network connect demonet mycontainerCode language: plaintext (plaintext)Conversely, a container can be disconnected from a network using the podman network disconnect command:
# podman network disconnect demonet mycontainerCode language: plaintext (plaintext)When the new container network is created, a configuration file is generated in the /etc/containers/ networks directory with the name <network name>.json. In the case of the above example, a file named demonet.json that reads as follows will have been created:
{
     "name": "demonet",
     "id": "9692930055dc6ceea5cc4d0720df548daa521fe62e23ca3659a9815664bca2f6",
     "driver": "bridge",
     "network_interface": "podman1",
     "created": "2023-04-10T16:54:35.618056082-04:00",
     "subnets": [
          {
               "subnet": "10.89.0.0/24",
               "gateway": "10.89.0.1"
          }
     ],
     "ipv6_enabled": false,
     "internal": false,
     "dns_enabled": true,
     "ipam_options": {
          "driver": "host-local"
     }
}Code language: JSON / JSON with Comments (json)
Modifications can be made to this file to change settings such as the subnet address range, IPv6 support, and network type (set to bridge for this example) for implementing different network configurations.
 |
You are reading a sample chapter from Rocky Linux 9 Essentials. Buy the full book now in eBook or Print format.
Full book includes 34 chapters and 290 pages. Learn more. |
Finally, we can use the following command to delete the custom network:
# podman network rm demonetCode language: plaintext (plaintext)Managing Containers in Cockpit
In addition to the command-line tools outlined in this chapter, Linux containers may be created and managed using the Cockpit web interface. Assuming that Cockpit is installed and enabled on the system (a topic covered in An Overview of the Rocky Linux 9 Cockpit Web Interface) and that the steps to log into the Red Hat Container Registry outlined at the start of the chapter have been completed, sign into Cockpit and select the Podman Containers option. If the Podman module is not installed within Cockpit, open a terminal window and run the following command:
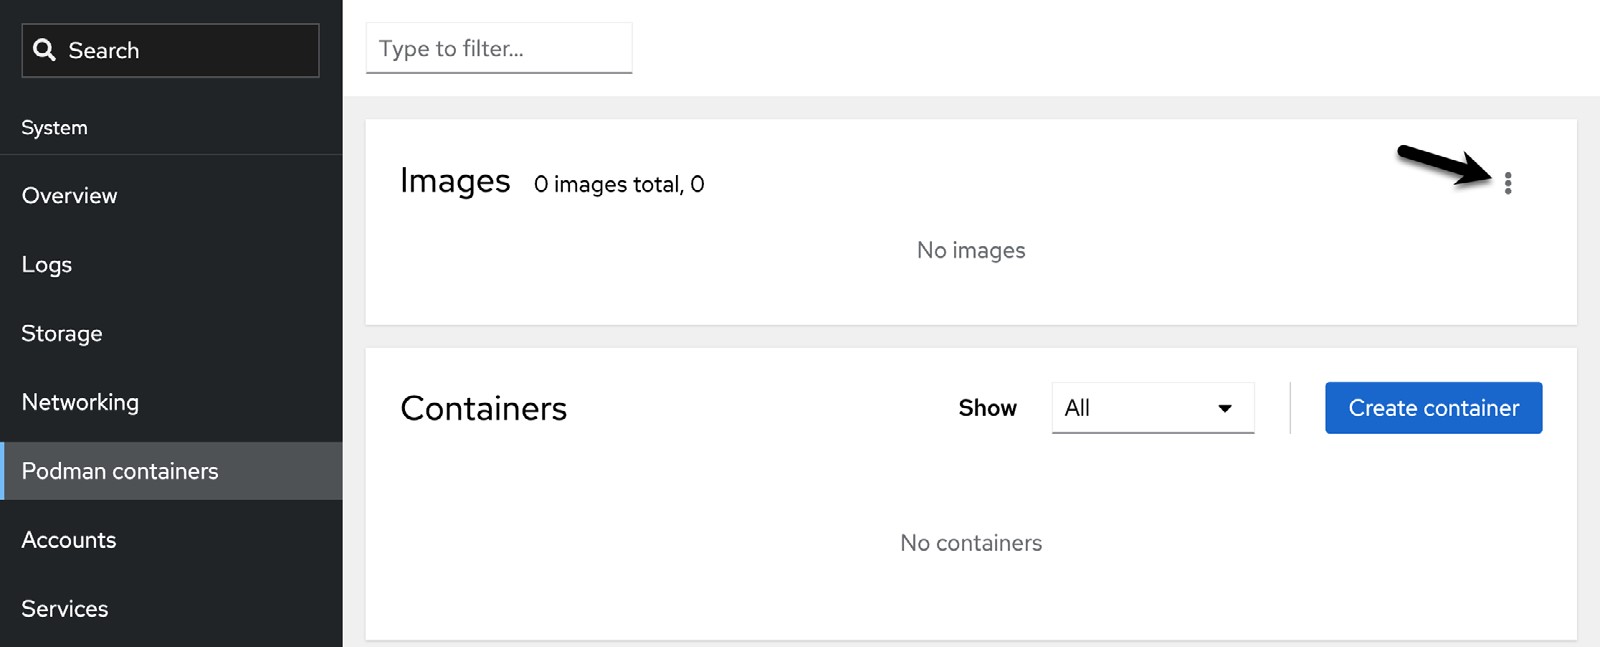
# dnf install cockpit-podmanCode language: plaintext (plaintext)If necessary, click the button to start the Podman service, at which point the screen should resemble Figure 28-1:

The first step is to download an image to use as the basis for a container (unless one has already been downloaded using the command-line tools). To perform the download, click the menu button marked by the arrow in Figure 28-1 above and select the Download new image option. When the search dialog appears, enter a keyword into the search dialog. Figure 28-2, for example, shows the result of searching for the Rocky Linux 9 images:

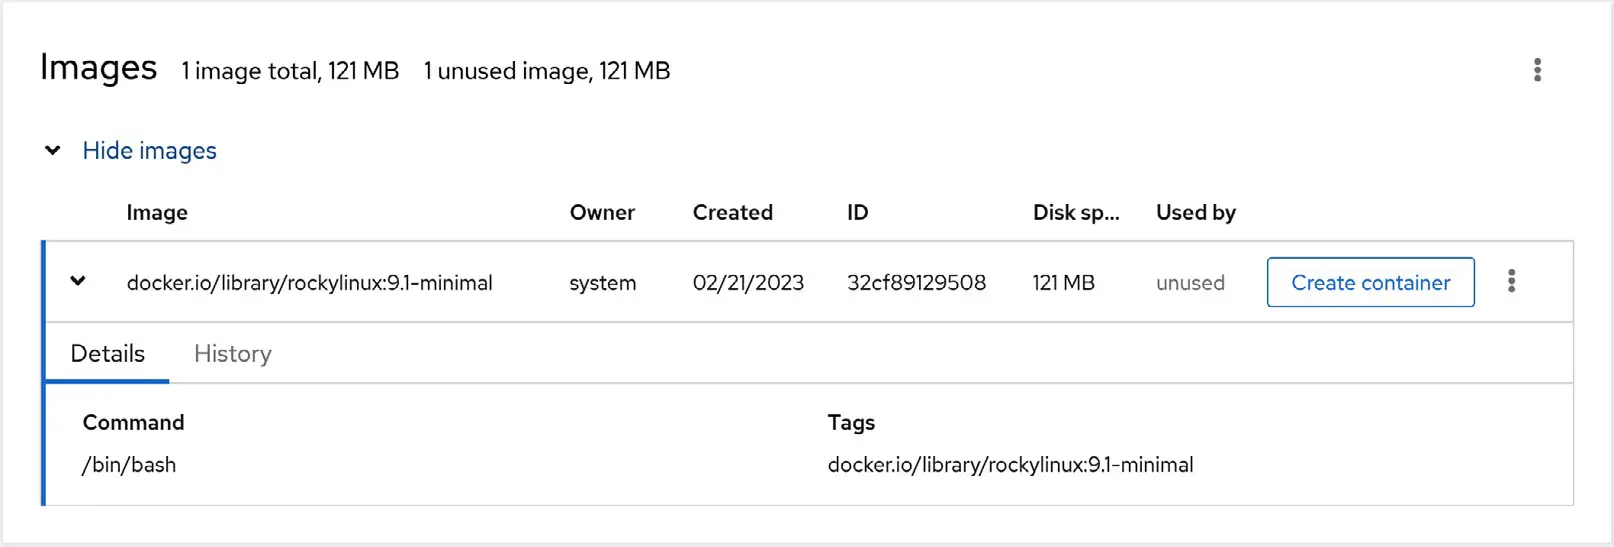
Once the image has been located, select it and click the Download button to pull it from the registry. Once downloaded, it will appear in the images list, as shown in Figure 28-3:
 |
You are reading a sample chapter from Rocky Linux 9 Essentials. Buy the full book now in eBook or Print format.
Full book includes 34 chapters and 290 pages. Learn more. |

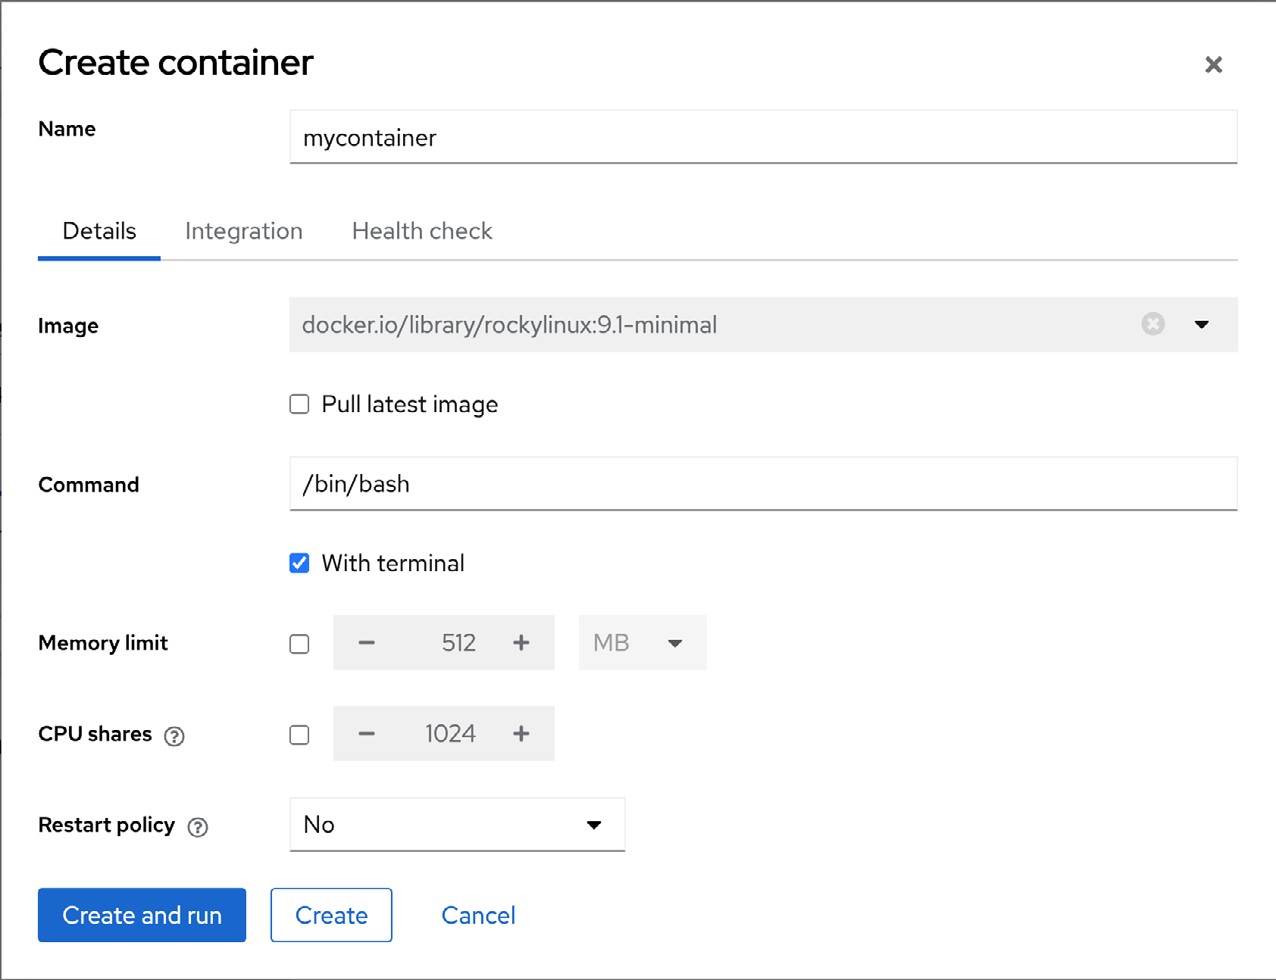
To run the image as a container, click on the Create container button and configure the container in the resulting dialog:

Note that options are provided to map ports on the host to ports on the container (useful, for example, if the container is hosting a web server), to limit the memory allocated to the container, and to specify volumes to use as the container storage. An option is also available to specify the program to run when the container starts. Once configured, click the Create and run button to launch the container.
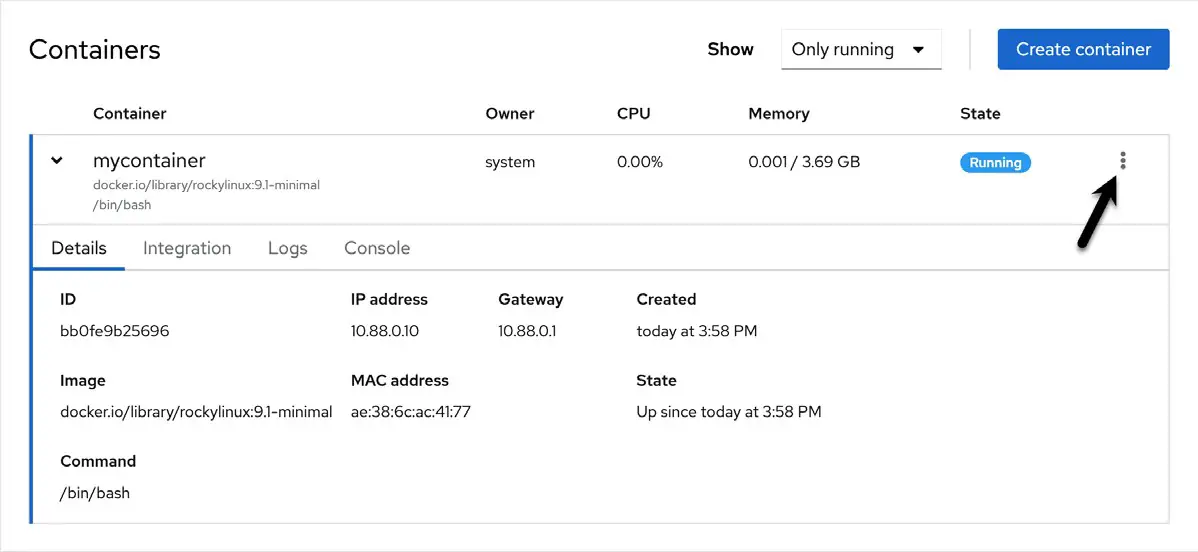
Once running, the container will appear in the Containers section, as illustrated in Figure 28-5 below:

The highlighted menu button allows actions such as starting, stopping, pausing, and saving the container to be performed. In addition, the container may also now be accessed and managed from the command line using the steps outlined earlier in the chapter.
Summary
This chapter has worked through creating and managing Linux Containers on Rocky Linux 9 using the podman, skopeo, and buildah tools together with the Cockpit web interface, including using container images obtained from a repository and the creation of a new image built entirely from scratch.
 |
You are reading a sample chapter from Rocky Linux 9 Essentials. Buy the full book now in eBook or Print format.
Full book includes 34 chapters and 290 pages. Learn more. |
