There are now two ways in which a RHEL 9 system can be deployed. One method is to either purchase new hardware or re-purpose an existing computer system on which to install and run the operating system. Another option is to create a cloud-based operating system instance using services such as Amazon AWS, Google Cloud, or Microsoft Azure (to name but a few). Since cloud-based instances are typically created by selecting a pre-configured, ready-to-run operating system image already optimized for the cloud platform and using that as the basis for the RHEL system, there is no need to perform a manual operating system installation in this situation.
If, on the other hand, you plan to install RHEL 9 on your own hardware, the first step on the path to learning about Red Hat Enterprise Linux 9 involves installing the operating system.
RHEL can be installed either in a clean disk environment (where an entire disk is cleared of any existing partitions and dedicated entirely to RHEL) or in a dual boot environment where RHEL co-exists with another operating system on the disk (typically a member of the Microsoft Windows family of operating systems).
This chapter will cover the clean disk approach to installation from local or remote installation media. Dual boot installation with a Windows 11 system will be covered in Dual Booting RHEL 9 with Windows.
Obtaining the Red Hat Enterprise Linux Installation Media
Although RHEL is an open-source operating system, and as such, the source code is freely accessible, the binary installation images are only available as part of a paid Red Hat Enterprise Linux subscription. In addition to access to the installation images for RHEL, subscription levels are available that provide technical support for the operating system. If you already have a paid subscription, log into your Red Hat account to download the operating system. If you want to try RHEL before purchasing, Red Hat provides a 30-day trial. To register for a trial, visit the Red Hat website at the following address:
 |
You are reading a sample chapter from Red Hat Enterprise Linux 9 Essentials. Buy the full book now in eBook or Print format.
Includes 34 chapters and 290 pages. Learn more. |
https://www.redhat.com/en/technologies/linux-platforms/enterprise-linux/try-it
Red Hat Developer program members are also provided access to RHEL 9. Details on joining this program can be found on the Red Hat Developers website:
RHEL 9 is available for Intel 64-bit (x86_64) and ARM64 (AArch64) CPU architecture families. The installation media can be downloaded as a DVD or boot ISO image for each architecture.
The DVD ISO image is self-contained, including all of the packages necessary to install a RHEL system, and is named using the following convention:
 |
You are reading a sample chapter from Red Hat Enterprise Linux 9 Essentials. Buy the full book now in eBook or Print format.
Includes 34 chapters and 290 pages. Learn more. |
rhel-baseos-<version>-<architecture>-dvd.isoCode language: HTML, XML (xml)For example, the RHEL 9.1 DVD image for 64-bit Intel systems is named as follows:
rhel-baseos-9.1-x86_64-dvd.isoCode language: CSS (css)On the other hand, the boot ISO image only contains the files necessary to begin the installation and requires access to the full installation media located on a remote server. The boot image can also perform rescue operations on an existing RHEL system. The boot ISO is named using the following convention:
rhel-baseos-<version>-<architecture>-boot.isoCode language: HTML, XML (xml)The RHEL 9.1 boot image for AArch64, for example, is named as follows:
rhel-baseos-9.1-x86_64-boot.isoCode language: CSS (css)Having downloaded an image, either burn it to disk or use the steps in the next section to write the media to a USB drive, configure your virtualization environment to treat it as a DVD drive, or use the steps outlined later in this chapter to access the installation image over a network connection.
Writing the ISO Installation Image to a USB Drive
These days it is more likely that an operating system installation will be performed from a USB drive than from a DVD. Having downloaded the ISO installation image for RHEL 9, the steps to write that image to a USB drive will differ depending on whether the drive is attached to a Linux, macOS, or Windows system. The steps outlined in the remainder of this section assume that the USB drive is new or has been reformatted to remove any existing data or partitions:
 |
You are reading a sample chapter from Red Hat Enterprise Linux 9 Essentials. Buy the full book now in eBook or Print format.
Includes 34 chapters and 290 pages. Learn more. |
Linux
The first step in writing an ISO image to a USB drive on Linux is identifying the device name. Before inserting the USB drive, identify the storage devices already detected on the system by listing the devices in /dev as follows:
# ls /dev/sd*
/dev/sda /dev/sda1 /dev/sda2Code language: PHP (php)
Attach the USB drive to the Linux system and run the dmesg command to get a list of recent system messages, one of which will be a report that the USB drive was detected and will be similar to the following:
[ 406.241717] sd 6:0:0:0: [sdb] Attached SCSI removable diskCode language: CSS (css)This output tells us that we should expect the device name to include “sdb” which we can confirm by listing device names in /dev again:
# ls /dev/sd*
/dev/sda /dev/sda1 /dev/sda2 /dev/sdbCode language: PHP (php)
This output shows that the USB drive has been assigned to /dev/sdb. The next step before writing the ISO image to the device is to run the findmnt command to make sure it has not been automounted:
# findmnt /dev/sdb
TARGET                                           SOURCE   FSTYPE OPTIONS
/run/media/neil/d6bf9574-7e31-4f54-88b1          /dev/sdb ext3   rw,nosuid,no
If the findmnt command indicates that the USB drive has been mounted, unmount it before continuing:
 |
You are reading a sample chapter from Red Hat Enterprise Linux 9 Essentials. Buy the full book now in eBook or Print format.
Includes 34 chapters and 290 pages. Learn more. |
# umount /run/media/neil/d6bf9574-7e31-4f54-88b1Code language: PHP (php)Once the filesystem has been unmounted, use the dd command as follows to write the ISO image to the drive:
# dd if=/path/to/iso/<image name>.iso of=/dev/sdb bs=512kCode language: HTML, XML (xml)The writing process can take some time (as long as 10 – 15 minutes) depending on the image size and speed of the system on which it is running. Once the image has been written, output similar to the following will appear, and the USB drive will be ready to be used to install RHEL 9:
5956+0 records in
5956+0 records out
3122659328 bytes (3.1 GB, 2.9 GiB) copied, 426.234 s, 7.3 MB/s
macOS
The first step in writing an ISO image to a USB drive attached to a macOS system is to identify the device using the diskutil tool. Before attaching the USB device, open a Terminal window and run the following command:
$ diskutil list
/dev/disk0 (internal, physical):
   #:                       TYPE NAME                    SIZE       IDENTIFIER
   0:      GUID_partition_scheme                        *1.0 TB     disk0
   1:                        EFI EFI                     209.7 MB   disk0s1
   2:                 Apple_APFS Container disk2         1000.0 GB  disk0s2

/dev/disk1 (internal):
   #:                       TYPE NAME                    SIZE       IDENTIFIER
   0:      GUID_partition_scheme                         28.0 GB    disk1
   1:                        EFI EFI                     314.6 MB   disk1s1
   2:                 Apple_APFS Container disk2         27.7 GB    disk1s2

/dev/disk2 (synthesized):
   #:                       TYPE NAME                    SIZE       IDENTIFIER
   0:      APFS Container Scheme -                      +1.0 TB     disk2
                                 Physical Stores disk1s2, disk0s2
   1:                APFS Volume Macintosh HD            473.6 GB   disk2s1
   2:                APFS Volume Preboot                 42.1 MB    disk2s2
   3:                APFS Volume Recovery                517.0 MB   disk2s3
   4:                APFS Volume VM                      1.1 GB     disk2s4
Having established a baseline of detected devices, insert the USB drive into a port on the macOS system and rerun the command. The same results should appear with one additional entry for the USB drive resembling the following:
/dev/disk3 (external, physical):
   #:                       TYPE NAME                    SIZE       IDENTIFIER
   0:                                                   *16.0 GB    disk3
In the above example, the USB drive has been assigned to /dev/disk3. Before proceeding, unmount the disk as follows:
 |
You are reading a sample chapter from Red Hat Enterprise Linux 9 Essentials. Buy the full book now in eBook or Print format.
Includes 34 chapters and 290 pages. Learn more. |
$ diskutil unmountDisk /dev/disk3

Unmount of all volumes on disk3 was successful
Finally, use the dd command to write the ISO image to the device, taking care to reference the raw disk device (/dev/rdisk3) and entering your user password when prompted:
$ sudo dd if=/path/to/iso/image.iso of=/dev/rdisk3 bs=1m Code language: JavaScript (javascript)Once the image has been written, the USB drive is ready.
Windows/macOS
Several free tools are available for Windows and macOS that will write an ISO image to a USB drive, but one written specifically for writing Linux ISO images is the Fedora Media Writer tool which can be downloaded from the following URL:
https://getfedora.org/en/workstation/download/
Once installed, insert the destination USB drive, launch the writer tool, and choose the Select .iso file option as highlighted in Figure 3-1:
 |
You are reading a sample chapter from Red Hat Enterprise Linux 9 Essentials. Buy the full book now in eBook or Print format.
Includes 34 chapters and 290 pages. Learn more. |
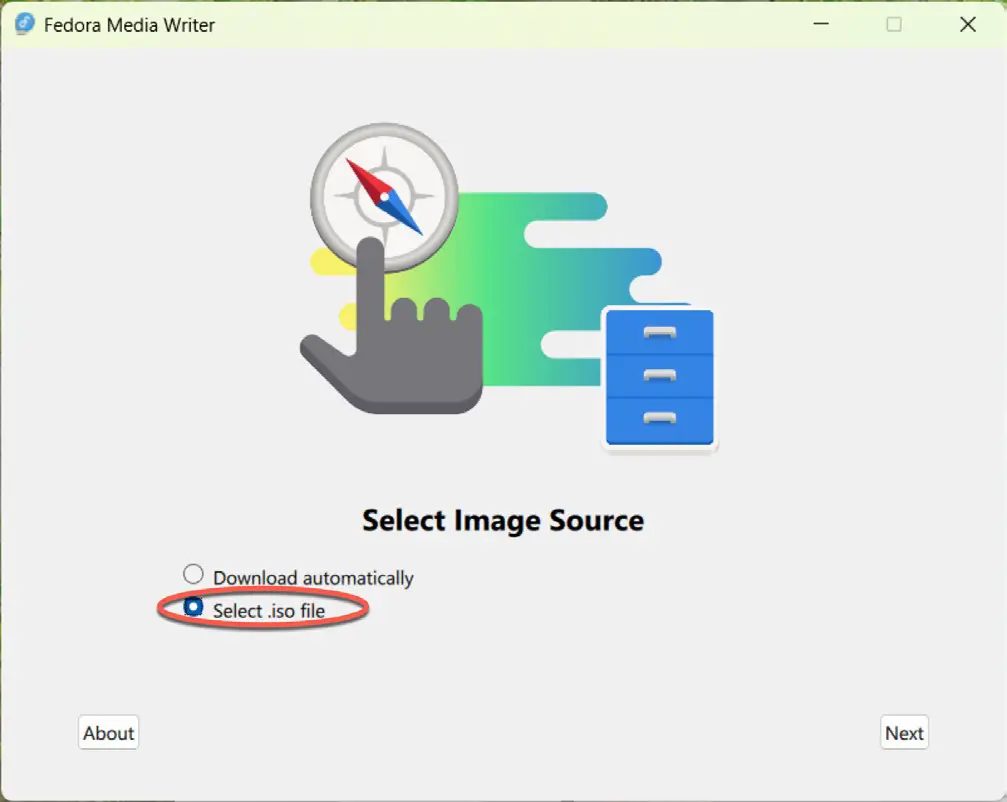
Click Next to proceed to the Write Options screen and select the USB Drive before clicking on the Select… button:
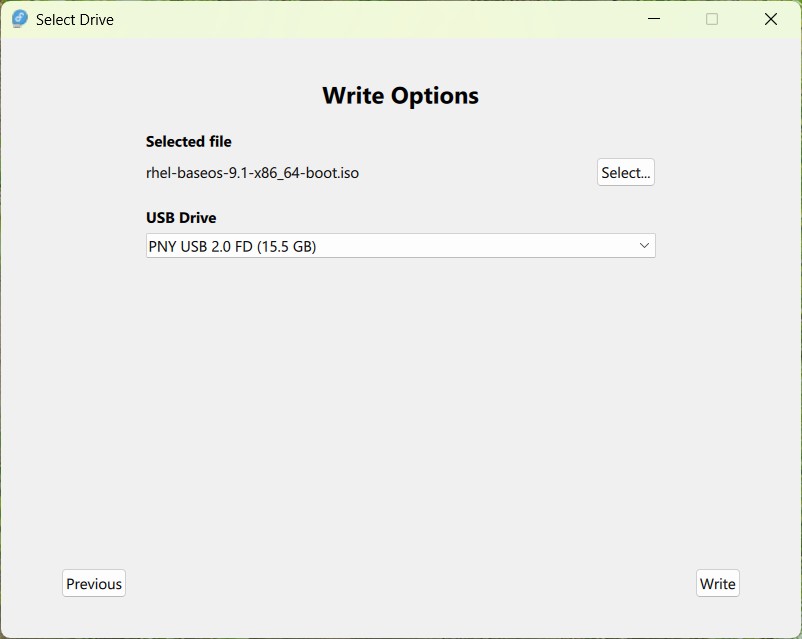
In the resulting file selection dialog, navigate to and select the RHEL 9 installation ISO image and click the Open button. Finally, click the Write button to start writing the image to the USB drive:
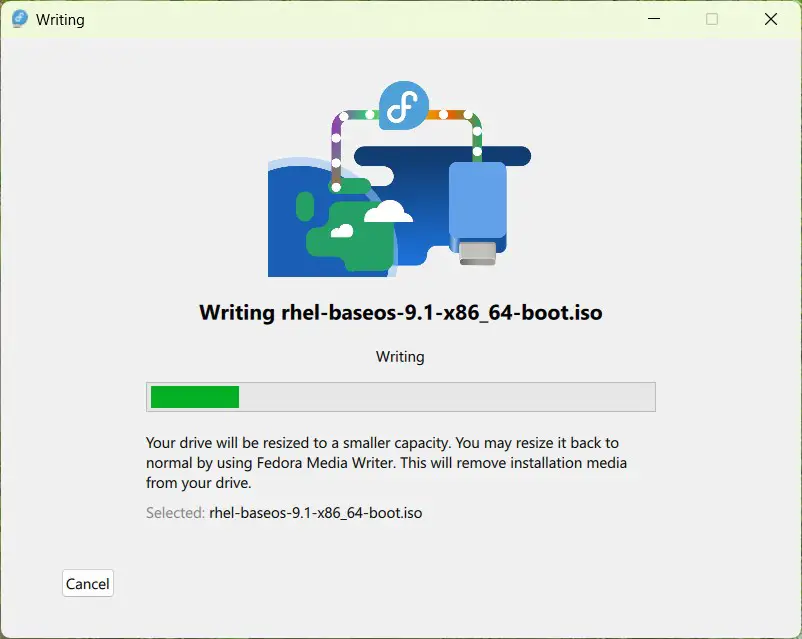
Once the image has been written to the device, the device is ready to perform the installation.
Installing Red Hat Enterprise Linux 9
Insert the RHEL 9 installation media into the appropriate drive and power on the system. If the system tries to boot from the hard disk drive, you will need to enter the BIOS set up for your computer and change the boot order so that it boots from the installation media drive first. Once the system has booted, you will be presented with the following screen:
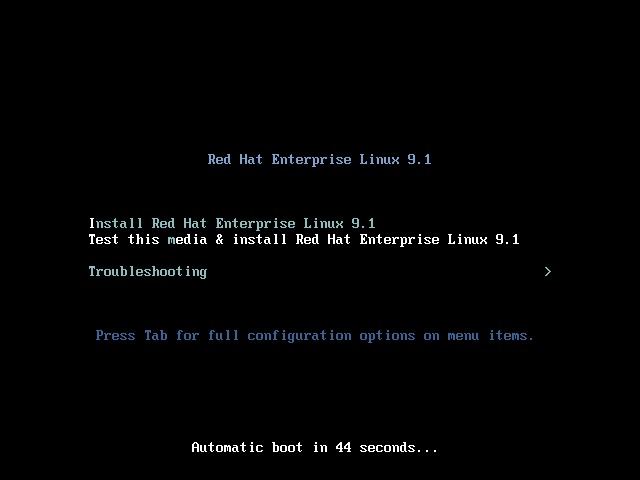
Use the arrow keys to navigate between the options and make a selection with the <Enter> key. For example, if the Troubleshooting option is selected, the screen shown in Figure 3-5 will appear, including options to boot from the current operating system on the local drive (if one is installed), test the system memory, or rescue an installed RHEL 9 system. An option is also available to perform the installation in basic graphics mode for systems without a graphical console:
 |
You are reading a sample chapter from Red Hat Enterprise Linux 9 Essentials. Buy the full book now in eBook or Print format.
Includes 34 chapters and 290 pages. Learn more. |
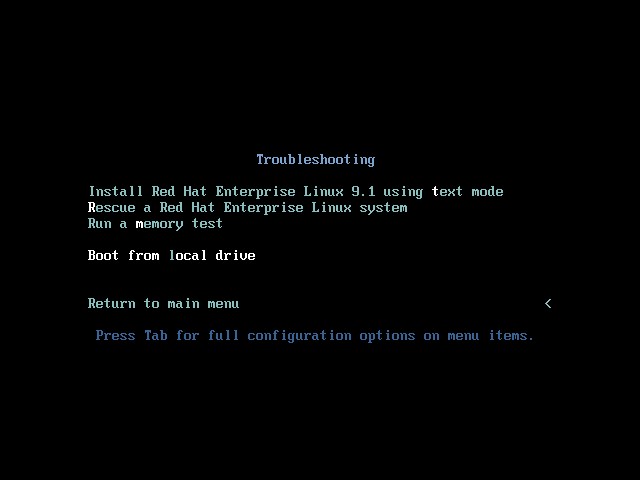
If you install the ARM64 image, the options to boot from the local drive and run a memory test may not be available on the troubleshooting screen.
Select the option on the main screen to install Red Hat Enterprise Linux and, after a short delay, the first screen of the graphical installer will appear:
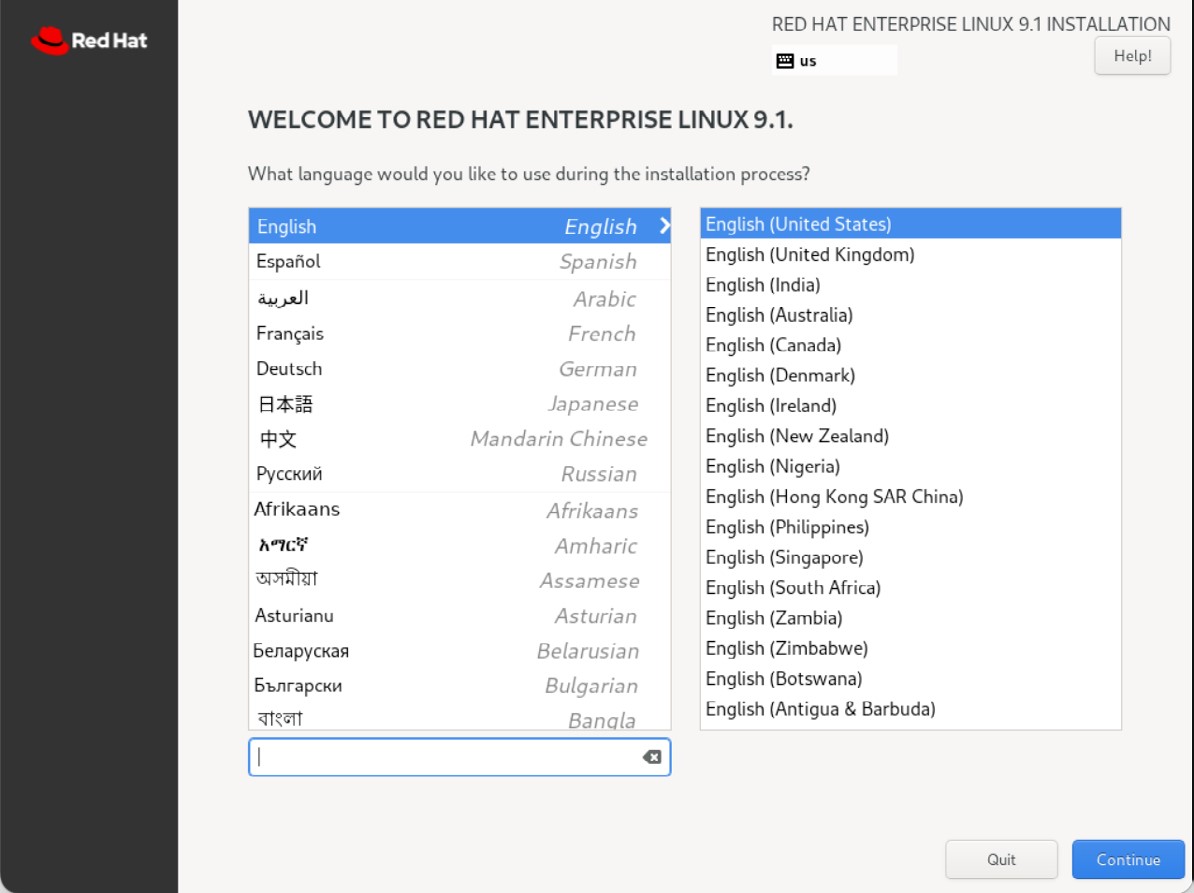
Select your preferred language on the first screen before clicking Continue to proceed to the main installation screen as shown in Figure 3-7:
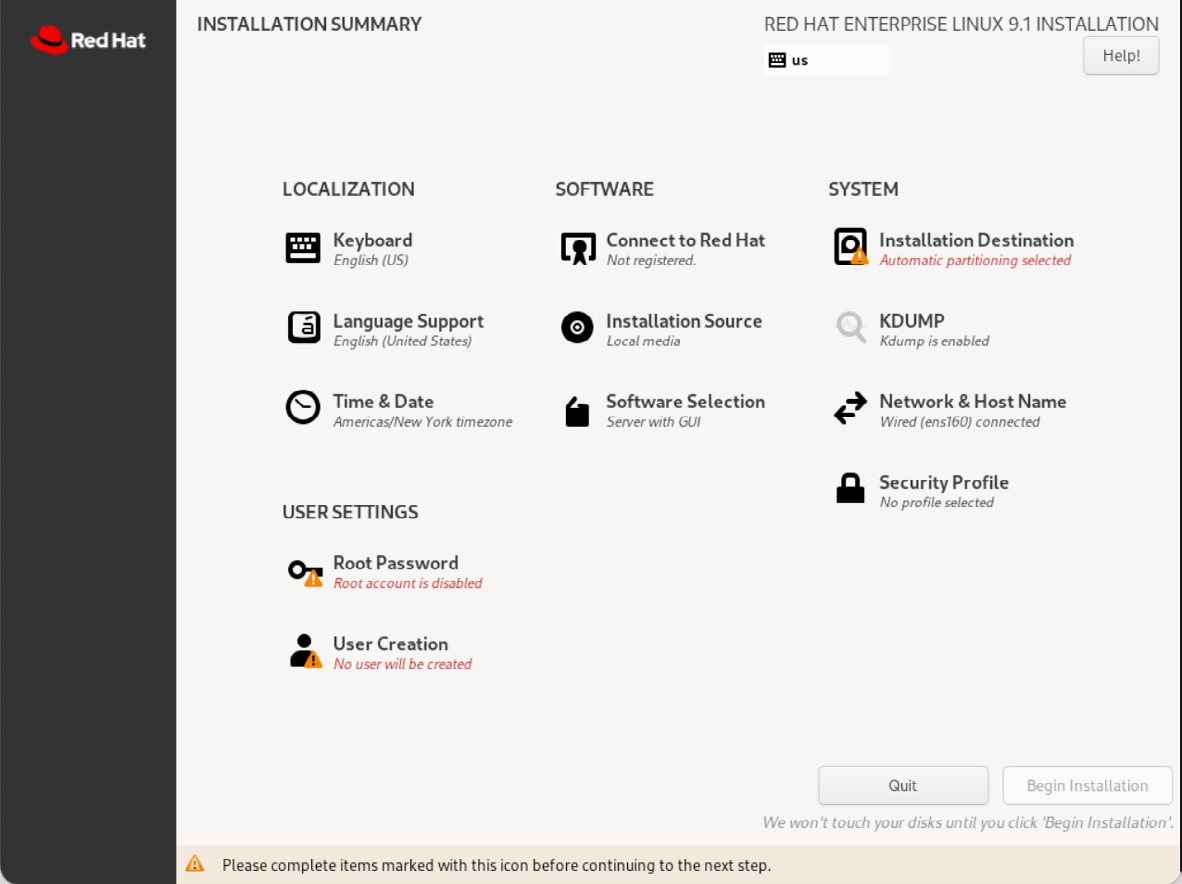
Begin by selecting the Network & Host Name option, enable a network device on your system, and enter a hostname before clicking the Apply button:
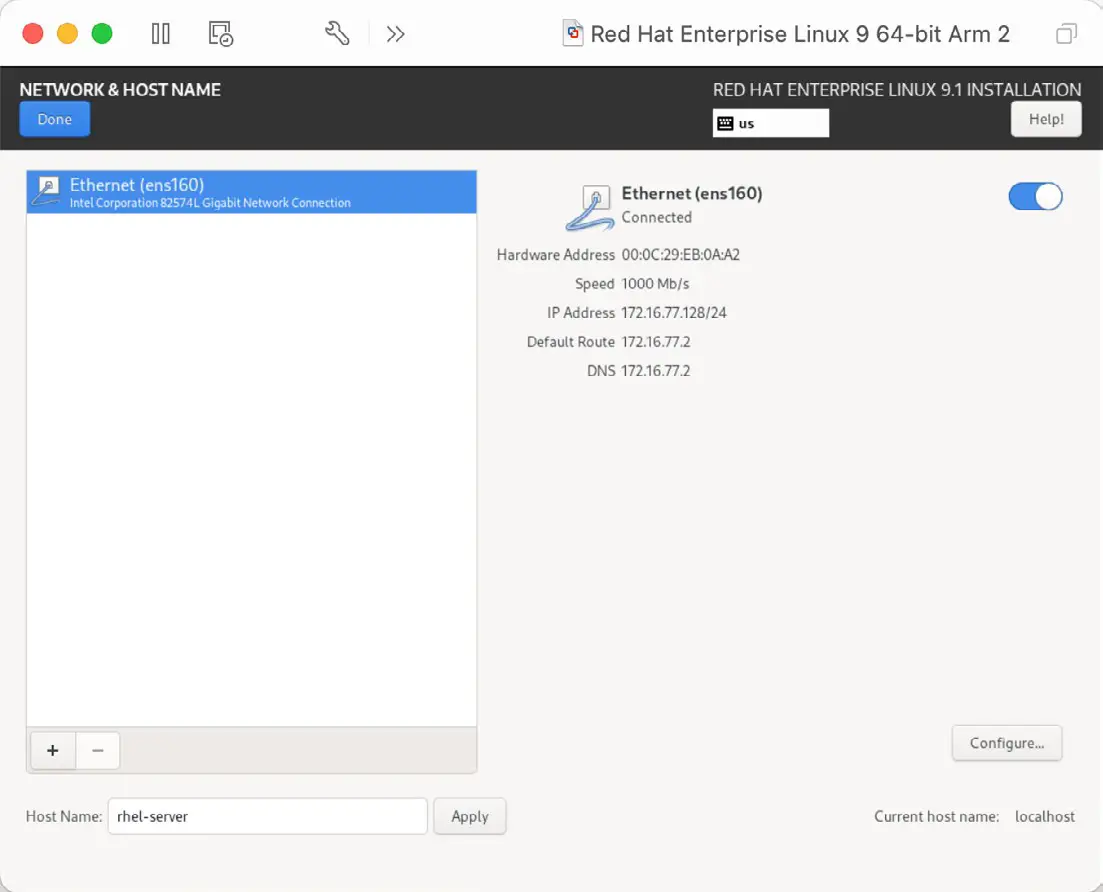
If your network connection requires additional settings, click on the Configure... button to access the advanced network settings screen illustrated in Figure 3-9:
 |
You are reading a sample chapter from Red Hat Enterprise Linux 9 Essentials. Buy the full book now in eBook or Print format.
Includes 34 chapters and 290 pages. Learn more. |
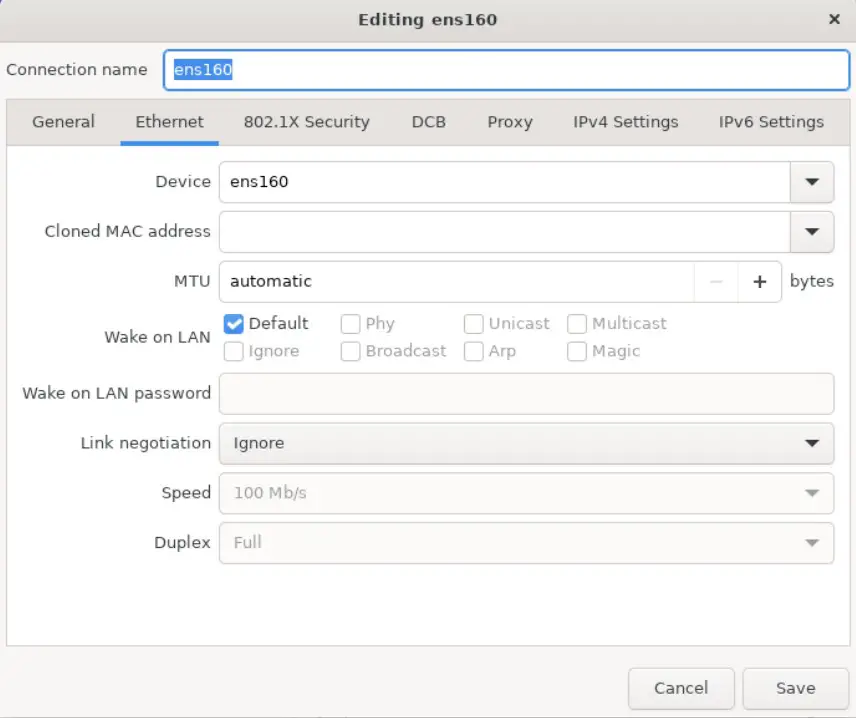
Once the hostname has been defined, and a network connection enabled, click Done to return to the main screen.
If you wish to change the keyboard, language, or time and date settings, select the corresponding option from the Localization column of the main screen. On the Time & Date screen, make a selection corresponding to your geographical location. The choice is also provided to use Network Time which automatically synchronizes the system with external Network Time Protocol servers.
Changes to the Installation Source settings should not be necessary since the installation is performed from local media. To complete the installation from media located on a remote server, select Installation Source, enable the On the network option, and then specify the location of the installation media and the type of URL being used. The installation media can, for example, be an ISO image installed either on a remote web server or on a system on the local network using NFS (the topic of NFS file sharing is covered in detail in the chapter entitled Using NFS on RHEL 9 to Share Files with Remote Systems), or the URL of a remote repository (repositories are essentially online collections of the software, packages, and applications that make up the operating system from which installations onto the local system can be performed).
By default, the installer will perform a Server with GUI installation of RHEL 9. This will consist of the minimum packages necessary to run the operating system and the graphical desktop environment. To select a different installation configuration, choose the Software Selection option to display the screen shown below:
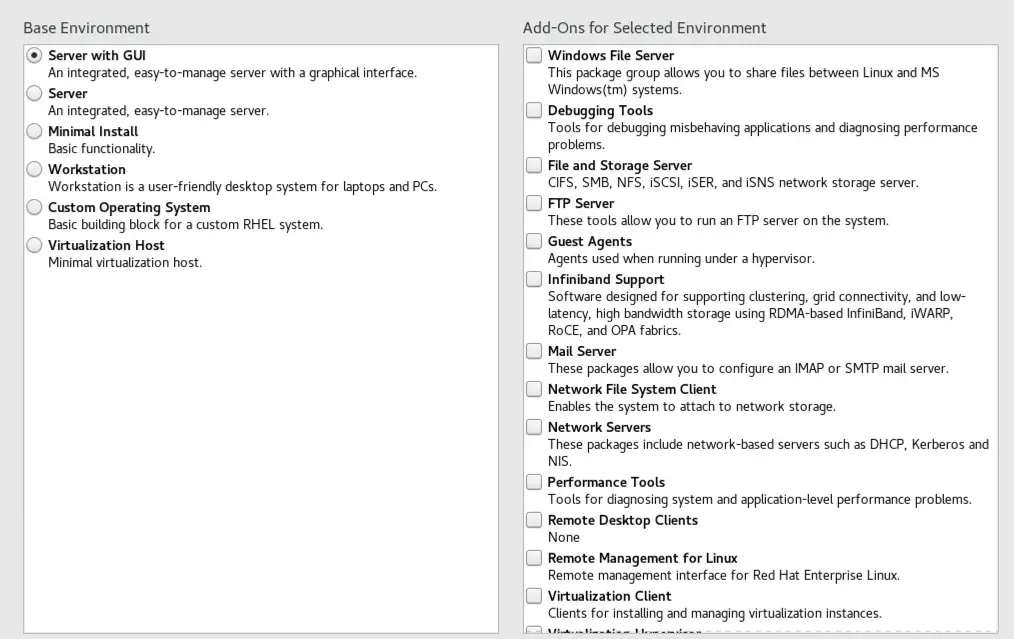
Use the left-hand panel to select a basic configuration and the right-hand panel to add any additional packages you know you will need after the system starts up. If the desktop environment is not required and you are unsure which packages to install on the system, use the Minimal install option and install additional packages as needed once the system has booted. This avoids installing any packages that may never be required.
 |
You are reading a sample chapter from Red Hat Enterprise Linux 9 Essentials. Buy the full book now in eBook or Print format.
Includes 34 chapters and 290 pages. Learn more. |
The Security Policy option allows additional security packages to be installed on the system that allow security restrictions that comply with the Security Content Automation Protocol (SCAP) standards to be imposed on the system. While selecting a profile from the list installs the necessary packages, the policy restrictions are not enforced until they are enabled on the running system. Unless you work for a government entity or company that mandates this level of security, selecting a policy on this screen is optional.
The Kdump feature, when enabled, writes out the state of the operating system kernel in the event of a system crash. This dump file can help identify the cause of a crash but takes up system memory when enabled. Unless memory is limited on your system, this can be left in the enabled state.
Having configured the basic settings, the next step is to decide how the hard disk drive will be partitioned to accommodate the operating system.
Partitioning a Disk for RHEL 9
When the Installation Destination option is selected, the installer will present a screen similar to the one illustrated in Figure 3-11 below:
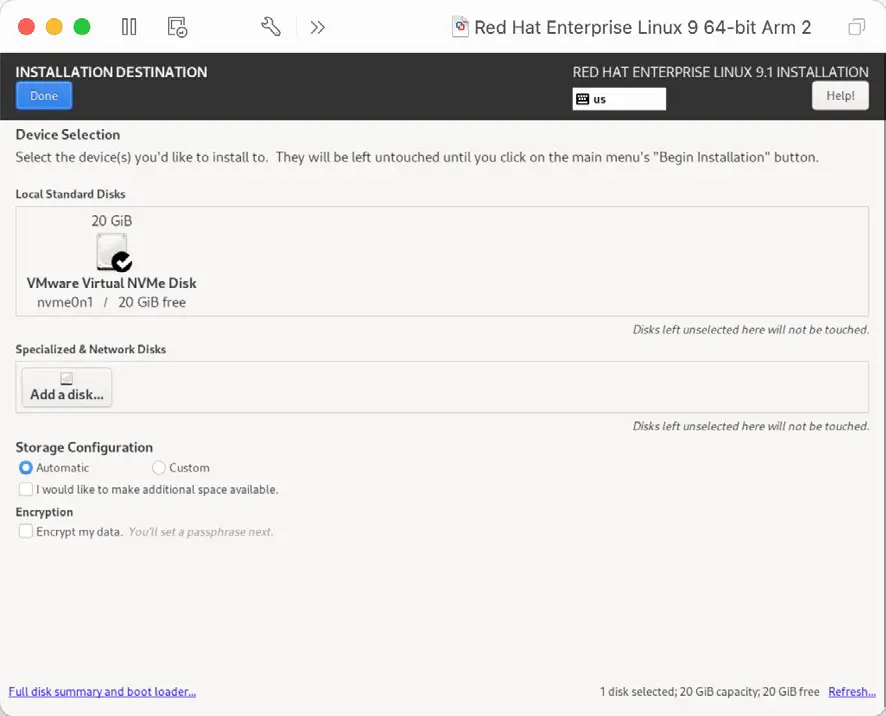
By default, the installer is configured to automatically install the operating system using the available space on the currently selected disk drive and to configure standard partition sizes. If the disk previously contained another operating system, these existing partitions will not be deleted, potentially leaving unused space on the drive after RHEL 9 has been installed. To remove any existing partitions so that they can be reclaimed and used by RHEL 9, enable the I would like to make additional space available option and click on the Done button to display the dialog shown in Figure 3-12.
 |
You are reading a sample chapter from Red Hat Enterprise Linux 9 Essentials. Buy the full book now in eBook or Print format.
Includes 34 chapters and 290 pages. Learn more. |
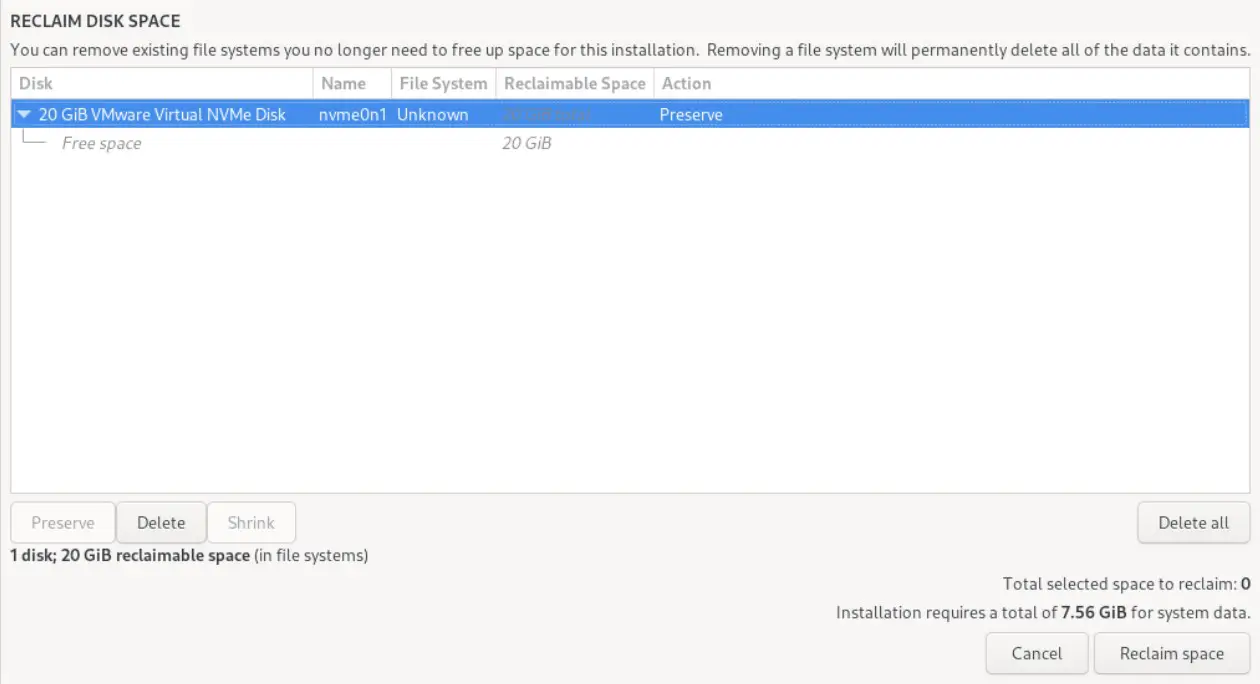
To reclaim space, select a partition that is no longer needed and mark it for removal by clicking the Delete button. Once all the partitions to be removed have been selected, click on the Reclaim Space button to perform the deletion. The reclaimed space will now be used automatically by the RHEL 9 installer.
To manually configure the layout of the disk in terms of how the available space will be allocated, change the Storage Allocation setting from Automatic to Custom and click Done to display the Manual Partitioning screen (Figure 3-13):
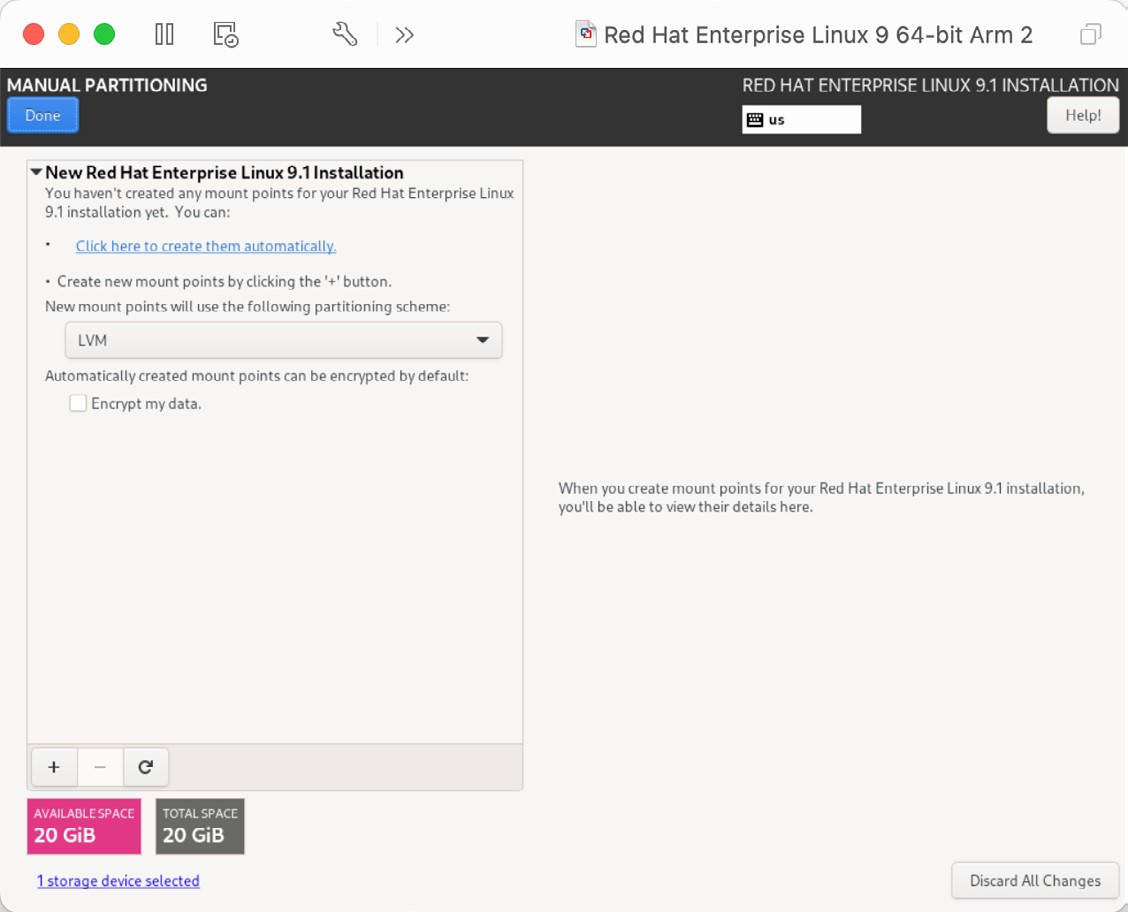
The manual partitioning screen allows configuring the disk using Logical Volume Management (LVM) or standard partitioning. LVM is the recommended option because it provides flexibility in terms of managing partition sizes once the system is up and running (LVM is covered in detail in the chapter entitled Adding a New Disk to a RHEL 9 Volume Group and Logical Volume).
Once a partitioning scheme has been selected, the last step is to decide on the sizes of the partitions and the corresponding filesystem mount points. In general, the default configuration provided by the Click here to create them automatically option will meet most system needs. However, to manually create partitions and allocate mount points, click the + button to declare and assign each partition manually.
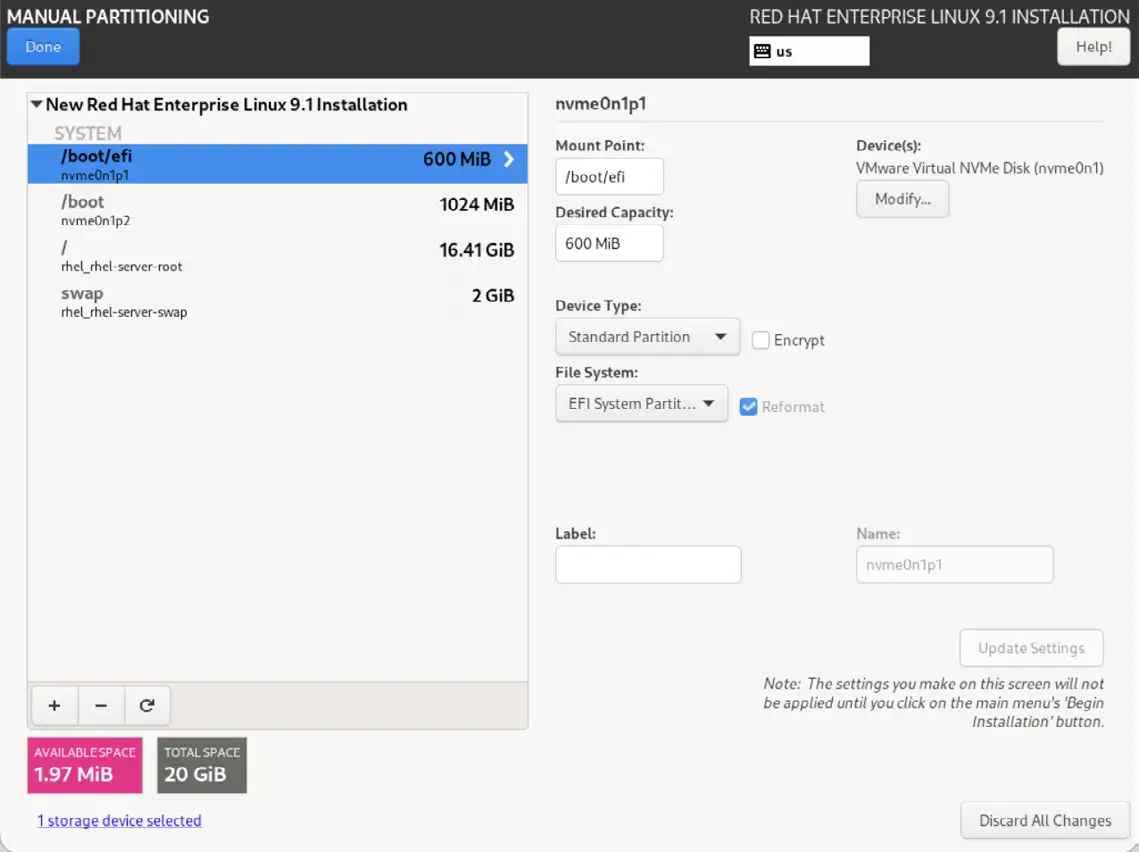
Another option is to select automatic partition creation and then use the resulting screen to change the partition configuration as needed manually. Figure 3-14, for example, shows the partition configuration defined by selecting the automatic creation option and allows the settings for each partition to be modified before any changes are made to the disk:
 |
You are reading a sample chapter from Red Hat Enterprise Linux 9 Essentials. Buy the full book now in eBook or Print format.
Includes 34 chapters and 290 pages. Learn more. |
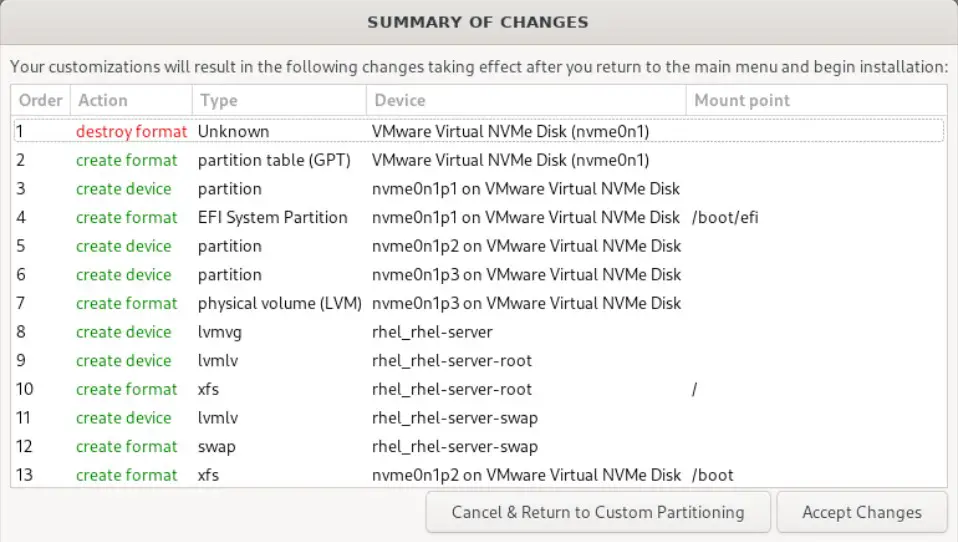
Once the disk has been configured, click on Done, review the summary of the changes to be made to the disk (Figure 3-14), followed by the Accept Changes button:
Disk Encryption
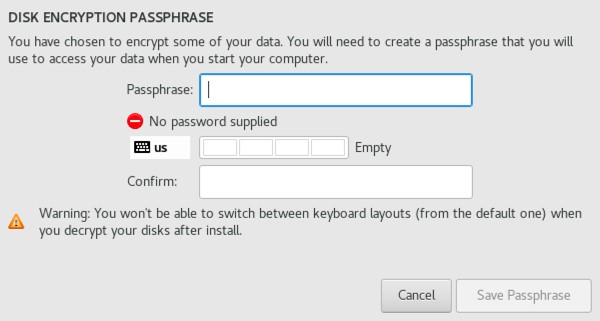
RHEL 9 also allows the disk’s contents to be protected by encryption. This will require a passphrase to be entered each time the system boots. To enable encryption, select the Encrypt my data option on the main Installation Destination screen and, after clicking the Done button, enter the passphrase in the dialog shown in Figure 3-16:
User Settings
Before the installation can be completed, you must create a root password and an optional user account. The root, or super-user account, is a special user with administrative privileges on the system. While you will generally use your own account to log into the system, you will need root privileges to configure the system and perform other administrative tasks.
Select the Root Password option and enter a suitably secure password. Options are also available to lock the root account, so it cannot be accessed and to allow access to the root account over remote connections to the system via password authentication. In general, it is recommended to leave the root account unlocked but to disallow remote SSH access using password access. If remote root access is required, it should be implemented using SSH key-based authentication, a topic we will be covering the “Configuring SSH Key-based Authentication on RHEL 9” chapter of this book.
Next, select the User Creation option and enter a user name and password. If you would like this user to be able to perform administrative tasks using the sudo command, also enable the Make this user administrator checkbox. If this option is not enabled, the user must use the su command and enter the root password to gain root privileges (assuming that the option outlined above to lock the root account was not enabled). If the user you add will need to perform administrative tasks, sudo is the recommended option, and the checkbox should be enabled.
 |
You are reading a sample chapter from Red Hat Enterprise Linux 9 Essentials. Buy the full book now in eBook or Print format.
Includes 34 chapters and 290 pages. Learn more. |
Registering the System
After the installation process has been completed and the system is running, the system must be registered with Red Hat before any updates, or additional packages can be installed. At the time of writing, installing the ARM64 version of RHEL 9 without first registering was possible, but the X86_64 version requires registration before installation. To register the system, select the Connect to Red Hat option and choose either the Account or Activation key option, depending on how you obtained your RHEL license. Once you have entered the information, click the Register button to complete the registration process.
The Physical Installation
Having made the appropriate package selections, clicking Begin Installation will start partitioning the disks and installing the packages that match the chosen installation settings. During this phase, the installation progress screen shown in Figure 3-17 will appear:
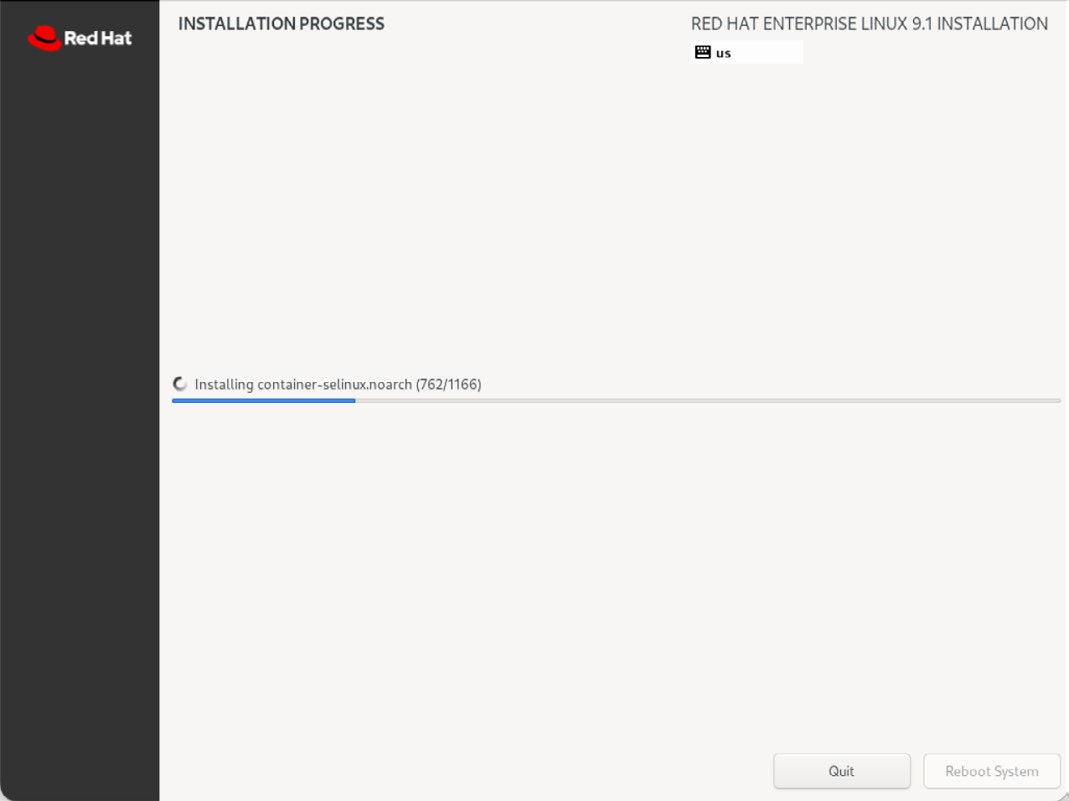
Once all the system packages have been installed and configured, remove the installation media and click Reboot System to restart the system.
Final Configuration Steps
What appears on the console when the system has started will depend on whether the Workstation or Server with GUI option was chosen from the Software Selection installation screen. If either of these options was selected during installation, the GNOME Display Manager (GDM) login screen will appear. On the other hand, if the minimal or server configuration options were selected, the text-based login prompt will be displayed. Regardless of the configuration, log into the system as the user created during the installation process’s final steps.
In the case of a Workstation or Server with GUI installation, the GNOME initial setup tool will launch and offer a guided tour of the desktop environment.
 |
You are reading a sample chapter from Red Hat Enterprise Linux 9 Essentials. Buy the full book now in eBook or Print format.
Includes 34 chapters and 290 pages. Learn more. |
If you did not register your system before starting the installation, you can do so at the command prompt or a Terminal window in the case of the desktop environment.. To launch a Terminal session on the desktop, click Activities in the menu bar followed by the Terminal icon in the panel at the bottom of the screen, as shown in Figure 3-18:

At the prompt, use the sudo command to gain root privileges and enter your user password:
$ sudo su -Next, use the subscription-manager tool to register the system with Red Hat, entering your Red Hat Access username and password when prompted to do so:
# subscription-manager register
Registering to: subscription.rhsm.redhat.com:443/subscription
Username: myusername
Password:
The system has been registered with ID: 22f0caff-8d10-7733-be15-aac4d8e3fe1a
The registered system name is: rhelserver1.Code language: PHP (php)
Finally, attach the system to a subscription service as follows:
# subscription-manager attach --auto
Installed Product Current Status:
Product Name: Red Hat Enterprise Linux for x86_64
Status:       SubscribedCode language: PHP (php)
Installing Updates
As with most operating systems today, each particular release of a RHEL distribution continues to evolve after it has been released to the public. This generally takes the form of bug fixes, security updates, and, occasionally, new features that may be downloaded over the internet and installed on your system.
 |
You are reading a sample chapter from Red Hat Enterprise Linux 9 Essentials. Buy the full book now in eBook or Print format.
Includes 34 chapters and 290 pages. Learn more. |
Best practices dictate that the first step after installing RHEL is to make ensure any available updates are applied to the system. This can be achieved via the command-line prompt in a Terminal window using the dnf package manager tool. To check for the availability of updates, run the following command:
# dnf check-updateCode language: PHP (php)Any pending updates may be applied, once again, using the dnf tool:
# dnf updateCode language: PHP (php)Upon execution, the dnf tool will provide a list of available packages for update and prompt permission to perform the update.
Once the update is complete, the installation is essentially finished, and RHEL 9 is ready for use.
Displaying Boot Messages
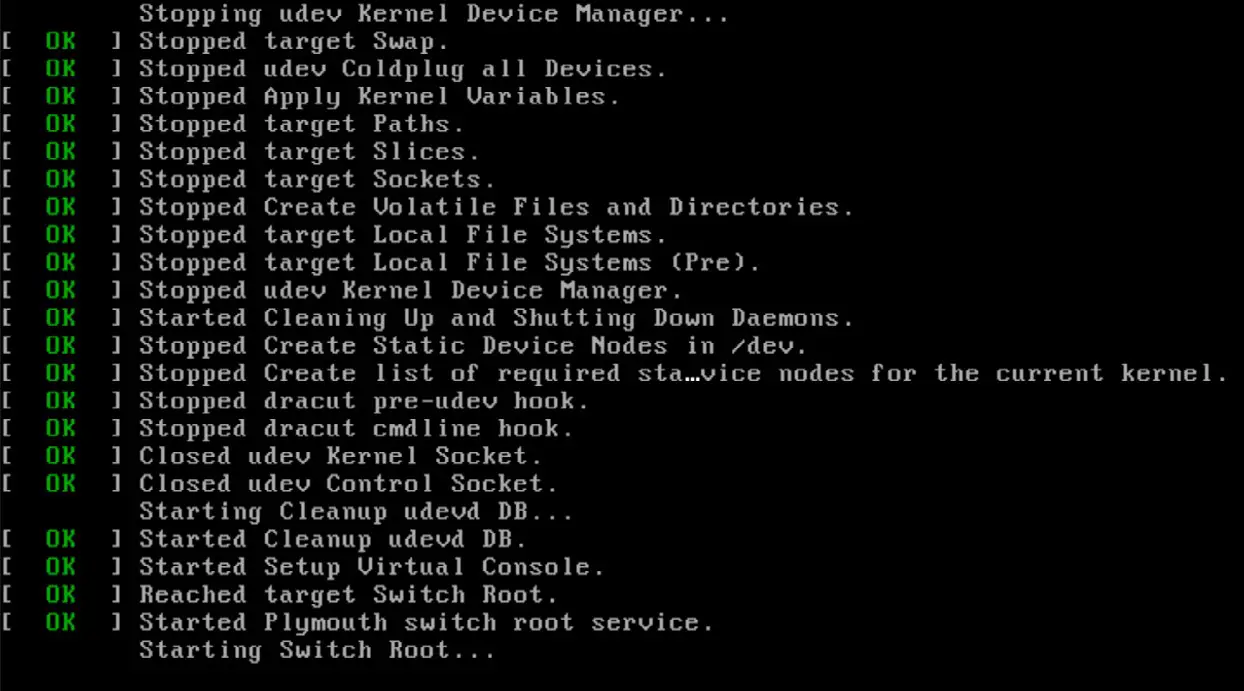
During the boot process, RHEL 9 will display the Red Hat Graphical Boot (RHGB) screen, which hides from view all of the boot messages generated by the system as it loads. To make these messages visible during the boot process (as shown in Figure 3-19), press the keyboard Esc key while the system is starting:
 |
You are reading a sample chapter from Red Hat Enterprise Linux 9 Essentials. Buy the full book now in eBook or Print format.
Includes 34 chapters and 290 pages. Learn more. |
The default behavior can be changed so that messages are always displayed by default by editing the /etc/default/grub file and changing the GRUB_CMDLINE_LINUX setting, which, by default, will resemble the following:
GRUB_CMDLINE_LINUX="... rhgb quiet"Code language: JavaScript (javascript)To remove the graphical boot screen so that messages are visible without pressing the Esc key, remove the “rhgb” option from the setting:
GRUB_CMDLINE_LINUX=”… rhgb quiet”
This change will cause the system to display only a subset of the boot messages generated by the system. To show all messages generated by the system, also remove the “quiet” option:
GRUB_CMDLINE_LINUX=”… quiet“
 |
You are reading a sample chapter from Red Hat Enterprise Linux 9 Essentials. Buy the full book now in eBook or Print format.
Includes 34 chapters and 290 pages. Learn more. |
Once the changes have been made, run the following command to generate a new boot configuration to take effect the next time the system starts:
# grub2-mkconfig --output=/boot/grub2/grub.cfgCode language: PHP (php)Summary
The first step in working with RHEL 9 is to install the operating system. In the case of a cloud-based server, this task is typically performed automatically when an operating system image is selected for the system based on a range of options offered by the cloud service provider. Installation on your own hardware, however, involves downloading the installation media as an ISO image, writing that image to suitable storage such as a DVD or USB drive, and booting from it. Once running, the installation process allows a range of options to be configured, ranging from networking, whether the installation should proceed from the local media or via a remote server or repository, the packages to be installed, and the partitioning of the disk. Once installation is complete, it is important to install any operating system updates that may have been released since the original installation image was created.
