When Apple introduced speech recognition for iOS devices, it was always assumed that this capability would one day be available to iOS app developers. That day finally arrived with the introduction of iOS 10.
The iOS SDK now includes the Speech framework, which can implement speech-to-text transcription within any iOS app. Speech recognition can be implemented with relative ease using the Speech framework and, as demonstrated in this chapter, may be used to transcribe both real-time and previously recorded audio.
An Overview of Speech Recognition in iOS
The speech recognition feature of iOS allows speech to be converted to text and supports a wide range of spoken languages. Most iOS users will no doubt be familiar with the microphone button that appears within the keyboard when entering text into an app. This dictation button is perhaps most commonly used to enter text into the Messages app.
Before the introduction of the Speech framework in iOS 10, app developers could still take advantage of the keyboard dictation button. Tapping a Text View object within any app displays the keyboard containing the button. Once tapped, any speech picked up by the microphone is transcribed into text and placed within the Text View. For basic requirements, this option is still available within iOS, though there are several advantages to performing a deeper integration using the Speech framework.
One of the key advantages of the Speech framework is the ability to trigger voice recognition without needing to display the keyboard and wait for the user to tap the dictation button. In addition, while the dictation button can only transcribe live speech, the Speech framework allows speech recognition to be performed on pre-recorded audio files.
Another advantage over the built-in dictation button is that the app can define the spoken language that is to be transcribed where the dictation button is locked into the prevailing device-wide language setting.
Behind the scenes, the service uses the same speech recognition technology as Siri. However, it is also important to know that the audio is typically transferred from the local device to Apple’s remote servers, where the speech recognition process is performed. The service is, therefore, only likely to be available when the device on which the app is running has an active internet connection.
When working with speech recognition, it is important to note that the length of audio that can be transcribed in a single session is restricted to one minute at the time of writing. In addition, Apple also imposes undeclared limits on the total amount of time an app can freely use of the speech recognition service, the implication being that Apple will begin charging heavy users of the service at some point in the future.
Speech Recognition Authorization
As outlined in the previous chapter, an app must seek permission from the user before being authorized to record audio using the microphone. This is also the case when implementing speech recognition, though the app must also specifically request permission to perform speech recognition. This is particularly important given that the audio will be transmitted to Apple for processing. Therefore, in addition to an NSMicrophoneUsageDescription entry in the Info.plist file, the app must include the NSSpeechRecognitionUsageDescription entry if speech recognition is to be performed.
The app must also specifically request speech recognition authorization via a call to the requestAuthorization method of the SFSpeechRecognizer class. This results in a completion handler call which is, in turn, passed a status value indicating whether authorization has been granted. Note that this step also includes a test to verify that the device has an internet connection.
Transcribing Recorded Audio
Once the appropriate permissions and authorizations have been obtained, speech recognition can be performed on an existing audio file with just a few lines of code. All that is required is an instance of the SFSpeechRecognizer class together with a request object in the form of an SFSpeechURLRecognitionRequest instance initialized with the URL of the audio file. Next, a recognizer task is created using the request object, and a completion handler is called when the audio has been transcribed. For example, the following code fragment demonstrates these steps:
let recognizer = SFSpeechRecognizer()
let request = SFSpeechURLRecognitionRequest(url: fileUrl)
    recognizer?.recognitionTask(with: request, resultHandler: {
		(result, error) in
            print(result?.bestTranscription.formattedString)
})Code language: Swift (swift)
Transcribing Live Audio
Live audio speech recognition makes use of the AVAudioEngine class. The AVAudioEngine class manages audio nodes that tap into different input and output buses on the device. In the case of speech recognition, the engine’s input audio node is accessed and used to install a tap on the audio input bus. The audio input from the tap is then streamed to a buffer which is repeatedly appended to the speech recognizer object for conversion. The next chapter, entitled An iOS 17 Real-Time Speech Recognition Tutorial will cover these steps in greater detail.
An Audio File Speech Recognition Tutorial
The remainder of this chapter will modify the Record app created in the previous chapter to provide the option to transcribe the speech recorded to the audio file. In the first instance, load Xcode, open the Record project, and select the Main.storyboard file so that it loads into the Interface Builder tool.
Modifying the User Interface
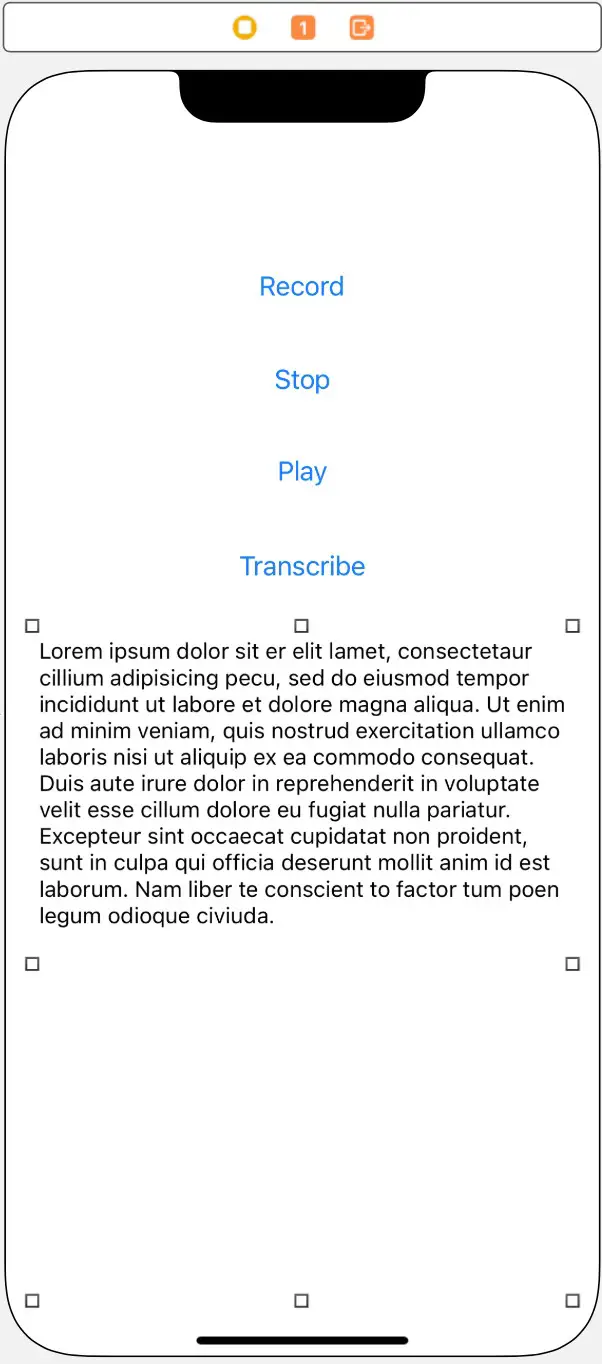
The modified Record app will require the addition of a Transcribe button and a Text View object into which the transcribed text will be placed as it is generated. Add these elements to the storyboard scene so that the layout matches that shown in Figure 90-1 below.
Select the Transcribe button view, display the Auto Layout Align menu, and apply a constraint to center the button in the horizontal center of the containing view. Next, display the Add New Constraints menu and establish a spacing to nearest neighbor constraint on the view’s top edge using the current value and the Constrain to margins option disabled.
With the newly added Text View object selected, display the Attributes Inspector panel and delete the sample Latin text. Then, using the Add New Constraints menu, add spacing to nearest neighbor constraints on all four sides of the view with the Constrain to margins option enabled.

Display the Assistant Editor panel and establish outlet connections for the new Button and Text View named transcribeButton and textView, respectively.
Complete this tutorial section by establishing an action connection from the Transcribe button to a method named transcribeAudio.
Adding the Speech Recognition Permission
Select the Record entry at the top of the Project navigator panel and select the Info tab in the main panel. Next, click on the + button contained with the last line of properties in the Custom iOS Target Properties section. Then, select the Privacy – Speech Recognition Usage Description item from the resulting menu. Once the key has been added, double-click in the corresponding value column and enter the following text:
Speech recognition services are used by this app to convert speech to text.Code language: plaintext (plaintext)Seeking Speech Recognition Authorization
In addition to adding the usage description key to the Info.plist file, the app must include code to seek authorization to perform speech recognition. This will also ensure that the device is suitably configured to perform the task and that the user has given permission for speech recognition to be performed. Before adding code to the project, the first step is to import the Speech framework within the ViewController.swift file:
import UIKit
import AVFoundation
import Speech

class ViewController: UIViewController, AVAudioPlayerDelegate, AVAudioRecorderDelegate {
.
.
.Code language: Swift (swift)
For this example, the code to perform this task will be added as a method named authorizeSR within the ViewController.swift file as follows:
func authorizeSR() {
    SFSpeechRecognizer.requestAuthorization { authStatus in

        OperationQueue.main.addOperation {
            switch authStatus {
            case .authorized:
                self.transcribeButton.isEnabled = true

            case .denied:
                self.transcribeButton.isEnabled = false
                self.recordButton.setTitle("Speech recognition access denied by user", for: .disabled)

            case .restricted:
                self.transcribeButton.isEnabled = false
                self.transcribeButton.setTitle("Speech recognition restricted on device", for: .disabled)

            case .notDetermined:
                self.transcribeButton.isEnabled = false
                self.transcribeButton.setTitle("Speech recognition not authorized", for: .disabled)
            @unknown default:
                print("Unknown Status")
            }
        }
    }
}Code language: Swift (swift)
The above code calls the requestAuthorization method of the SFSpeechRecognizer class with a closure specified as the completion handler. This handler is passed a status value which can be one of four values (authorized, denied, restricted, or not determined). A switch statement is then used to evaluate the status and enable the transcribe button or to display the reason for the failure on that button.
Note that the switch statement code is specifically performed on the main queue. This is because the completion handler can be called at any time and not necessarily within the main thread queue. Since the completion handler code in the statement changes the user interface, these changes must be made on the main queue to avoid unpredictable results.
With the authorizeSR method implemented, modify the end of the viewDidLoad method to call this method:
override func viewDidLoad() {
    super.viewDidLoad()
    audioInit()
    authorizeSR()
}Code language: Swift (swift)
Performing the Transcription
All that remains before testing the app is to implement the code within the transcribeAudio action method. Locate the template method in the ViewController.swift file and modify it to read as follows:
@IBAction func transcribeAudio(_ sender: Any) {
    let recognizer = SFSpeechRecognizer()
    let request = SFSpeechURLRecognitionRequest(
				url: (audioRecorder?.url)!)
    recognizer?.recognitionTask(with: request, resultHandler: {
	(result, error) in
         self.textView.text = result?.bestTranscription.formattedString
    })
}Code language: Swift (swift)
The code creates an SFSpeechRecognizer instance, initializes it with a request containing the URL of the recorded audio, and then initiates a task to perform the recognition. Finally, the completion handler displays the transcribed text within the Text View object.
Testing the App
Compile and run the app on a physical device, accept the request for speech recognition access, tap the Record button, and record some speech. Next, tap the Stop button, followed by Transcribe, and watch as the recorded speech is transcribed into text within the Text View object.
Summary
The Speech framework provides apps with access to Siri’s speech recognition technology. This access allows speech to be transcribed to text, either in real-time or by passing pre-recorded audio to the recognition system. This chapter has provided an overview of speech recognition within iOS and adapted the Record app created in the previous chapter to transcribe recorded speech to text. The next chapter, entitled An iOS 17 Real-Time Speech Recognition Tutorial, will provide a guide to performing speech recognition in real-time.

