Included with the Android Architecture Components, the Room persistence library is designed to make it easier to add database storage support to Android apps in a way consistent with the Android architecture guidelines. With the basics of SQLite databases covered in the previous chapter, this chapter will explore the basic concepts behind Room-based database management, the key elements that work together to implement Room support within an Android app, and how these are implemented in terms of architecture and coding. Having covered these topics, the next two chapters will put this theory into practice with an example Room database project.
Revisiting Modern App Architecture
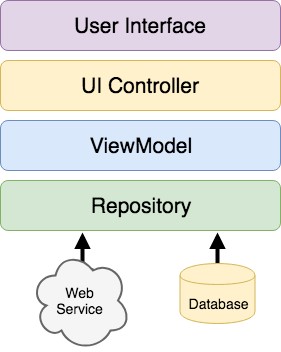
The chapter entitled Modern Android App Architecture with Jetpack introduced the concept of modern app architecture and stressed the importance of separating different areas of responsibility within an app. The diagram illustrated in Figure 69-1 outlines the recommended architecture for a typical Android app:

With the top three levels of this architecture covered in some detail in earlier chapters of this book, it is time to explore the repository and database architecture levels in the context of the Room persistence library.
Key Elements of Room Database Persistence
Before going into greater detail later in the chapter, it is first worth summarizing the key elements involved in working with SQLite databases using the Room persistence library:
Repository
As previously discussed, the repository module contains all of the code necessary for directly handling all data sources used by the app. This avoids the need for the UI controller and ViewModel to contain code directly accessing sources such as databases or web services.
Room Database
The room database object provides the interface to the underlying SQLite database. It also provides the repository with access to the Data Access Object (DAO). An app should only have one room database instance, which may be used to access multiple database tables.
Data Access Object (DAO)
The DAO contains the SQL statements required by the repository to insert, retrieve and delete data within the SQLite database. These SQL statements are mapped to methods which are then called from within the repository to execute the corresponding query.
Entities
An entity is a class that defines the schema for a table within the database, defines the table name, column names, and data types, and identifies which column is to be the primary key. In addition to declaring the table schema, entity classes contain getter and setter methods that provide access to these data fields. The data returned to the repository by the DAO in response to the SQL query method calls will take the form of instances of these entity classes. The getter methods will then be called to extract the data from the entity object. Similarly, when the repository needs to write new records to the database, it will create an entity instance, configure values on the object via setter calls, then call insert methods declared in the DAO, passing through entity instances to be saved.
SQLite Database
The SQLite database is responsible for storing and providing access to the data. The app code, including the repository, should never directly access this underlying database. All database operations are performed using a combination of the room database, DAOs, and entities.
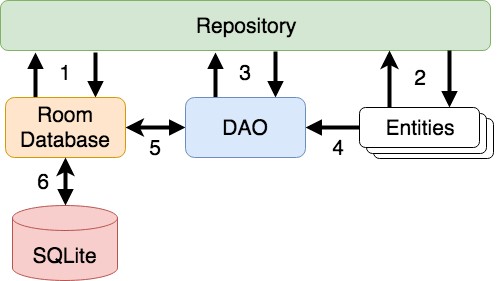
The architecture diagram in Figure 69-2 illustrates how these different elements interact to provide Room-based database storage within an Android app:

The numbered connections in the above architecture diagram can be summarized as follows:
- The repository interacts with the Room Database to get a database instance which, in turn, is used to obtain references to DAO instances.
- The repository creates entity instances and configures them with data before passing them to the DAO for use in search and insertion operations.
- The repository calls methods on the DAO passing through entities to be inserted into the database and receives entity instances back in response to search queries.
- When a DAO has results to return to the repository, it packages them into entity objects.
- The DAO interacts with the Room Database to initiate database operations and handle results.
- The Room Database handles all low-level interactions with the underlying SQLite database, submitting queries and receiving results.
With a basic outline of the key elements of database access using the Room persistent library covered, it is time to explore entities, DAOs, room databases, and repositories in more detail.
Understanding Entities
Each database table will have associated with it an entity class. This class defines the schema for the table and takes the form of a standard Kotlin class interspersed with some special Room annotations. An example Kotlin class declaring the data to be stored within a database table might read as follows:
class Customer {

    var id: Int = 0
    var name: String? = null
    var address: String? = null

    constructor() {}

    constructor(id: Int, name: String, address: String) {
        this.id = id
        this.name = name
        this.address = address
    }
    constructor(name: String, address: String) {
        this.name = name
        this.address = address
    }
}Code language: Kotlin (kotlin)
As currently implemented, the above code declares a basic Kotlin class containing several variables representing database table fields and a collection of getter and setter methods. This class, however, is not yet an entity. To make this class into an entity and to make it accessible within SQL statements, some Room annotations need to be added as follows:
@Entity(tableName = "customers")
class Customer {

    @PrimaryKey(autoGenerate = true)
    @NonNull
    @ColumnInfo(name = "customerId")
    var id: Int = 0

    @ColumnInfo(name = "customerName")
    var name: String? = null
    var address: String? = null

    constructor() {}

    constructor(id: Int, name: String, address: String) {
        this.id = id
        this.name = name
        this.address = address
    }

    constructor(name: String, address: String) {
        this.name = name
        this.address = address
    }
}Code language: Kotlin (kotlin)
The above annotations begin by declaring that the class represents an entity and assigns a table name of “customers”. This is the name by which the table will be referenced in the DAO SQL statements:
@Entity(tableName = "customers")Code language: Kotlin (kotlin)Every database table needs a column to act as the primary key. In this case, the customer id is declared as the primary key. Annotations have also been added to assign a column name to be referenced in SQL queries and to indicate that the field cannot be used to store null values. Finally, the id value is configured to be auto-generated. This means the system automatically generates the id assigned to new records to avoid duplicate keys:
@PrimaryKey(autoGenerate = true)
@NonNull
@ColumnInfo(name = "customerId")
var id: Int = 0Code language: Kotlin (kotlin)
A column name is also assigned to the customer name field. Note, however, that no column name was assigned to the address field. This means that the address data will still be stored within the database but is not required to be referenced in SQL statements. If a field within an entity is not required to be stored within a database, use the @Ignore annotation:
@Ignore
var MyString: String? = nullCode language: Kotlin (kotlin)
Annotations may also be included within an entity class to establish relationships with other entities using a relational database concept referred to as foreign keys. Foreign keys allow a table to reference the primary key in another table. For example, a relationship could be established between an entity named Purchase and our existing Customer entity as follows:
@Entity(foreignKeys = arrayOf(ForeignKey(entity = Customer::class,
    parentColumns = arrayOf("customerId"),
    childColumns = arrayOf("buyerId"),
    onDelete = ForeignKey.CASCADE,
    onUpdate = ForeignKey.RESTRICT)))

class Purchase {

    @PrimaryKey(autoGenerate = true)
    @NonNull
    @ColumnInfo(name = "purchaseId")
    var purchaseId: Int = 0

    @ColumnInfo(name = "buyerId")
    var buyerId: Int = 0
.
.
}Code language: Kotlin (kotlin)
Note that the foreign key declaration also specifies the action to be taken when a parent record is deleted or updated. Available options are CASCADE, NO_ACTION, RESTRICT, SET_DEFAULT, and SET_NULL.
Data Access Objects
A Data Access Object allows access to the data stored within a SQLite database. A DAO is declared as a standard Kotlin interface with additional annotations that map specific SQL statements to methods that the repository may then call.
The first step is to create the interface and declare it as a DAO using the @Dao annotation:
@Dao
interface CustomerDao {
}Code language: Kotlin (kotlin)
Next, entries are added consisting of SQL statements and corresponding method names. The following declaration, for example, allows all of the rows in the customers table to be retrieved via a call to a method named getAllCustomers():
@Dao
interface CustomerDao {
   @Query("SELECT * FROM customers")
   fun getAllCustomers(): LiveData<List<Customer>>
}Code language: Kotlin (kotlin)
The getAllCustomers() method returns a List object containing a Customer entity object for each record retrieved from the database table. The DAO is also using LiveData so that the repository can observe changes to the database.
Arguments may also be passed into the methods and referenced within the corresponding SQL statements. Consider the following DAO declaration, which searches for database records matching a customer’s name (note that the column name referenced in the WHERE condition is the name assigned to the column in the entity class):
@Query("SELECT * FROM customers WHERE name = :customerName")
fun findCustomer(customerName: String): List<Customer>Code language: Kotlin (kotlin)
In this example, the method is passed a string value which is, in turn, included within an SQL statement by prefixing the variable name with a colon (:).
A basic insertion operation can be declared as follows using the @Insert convenience annotation:
@Insert
fun addCustomer(Customer customer)Code language: Kotlin (kotlin)
This is referred to as a convenience annotation because the Room persistence library can infer that the Customer entity passed to the addCustomer() method is to be inserted into the database without the need for the SQL insert statement to be provided. Multiple database records may also be inserted in a single transaction as follows:
@Insert
fun insertCustomers(Customer... customers)Code language: Kotlin (kotlin)
The following DAO declaration deletes all records matching the provided customer name:
@Query("DELETE FROM customers WHERE name = :name")
fun deleteCustomer(String name)Code language: Kotlin (kotlin)
As an alternative to using the @Query annotation to perform deletions, the @Delete convenience annotation may also be used. In the following example, all of the Customer records that match the set of entities passed to the deleteCustomers() method will be deleted from the database:
@Delete
fun deleteCustomers(Customer... customers)Code language: Kotlin (kotlin)
The @Update convenience annotation provides similar behavior when updating records:
@Update
fun updateCustomers(Customer... customers)Code language: Kotlin (kotlin)
The DAO methods for these types of database operations may also be declared to return an int value indicating the number of rows affected by the transaction, for example:
@Delete
fun deleteCustomers(Customer... customers): intCode language: Kotlin (kotlin)
The Room Database
The Room database class is created by extending the RoomDatabase class and acts as a layer on top of the actual SQLite database embedded into the Android operating system. The class is responsible for creating and returning a new room database instance and providing access to the database’s associated DAO instances.
The Room persistence library provides a database builder for creating database instances. Each Android app should only have one room database instance, so it is best to implement defensive code within the class to prevent more than one instance from being created.
An example Room Database implementation for use with the example customer table is outlined in the following code listing:
import android.content.Context
import android.arch.persistence.room.Database
import android.arch.persistence.room.Room
import android.arch.persistence.room.RoomDatabase

@Database(entities = [(Customer::class)], version = 1)
abstract class CustomerRoomDatabase: RoomDatabase() {
    abstract fun customerDao(): CustomerDao

    companion object {

        private var INSTANCE: CustomerRoomDatabase? = null

        internal fun getDatabase(context: Context): CustomerRoomDatabase? {
            if (INSTANCE == null) {
                synchronized(CustomerRoomDatabase::class.java) {
                    if (INSTANCE == null) {
                        INSTANCE =
                             Room.databaseBuilder(
                              context.applicationContext,
                                CustomerRoomDatabase::class.java,
                                   "customer_database").build()
                    }
                }
            }
            return INSTANCE
        }
    }
}Code language: Kotlin (kotlin)
Important areas to note in the above example are the annotation above the class declaration declaring the entities with which the database is to work, the code to check that an instance of the class has not already been created and the assignment of the name “customer_database” to the instance.
The Repository
The repository is responsible for getting a Room Database instance, using that instance to access associated DAOs, and then making calls to DAO methods to perform database operations. A typical constructor for a repository designed to work with a Room Database might read as follows:
class CustomerRepository(application: Application) {

    private var customerDao: CustomerDao?

    init {
        val db: CustomerRoomDatabase? =
                   CustomerRoomDatabase.getDatabase(application)
        customerDao = db?.customerDao()
    }
.
.Code language: Kotlin (kotlin)
Once the repository can access the DAO, it can call the data access methods. The following code, for example, calls the getAllCustomers() DAO method:
val allCustomers: LiveData<List<Customer>>?
allCustomers = customerDao.getAllCustomers()Code language: Kotlin (kotlin)
When calling DAO methods, it is important to note that unless the method returns a LiveData instance (which automatically runs queries on a separate thread), the operation cannot be performed on the app’s main thread. Attempting to do so will cause the app to crash with the following diagnostic output:
Cannot access database on the main thread since it may potentially lock the UI for a long period of timeCode language: plaintext (plaintext)Since some database transactions may take a longer time to complete, running the operations on a separate thread avoids the app appearing to lock up. As will be demonstrated in the chapter entitled An Android Studio Room Database Tutorial, this problem can be easily resolved by making use of coroutines (for more information or a reminder of how to use coroutines, refer back to the chapter entitled A Guide to Kotlin Coroutines).
In-Memory Databases
The examples outlined in this chapter use a SQLite database that exists as a database file on the persistent storage of an Android device. This ensures that the data persists even after the app process is terminated.
The Room database persistence library also supports in-memory databases. These databases reside entirely in memory and are lost when the app terminates. The only change necessary to work with an in-memory database is to call the Room.inMemoryDatabaseBuilder() method of the Room Database class instead of Room. databaseBuilder(). The following code shows the difference between the method calls (note that the in-memory database does not require a database name):
// Create a file storage-based database
INSTANCE = Room.databaseBuilder<CustomerRoomDatabase>(context.applicationContext,
        CustomerRoomDatabase::class.java, "customer_database")
        .build()
// Create an in-memory database
INSTANCE = Room.inMemoryDatabaseBuilder<CustomerRoomDatabase>(
                       context.getApplicationContext(),
                            CustomerRoomDatabase.class)
                            .build()Code language: Kotlin (kotlin)
Database Inspector
Android Studio includes a Database Inspector tool window which allows the Room databases associated with running apps to be viewed, searched, and modified, as shown in Figure 69-3:

The Database Inspector will be covered in the chapter An Android Studio Room Database Tutorial.
Summary
The Android Room persistence library is bundled with the Android Architecture Components and acts as an abstract layer above the lower-level SQLite database. The library is designed to make it easier to work with databases while conforming to the Android architecture guidelines. This chapter has introduced the elements that interact to build Room-based database storage into Android app projects, including entities, repositories, data access objects, annotations, and Room Database instances.
With the basics of SQLite and the Room architecture component covered, the next step is to create an example app that puts this theory into practice. Since the user interface for the example application will require a forms-based layout, the next chapter, entitled An Android Studio TableLayout and TableRow Tutorial, will detour slightly from the core topic by introducing the basics of the TableLayout and TableRow views.

