Earlier versions of Rocky Linux provided two virtualization platforms: Kernel-based Virtual Machine (KVM) and Xen. In recent releases, support for Xen has been removed, leaving KVM as the only bundled virtualization option supplied with Rocky Linux 9. In addition to KVM, third-party solutions are available in products such as VMware and Oracle VirtualBox. Since KVM is supplied with Rocky 9, however, this virtualization solution will be covered in this and subsequent chapters.
Before plunging into installing and running KVM, it is worth discussing how it fits into the various types of virtualization outlined in the previous chapter.
An Overview of KVM
KVM is categorized as a Type-1 hypervisor virtualization solution that implements full virtualization with support for unmodified guest operating systems using Intel VT and AMD-V hardware virtualization support.
KVM differs from many other Type-1 solutions in that it turns the host Linux operating system into the hypervisor, allowing bare metal virtualization to be implemented while running a complete, enterprise-level host operating system.
KVM Hardware Requirements
Before proceeding with this chapter, we must discuss the hardware requirements for running virtual machines within a KVM environment. First and foremost, KVM virtualization is only available on certain processor types. As previously discussed, these processors must include either Intel VT or AMD-V technology.
 |
You are reading a sample chapter from Rocky Linux 9 Essentials. Buy the full book now in eBook or Print format.
Full book includes 34 chapters and 290 pages. Learn more. |
To check for virtualization support, run the lscpu command in a terminal window:
# lscpu | grep Virtualization:Code language: plaintext (plaintext)If the system contains a CPU with Intel VT support, the above command will provide the following output:
Virtualization: VT-xCode language: plaintext (plaintext)Alternatively, the following output will be displayed when a CPU with AMD-V support is detected:
Virtualization: AMD-VCode language: plaintext (plaintext)If the CPU does not support virtualization, no output will be displayed by the above lscpu command.
Note that while the above commands only report whether the processor supports the respective feature, it does not indicate whether it is currently enabled in the BIOS. This is because, in practice, virtualization support is typically disabled by default in the BIOS of most systems. Therefore, you should check your BIOS settings to ensure the appropriate virtualization technology is enabled before proceeding with this tutorial.
 |
You are reading a sample chapter from Rocky Linux 9 Essentials. Buy the full book now in eBook or Print format.
Full book includes 34 chapters and 290 pages. Learn more. |
Unlike a dual-booting environment, a virtualized environment involves running two or more complete operating systems concurrently on a single computer system. This means the system must have enough physical memory, disk space, and CPU processing power to comfortably accommodate all these systems in parallel. Therefore, before beginning the configuration and installation process, check on the minimum system requirements for Rocky 9 and your chosen guest operating systems and verify that your host system has sufficient resources to handle the requirements of both systems.
Preparing Rocky 9 for KVM Virtualization
Unlike Xen, it is not necessary to run a special version of the kernel to support KVM. As a result, KVM support is already available for use with the standard kernel via installing a KVM kernel module, thereby negating the need to install and boot from a special kernel.
To avoid conflicts, however, if a Xen-enabled kernel is currently running on the system, reboot the system and select a non-Xen kernel from the boot menu before proceeding with the remainder of this chapter.
The tools required to set up and maintain a KVM-based virtualized system are only installed by default if selected explicitly during the Rocky 9 operating system installation process. To install the KVM tools from the command prompt, execute the following command in a terminal window:
# dnf install qemu-kvm qemu-img libvirt virt-install libvirt-clientCode language: plaintext (plaintext)If you have access to a graphical desktop environment, the virt-manager package is also recommended:
 |
You are reading a sample chapter from Rocky Linux 9 Essentials. Buy the full book now in eBook or Print format.
Full book includes 34 chapters and 290 pages. Learn more. |
# dnf install virt-managerCode language: plaintext (plaintext)Verifying the KVM Installation
It is worthwhile checking that the KVM installation worked correctly before moving forward. When KVM is installed and running, two modules will have been loaded into the kernel. The presence or otherwise of these modules can be verified in a terminal window by running the lsmod command:
# lsmod | grep kvmCode language: plaintext (plaintext)Assuming that the installation was successful, the above command should generate output similar to the following:
kvm_intel             237568  0
kvm                   737280  1 kvm_intel
irqbypass              16384  1 kvmCode language: plaintext (plaintext)
Note that if the system contains an AMD processor, the kvm module will likely read kvm_amd rather than kvm_intel.
The installation process should also have configured the libvirtd daemon to run in the background. Once again, using a terminal window, run the following command to ensure libvirtd is running:
# systemctl status libvirtd
 libvirtd.service - Virtualization daemon
   Loaded: loaded (/usr/lib/systemd/system/libvirtd.service; enabled; vendor preset: enabled)
   Active: active (running) since Wed 2019-03-06 14:41:22 ESCode language: plaintext (plaintext)
If the process is not running, it may be started as follows:
 |
You are reading a sample chapter from Rocky Linux 9 Essentials. Buy the full book now in eBook or Print format.
Full book includes 34 chapters and 290 pages. Learn more. |
# systemctl enable --now libvirtd
# systemctl start libvirtdCode language: plaintext (plaintext)
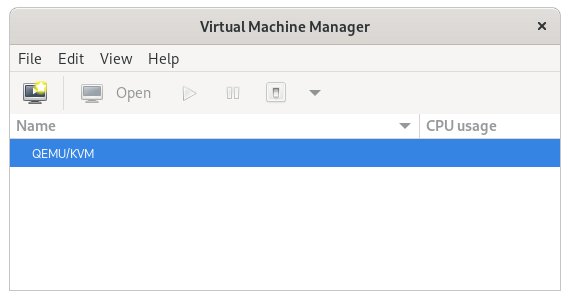
If the desktop environment is available, run the virt-manager tool by selecting Activities and entering “virt” into the search box. When the Virtual Machine Manager icon appears, click it to launch it. When loaded, the manager should appear as illustrated in the following figure:

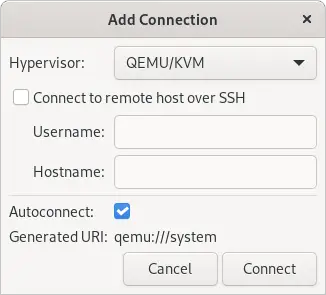
If the QEMU/KVM entry is not listed, select the File -> Add Connection menu option and, in the resulting dialog, select the QEMU/KVM Hypervisor before clicking on the Connect button:

If the manager is not currently connected to the virtualization processes, right-click on the entry listed and select Connect from the popup menu.
Summary
KVM is a Type-1 hypervisor virtualization solution that implements full virtualization with support for unmodified guest operating systems using Intel VT and AMD-V hardware virtualization support. It is the default virtualization solution bundled with Rocky 9 and can be installed quickly and easily on any Rocky 9 system with appropriate processor support. With KVM support installed and enabled, the following chapters will outline some options for installing and managing virtual machines on a Rocky 9 host.
