Like most Linux distributions, Red Hat Enterprise Linux 9 will happily co-exist on a hard disk drive with just about any version of Windows up to and including Windows 11. This is a concept known as dual-booting. When you power up the system, you will be presented with a menu providing the option to boot either your RHEL 9 installation or Windows. Obviously, you can only run one operating system at a time. Still, it is worth noting that the files on the Windows partition of your disk drive will be available to you from RHEL 9 regardless of whether your Windows partition was formatted using NTFS, FAT16, or FAT32.
This installation method involves shrinking the size of the existing Windows partitions and then installing RHEL 9 into the reclaimed space. This chapter will assume that RHEL 9 is being installed on a system currently running Windows 11.
Partition Resizing
To accommodate RHEL on a disk drive that already contains a Windows installation, the first step involves shrinking the Windows partition to make some room. The recommended course of action is to use the Windows Disk Management interface to reduce the partition size before attempting to install RHEL 9.
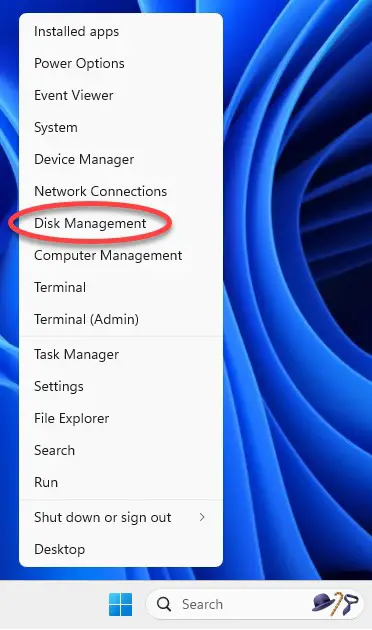
To access Disk Management on Windows 11, right-click on the Start menu and select the option from the resulting menu as highlighted in Figure 4-1:

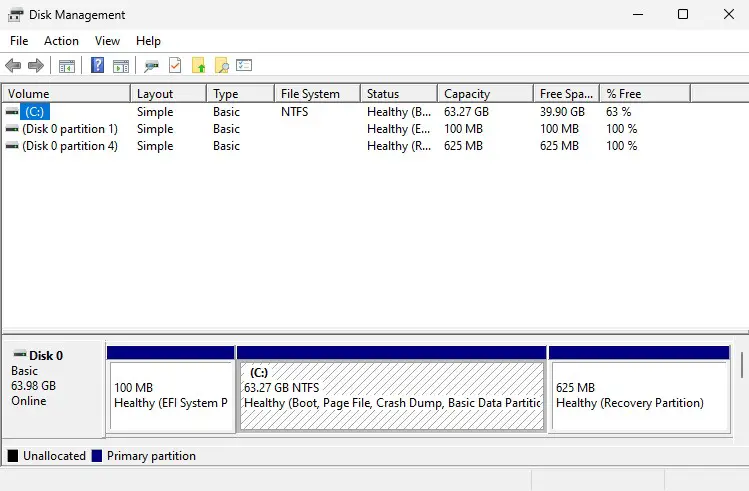
Once loaded, the Disk Management tool will display a graphical representation of the disk drives detected on the system:
 |
You are reading a sample chapter from Red Hat Enterprise Linux 9 Essentials. Buy the full book now in eBook or Print format.
Includes 34 chapters and 290 pages. Learn more. |

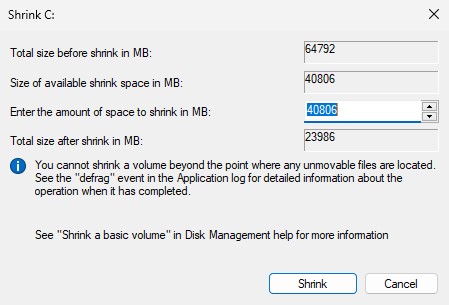
Right-click on the partition you wish to reduce in size and select Shrink Volume… from the popup menu. The tool will calculate the maximum amount by which the volume size can be reduced without data loss (a process that can take several minutes depending on the overall size of the partition). Once this analysis is complete, a dialog similar to the one in Figure 4-3 below will appear:

Specify a value in the Enter amount of space to shrink in the MB field and click the Shrink button to proceed. Once the resizing operation is complete, reboot using the RHEL 9 installation media (as outlined in Installing RHEL 9 on a Clean Disk Drive) and install using the new free space. During the RHEL 9 installation process, this can be achieved by selecting the Installation Destination option on the Installation Summary screen and ensuring that the Automatic storage configuration option is selected. This will automatically install RHEL 9 into the unallocated space created when the Windows partition was reduced in size.
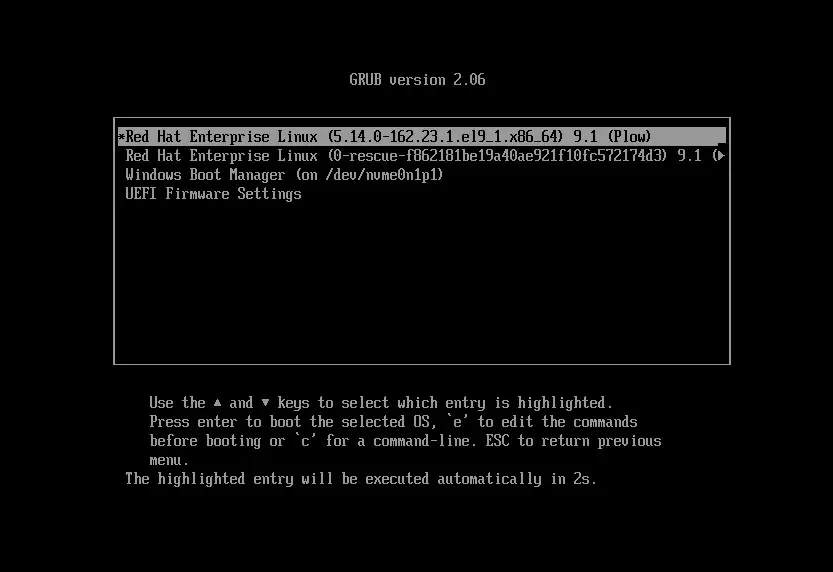
Once installation of RHEL onto the disk is complete and the system has restarted, the standard RHEL boot menu will appear, including an additional option to boot the Windows system:

Changing the Default Boot Option
When the system starts, the boot options screen will appear, and wait 5 seconds for the user to choose an operating system. If no selection has been made before the timeout elapses, the default operating system will be started. The default operating system will be the standard (non-rescue) RHEL 9 image on a newly configured system. This default can, however, be changed from within RHEL.
A range of boot configuration options (including the 5-second timeout and the boot RHGB settings outlined in ) are declared in the /etc/default/grub file, which reads as follows on a new installation:
 |
You are reading a sample chapter from Red Hat Enterprise Linux 9 Essentials. Buy the full book now in eBook or Print format.
Includes 34 chapters and 290 pages. Learn more. |
GRUB_TIMEOUT=5
GRUB_DISTRIBUTOR="$(sed 's, release .*$,,g' /etc/system-release)"
GRUB_DEFAULT=saved
GRUB_DISABLE_SUBMENU=true
GRUB_TERMINAL_OUTPUT="console"
GRUB_CMDLINE_LINUX="crashkernel=1G-4G:192M,4G-64G:256M,64G-:512M resume=/dev/mapper/rhel-swap rd.lvm.lv=rhel/root rd.lvm.lv=rhel/swap rhgb quiet"
GRUB_DISABLE_RECOVERY="true"
GRUB_ENABLE_BLSCFG=true
The first step in changing the default boot system is to declare the GRUB_SAVEDEFAULT setting within this file:
GRUB_TIMEOUT=5
GRUB_DISTRIBUTOR="$(sed 's, release .*$,,g' /etc/system-release)"
GRUB_DEFAULT=saved
GRUB_SAVEDEFAULT=true
.
.
This setting saves a new default value within the boot configuration. Next, run the grub2-set-default command to change the default setting using a numbering system that counts the first option as 0. For example, if the Windows 11 option is position 3 in the menu, the command to make Windows 11 the default boot option would read as follows:
# grub2-set-default 2
Check that the new setting has taken effect by running the following command:
# grub2-editenv list
saved_entry=f862181be19a40ae921f10fc572174d3-5.14.0-162.23.1.el9_1.x86_64
menu_auto_hide=1
boot_success=1
boot_indeterminate=0
save_default=true
Note that the saved_entry value is now set to 2. After changing the default, regenerate the boot configuration file as follows:
# grub2-mkconfig --output=/boot/grub2/grub.cfg
Reboot the system and verify that the boot menu defaults to the Windows option and that Windows loads after the timeout expires.
 |
You are reading a sample chapter from Red Hat Enterprise Linux 9 Essentials. Buy the full book now in eBook or Print format.
Includes 34 chapters and 290 pages. Learn more. |
Accessing the Windows Partition from RHEL 9
When running RHEL in a dual boot configuration, it is possible to access files located on the Windows partition by manually mounting the partition from the command line. Before doing so, however, some additional packages need to be installed on the system. First, the fuse kernel module needs to be downloaded and installed:
# dnf install fuse
# modprobe fuse
Next, the Fuse NTFS driver needs to be installed. Unfortunately, this package is not included in the standard RHEL 9 repositories, so the Extra Packages for Enterprise Linux (EPEL) repository needs to be added to the system as follows:
# subscription-manager repos --enable codeready-builder-for-rhel-9-$(arch)-rpms
# dnf install https://dl.fedoraproject.org/pub/epel/epel-release-latest-9.noarch.rpm
With the EPEL repository added, the driver can now be installed:
# dnf install ntfs-3g
Once the requisite packages are installed, the next step is to create a directory to use as the mount point for our Windows partition. In this example, we will create a directory named /mnt/windows:
# mkdir /mnt/windows
To identify the device name that has been assigned to the Windows partition, use the fdisk command as follows:
 |
You are reading a sample chapter from Red Hat Enterprise Linux 9 Essentials. Buy the full book now in eBook or Print format.
Includes 34 chapters and 290 pages. Learn more. |
# fdisk -l
.
.
Device             Start       End  Sectors  Size Type
/dev/nvme0n1p1      2048    206847   204800  100M EFI System
/dev/nvme0n1p2    206848    239615    32768   16M Microsoft reserved
/dev/nvme0n1p3    239616  49362943 49123328 23.4G Microsoft basic data
/dev/nvme0n1p4 132933632 134213631  1280000  625M Windows recovery environment
/dev/nvme0n1p5  49362944  51460095  2097152    1G Linux filesystem
/dev/nvme0n1p6  51460096 132933631 81473536 38.8G Linux LVM
In the above output, the main Windows partition containing the files we need access to is represented by /dev/nvme0n1p3. Next, we need to run the mount command (assuming the Windows partition is /dev/nvme0n1p3) as follows:
# mount /dev/nvme0n1p3 /mnt/windows
Check that the mount was successful by listing the contents of the top-level directory of the mount point:
# ls /mnt/windows
'$Recycle.Bin'             ProgramData            swapfile.sys
'Documents and Settings'  'Program Files'        'System Volume Information'
 pagefile.sys             'Program Files (x86)'  Users
 PerfLogs                  Recovery               Windows
To automate the mount each time the system is booted, add the appropriate mount line to the / etc/fstab file:
/dev/nvme0n1p3 /mnt/windows ntfs defaults 0 0
To unmount the Windows file system at any time:
# umount /mnt/windows
Summary
RHEL 9 can safely co-exist on the same disk drive as a Windows operating system by creating a dual boot environment. This involves shrinking the Windows system’s space to make room for RHEL 9 before performing the installation. Once RHEL has been installed, the boot menu configuration must be modified to include the option to boot from Windows. To access the Windows filesystem from within RHEL, the Fuse NTFS driver needs to be installed and used to mount the Windows partitions.
 |
You are reading a sample chapter from Red Hat Enterprise Linux 9 Essentials. Buy the full book now in eBook or Print format.
Includes 34 chapters and 290 pages. Learn more. |
