This chapter will explore using the iOS MapKit MKLocalSearchRequest class to search for map locations within an iOS app. The example app created in the chapter, Working with Maps on iOS 17 with MapKit and the MKMapView Class will then be extended to demonstrate local search in action.
An Overview of iOS Local Search
Local search is implemented using the MKLocalSearch class. The purpose of this class is to allow users to search for map locations using natural language strings. Once the search has been completed, the class returns a list of locations within a specified region that match the search string. For example, a search for “Pizza” will return a list of locations for any pizza restaurants within a specified area. Search requests are encapsulated in instances of the MKLocalSearchRequest class, and results are returned within an MKLocalSearchResponse object which, in turn, contains an MKMapItem object for each matching location.
Local searches are performed asynchronously, and a completion handler is called when the search is complete. It is also important to note that the search is performed remotely on Apple’s servers instead of locally on the device. Local search is, therefore, only available when the device has an active internet connection and can communicate with the search server.
The following code fragment, for example, searches for pizza locations within the currently displayed region of an MKMapView instance named mapView. Having performed the search, the code iterates through the results and outputs the name and phone number of each matching location to the console:
let request = MKLocalSearchRequest()
request.naturalLanguageQuery = "Pizza"
request.region = mapView.region

let search = MKLocalSearch(request: request)

    search.start(completionHandler: {(response, error) in

        if error != nil {
            print("Error occurred in search:
			\(error!.localizedDescription)")
        } else if response!.mapItems.count == 0 {
            print("No matches found")
        } else {
            print("Matches found")

            for item in response!.mapItems {
                print("Name = \(item.name)")
                print("Phone = \(item.phoneNumber)")
        }
    }
})Code language: Swift (swift)
The above code begins by creating an MKLocalSearchRequest request instance initialized with the search string (in this case, “Pizza”). The region of the request is then set to the currently displayed region of the map view instance.
let request = MKLocalSearchRequest()
request.naturalLanguageQuery = "Pizza"
request.region = mapView.regionCode language: Swift (swift)
An MKLocalSearch instance is then created and initialized with a reference to the search request instance. The search is then initiated via a call to the object’s start(completionHandler:) method.
search.start(completionHandler: {(response, error) inCode language: Swift (swift)The code in the completion handler checks the response to ensure that matches were found and then accesses the mapItems property of the response, which contains an array of mapItem instances for the matching locations. The name and phoneNumber properties of each mapItem instance are then displayed in the console:
if error != nil {
    print("Error occurred in search: \(error!.localizedDescription)")
} else if response!.mapItems.count == 0 {
    print("No matches found")
} else {
    print("Matches found")

    for item in response!.mapItems {
        print("Name = \(item.name)")
        print("Phone = \(item.phoneNumber)")
    }
  }
})Code language: Swift (swift)
Adding Local Search to the MapSample App
The remainder of this chapter will extend the MapSample app so the user can perform a local search. The first step in this process involves adding a text field to the first storyboard scene. Begin by launching Xcode and opening the MapSample project created in the previous chapter.
Adding the Local Search Text Field
With the project loaded into Xcode, select the Main.storyboard file and modify the user interface to add a Text Field object to the user interface layout (reducing the height of the map view object accordingly to make room for the new field). With the new Text Field selected, display the Attributes Inspector and enter Local Search into the Placeholder property field. When completed, the layout should resemble that of Figure 69-1:
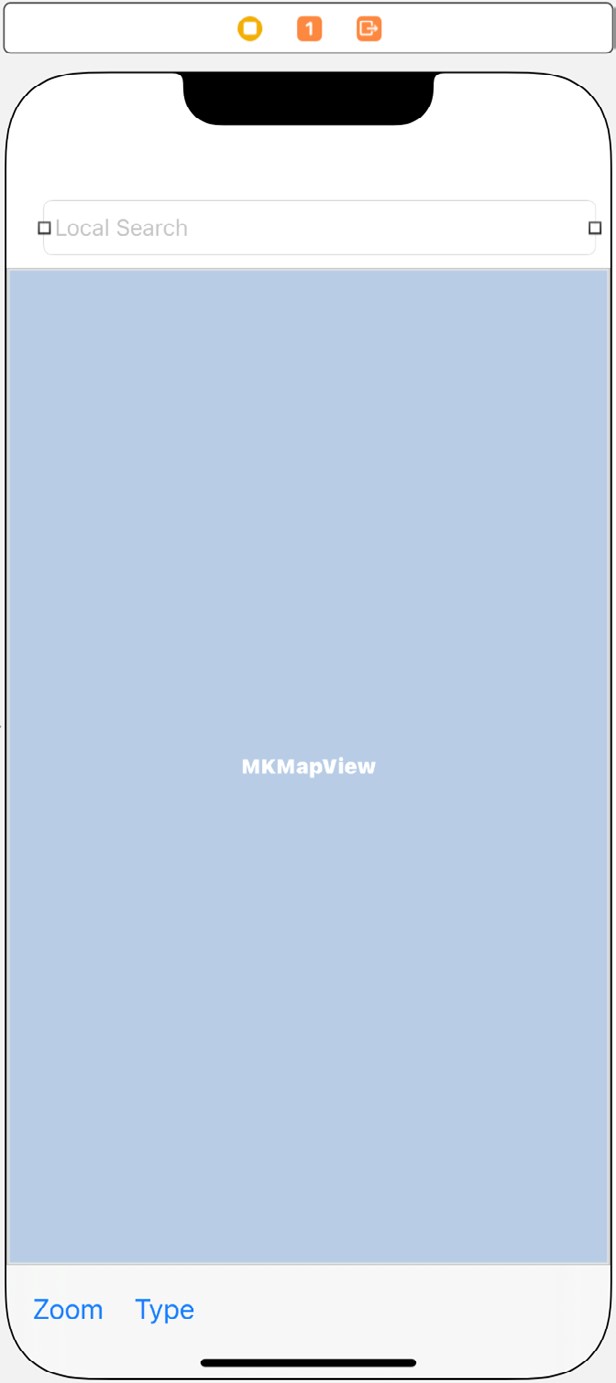
Select the Map Sample view controller by clicking on the toolbar at the top of the scene to highlight the scene in blue. Next, select the Resolve Auto Layout Issues menu from the toolbar in the lower right-hand corner of the storyboard canvas and select the Reset to Suggested Constraints menu option located beneath All Views in View Controller.
When the user touches the text field, the keyboard will appear. By default, this will display a “Return” key. However, a “Search” key would be more appropriate for this app. To make this modification, select the new Text Field object, display the Attributes Inspector, and change the Return Key setting from Default to Search.
Next, display the Assistant Editor and make sure that it displays the content of the ViewController.swift file. Right-click on the Text Field object, drag the resulting line to the Assistant Editor panel and establish an outlet named searchText.
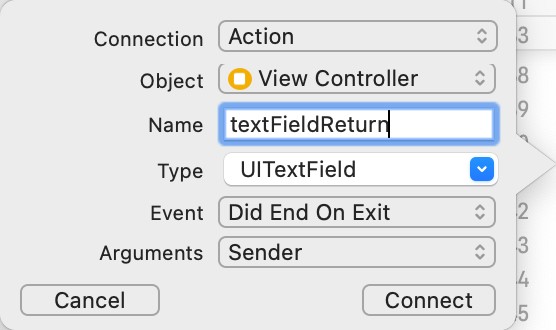
Repeat the above step, setting up an Action for the Text Field to call a method named textFieldReturn for the Did End on Exit event. Be sure to set the Type menu to UITextField, as shown in Figure 69-2, before clicking on the Connect button:
The textFieldReturn method will be required to perform three tasks when triggered. In the first instance, it will be required to hide the keyboard from view. When matches are found for the search results, an annotation for each location will be added to the map. The second task to be performed by this method is to remove any annotations created due to a previous search.
Finally, the textFieldReturn method will initiate the search using the user’s string entered into the text field. Select the ViewController.swift file, locate the template textFieldReturn method, and implement it so that it reads as follows:
@IBAction func textFieldReturn(_ sender: UITextField) {
    _ = sender.resignFirstResponder()
    mapView.removeAnnotations(mapView.annotations)
    self.performSearch()
}Code language: Swift (swift)
Performing the Local Search
The next task is to write the code to perform the search. When the user touches the keyboard Search key, the above textFieldReturn method is called, which, in turn, has been written to make a call to a method named performSearch. Remaining within the ViewController.swift file, this method may now be implemented as follows:
func performSearch() {

    matchingItems.removeAll()
    let request = MKLocalSearch.Request()
    request.naturalLanguageQuery = searchText.text
    request.region = mapView.region

    let search = MKLocalSearch(request: request)

    search.start(completionHandler: {(response, error) in

        if let results = response {

            if let err = error {
                print("Error occurred in search: \(err.localizedDescription)")
            } else if results.mapItems.count == 0 {
                print("No matches found")
            } else {
                print("Matches found")

                for item in results.mapItems {
                    print("Name = \(item.name ?? "No match")")
                    print("Phone = \(item.phoneNumber ?? "No Match")")

                    self.matchingItems.append(item as MKMapItem)
                    print("Matching items = \(self.matchingItems.count)")

                    let annotation = MKPointAnnotation()
                    annotation.coordinate = item.placemark.coordinate
                    annotation.title = item.name
                    self.mapView.addAnnotation(annotation)
                }
            }
        }
    })
}Code language: Swift (swift)
Next, edit the ViewController.swift file to add the declaration for the matchingItems array referenced in the above method. This array is used to store the current search matches and will be used later in the tutorial:
import UIKit
import MapKit

class ViewController: UIViewController, MKMapViewDelegate {

    @IBOutlet weak var mapView: MKMapView!
    @IBOutlet weak var searchText: UITextField!
    var matchingItems: [MKMapItem] = [MKMapItem]()
.
.Code language: Swift (swift)
The code in the performSearch method is largely the same as that outlined earlier in the chapter, the major difference being the addition of code to add an annotation to the map for each matching location:
let annotation = MKPointAnnotation()
annotation.coordinate = item.placemark.coordinate
annotation.title = item.name
self.mapView.addAnnotation(annotation)Code language: Swift (swift)
Annotations are represented by instances of the MKPointAnnotation class and are, by default, represented by red pin markers on the map view (though custom icons may be specified). The coordinates of each match are obtained by accessing the placemark instance within each item. The annotation title is also set in the above code using the item’s name property.
Testing the App
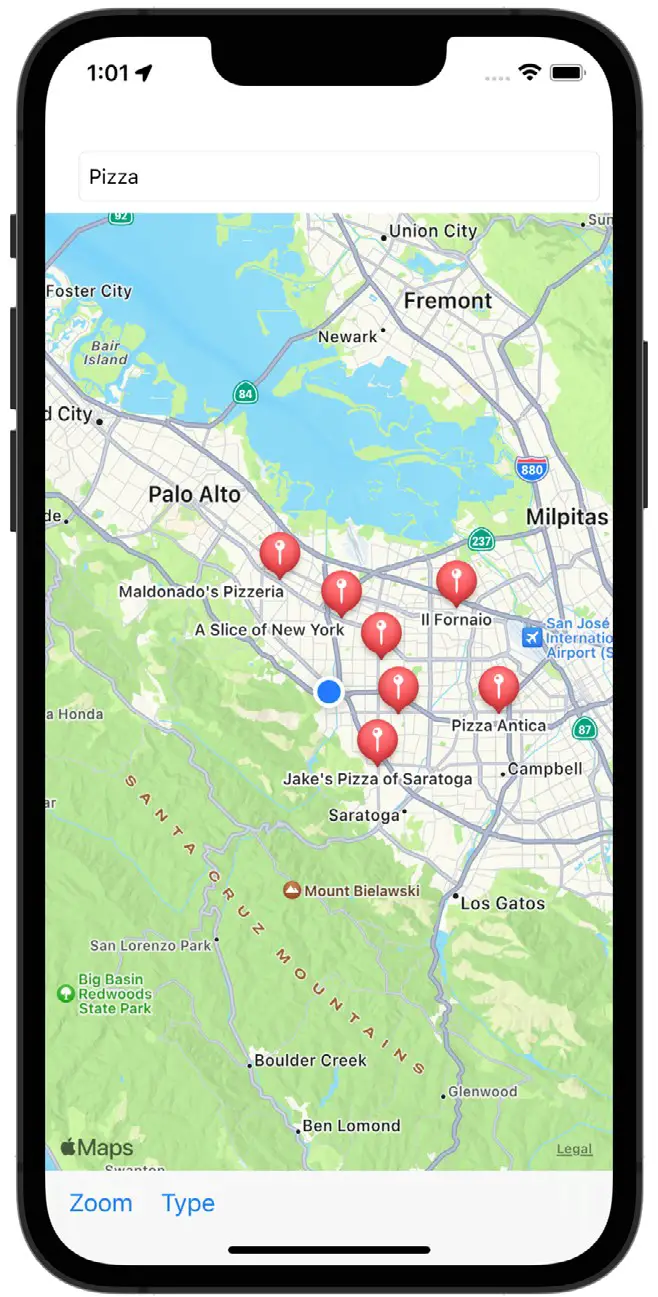
Compile and run the app on an iOS device and, once running, select the zoom button before entering the name of a type of business into the local search field, such as “pizza,” “library,” or “coffee.” Next, touch the keyboard “Search” button and, assuming such businesses exist within the currently displayed map region, an annotation marker will appear for each matching location (Figure 69-3):
Local searches are not limited to business locations. For example, it can also be used as an alternative to geocoding for finding local addresses.
Customized Annotation Markers
By default, the annotation markers appear with a red background and a white push-pin icon (referred to as the glyph). To change the appearance of the annotations, the first step is to implement the mapView(_:viewFor:) delegate method within the ViewController.swift file. When implemented, this method will be called each time an annotation is added to the map. The method is passed the MKAnnotation object to be added and needs to return an MKMarkerAnnotationView object configured with appropriate settings ready to be displayed on the map. In the same way that the UITableView class reuses table cells, the MapView class also maintains a queue of MKMarkerAnnotationView objects ready to be used. This dramatically increases map performance when working with large volumes of annotations.
Within the ViewController.swift file, implement a basic form of this method as follows:
func mapView(_ mapView: MKMapView, viewFor annotation: MKAnnotation)
    -> MKAnnotationView? {

    let identifier = "marker"
    var view: MKMarkerAnnotationView

    if let dequeuedView = mapView.dequeueReusableAnnotationView(
                             withIdentifier: identifier)
                                 as? MKMarkerAnnotationView {
        dequeuedView.annotation = annotation
        view = dequeuedView
    } else {
        view =
            MKMarkerAnnotationView(annotation: annotation,
		reuseIdentifier: identifier)
    }
    return view
}Code language: Swift (swift)
The method begins by specifying an identifier for the annotation type. For example, if a map displays different annotation categories, each category will need a unique identifier. Next, the code checks to see if an existing annotation view with the specified identifier can be reused. If one is available, it is returned and displayed on the map. If no reusable annotation views are available, a new one consisting of the annotation object passed to the method and with the identifier string is created.
Run the app now, zoom in on the current location, and perform a search that will result in annotations appearing. Since no customizations have been made to the MKMarkerAnnotationView object, the location markers appear as before.
Modify the mapView(_:viewFor:) method as follows to change the color of the marker and to display text instead of the glyph icon:
func mapView(_ mapView: MKMapView, viewFor annotation: MKAnnotation)
  -> MKAnnotationView? {
.
.
    } else {
        view = MKMarkerAnnotationView(annotation: annotation,
		reuseIdentifier: identifier)
        view.markerTintColor = UIColor.blue
        view.glyphText = "Here"
    }
    return view
}Code language: Swift (swift)
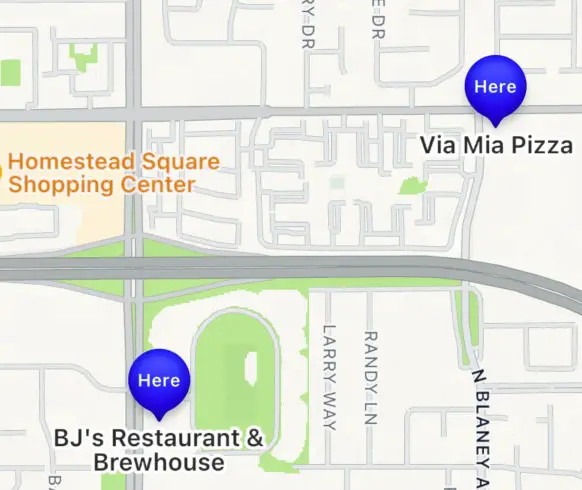
When the app is now tested, the markers appear with a blue background and display text which reads “Here” as shown in Figure 69-4:
A different image may also replace the default glyph icon. Ideally, two images should be assigned, one sized at 20x20px to be displayed on the standard marker and a larger one (40x40px) to be displayed when the marker is selected. To try this, open a Finder window and navigate to the map_glyphs folder of the sample code available from the following URL:
https://www.ebookfrenzy.com/web/ios16/
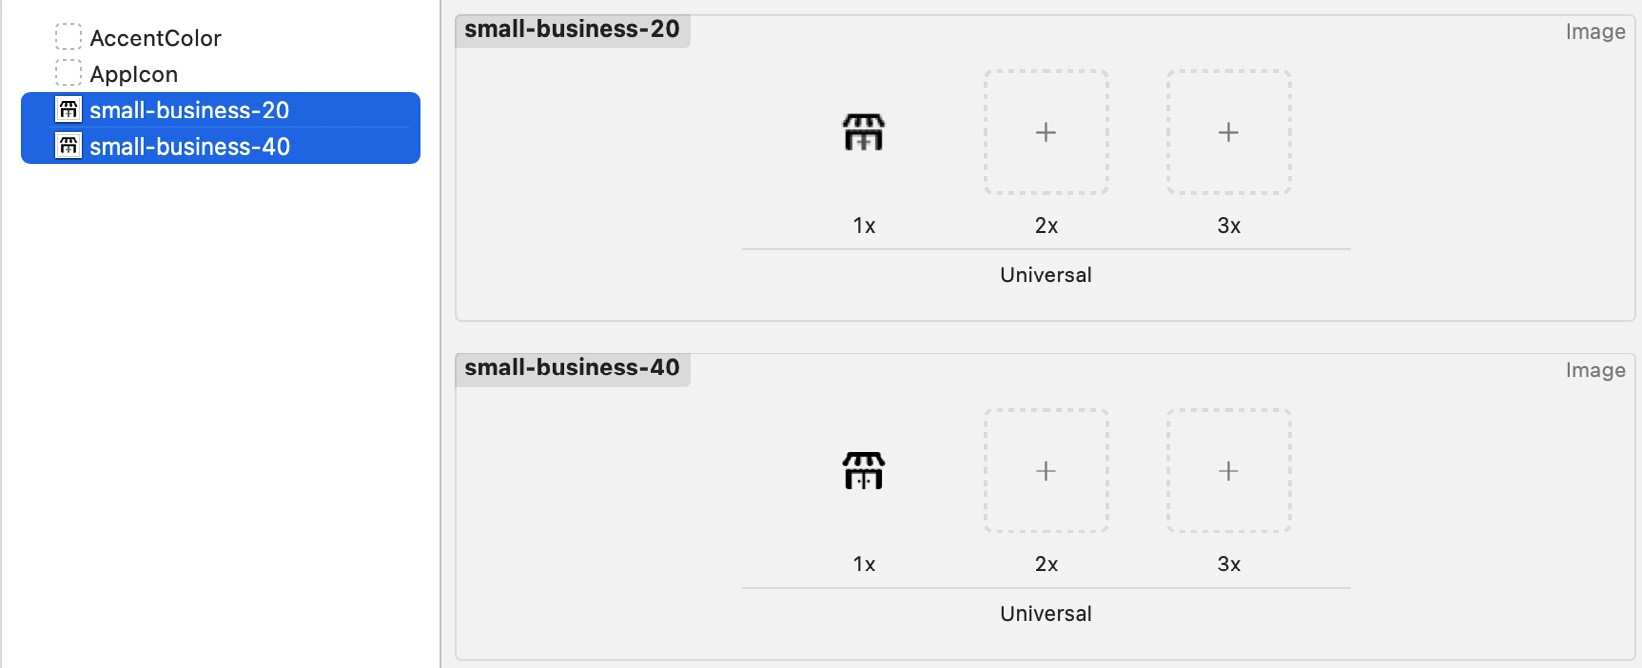
This folder contains two image files named small-business-20.png and small-business-40.png. Within Xcode, select the Assets entry in the project navigator panel and drag and drop the two image files from the Finder window onto the asset panel as indicated in Figure 69-5:
With the glyphs added, modify the code in the mapView(_:viewFor:) method to use these images instead of the text:
.
.
} else {
    view = MKMarkerAnnotationView(annotation: annotation,
				reuseIdentifier: identifier)
    view.markerTintColor = UIColor.blue
    view.glyphText = "Here"
    view.glyphImage = UIImage(named: "small-business-20")
    view.selectedGlyphImage = UIImage(named: "small-business-40")
}
.
.Code language: Swift (swift)
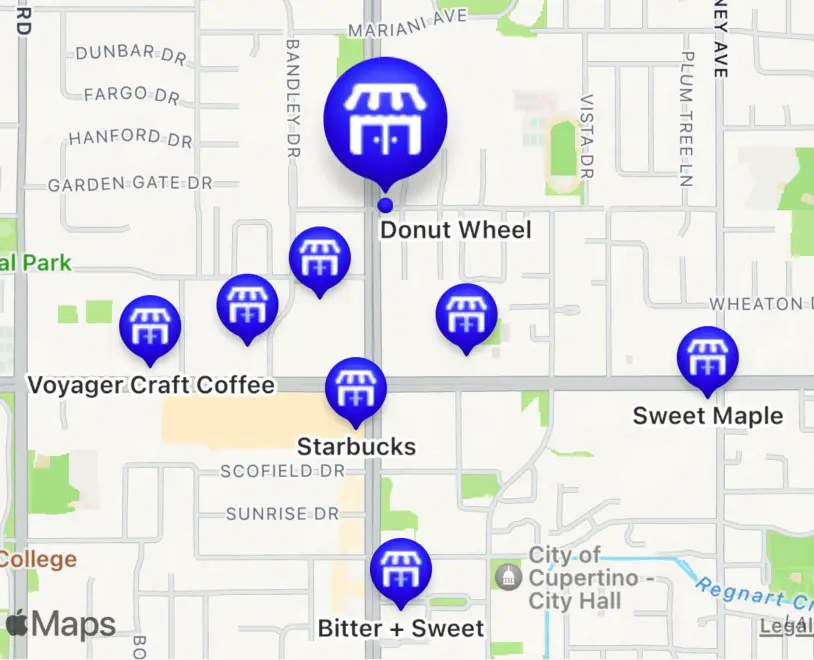
The markers will now display the smaller glyph when a search is performed within the app. Selecting a marker on the map will display the larger glyph image:
Another option for customizing annotation markers involves adding callout information, which appears when a marker is selected within the app. Modify the code once again, this time adding code to add a callout to each marker:
} else {
    view = MKMarkerAnnotationView(annotation: annotation,
		reuseIdentifier: identifier)
    view.markerTintColor = UIColor.blue
    view.glyphImage = UIImage(named: "small-business-20")
    view.selectedGlyphImage = UIImage(named: "small-business-40")
    view.canShowCallout = true
    view.calloutOffset = CGPoint(x: -5, y: 5)
    view.rightCalloutAccessoryView = UIButton(type: .detailDisclosure)
}Code language: Swift (swift)
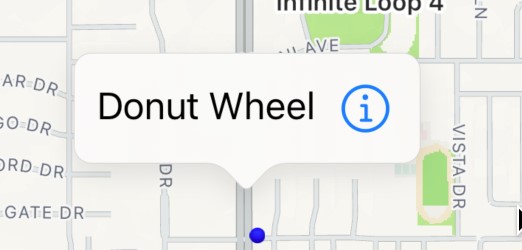
The new code begins by indicating that the marker can display a callout before specifying the position of the callout in relation to the corresponding marker. The final line of code declares a view to appear to the left of the callout text, in this case, a UIButton view configured to display the standard information icon. Since UIButton is derived from UIControl, the app can receive notifications of the button being tapped by implementing the mapView(_: calloutAccessoryControlTapped:) delegate method. The following example implementation of this method simply outputs a message to the console when the button is tapped:
func mapView(_: MKMapView, annotationView:
     MKAnnotationView, calloutAccessoryControlTapped: UIControl) {
        print("Control tapped")
}Code language: Swift (swift)
Run the app again, zoom in, and perform a business search. When the result appears, select one of the annotations and note that the callout appears as is the case in Figure 69-7:
Click the information button to verify that the message appears in the console window.
Annotation Marker Clustering
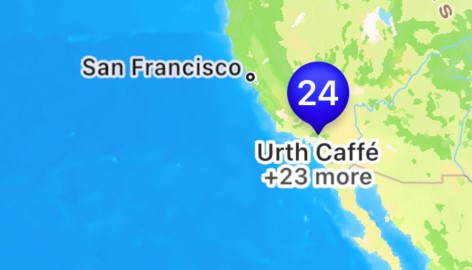
When too many annotations appear close together on a map, it can be difficult to identify one marker from another without zooming into the area so that the markers move apart. MapKit resolves this issue by providing support for the clustering of annotation markers. Clustering is enabled by assigning cluster identifiers to the MKMarkerAnnotationView objects. When a group of annotations belonging to the same cluster is grouped too closely, a single marker appears, displaying the number of annotations in the cluster.
To see clusters in action, modify the mapView(_:viewFor:) delegate method one last time to assign a cluster identifier to each annotation marker as follows:
.
.
} else {
    view = MKMarkerAnnotationView(annotation: annotation,
                                  reuseIdentifier: identifier)
    view.clusteringIdentifier = "myCluster"
    view.markerTintColor = UIColor.blue
.
.Code language: JavaScript (javascript)
After building and relaunching the app, enter a search term without first zooming into the map. Because the map is zoomed out, the markers should be too close together to display, causing the cluster count (Figure 69-8) to appear instead:
Summary
The iOS MapKit Local Search feature allows map searches to be performed using free-form natural language strings. Once initiated, a local search will return a response containing map item objects for matching locations within a specified map region.
In this chapter, the MapSample app was extended to allow the user to perform local searches, use and customize annotations to mark matching locations on the map view, and marker clustering.
In the next chapter, the example will be further extended to cover the use of the Map Kit directions API to generate turn-by-turn directions and draw the corresponding route on a map view.

