Having covered the basics of location management in iOS 17 apps in the previous chapter, we can put theory into practice and work step-by-step through an example app. This chapter aims to create a simple iOS app that tracks the latitude, longitude, and altitude of an iOS device. In addition, the level of location accuracy will be reported, together with the distance between a selected location and the device’s current location.
Creating the Example iOS 17 Location Project
The first step, as always, is to launch the Xcode environment and start a new project to contain the location app. Once Xcode is running, create a new project using the iOS App template with the Swift and Storyboard options selected, entering Location as the product name.
Designing the User Interface
The user interface for this example location app will consist of some labels and a button connected to an action method. First, initiate the user interface design process by selecting the Main.storyboard file. Once the view has loaded into the Interface Builder editing environment, create a user interface that resembles as closely as possible the view illustrated in Figure 67-1:
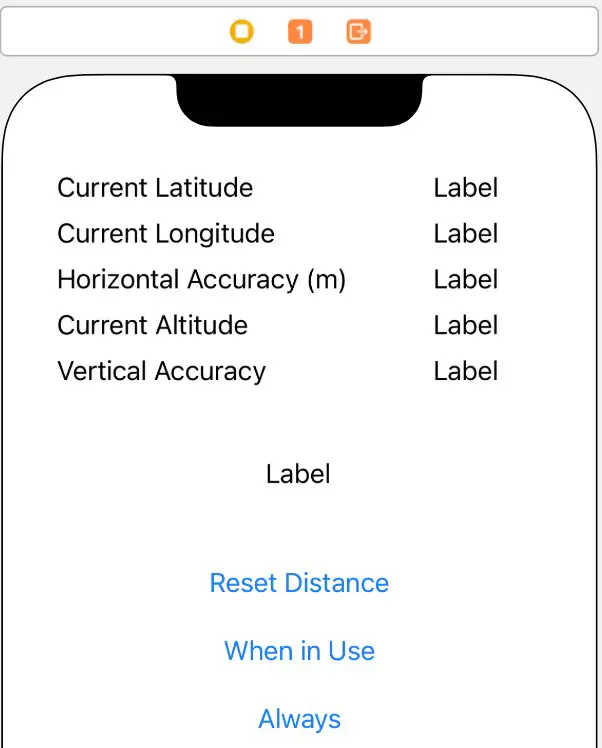
In the case of the five labels in the right-hand column, which will display location and accuracy data, ensure that the labels are stretched to the right until the blue margin guideline appears. The data will be displayed to multiple levels of decimal points requiring space beyond the default size of the label.
Select the label object to the right of the “Current Latitude” label in the view canvas, display the Assistant Editor panel, and verify that the editor is displaying the contents of the ViewController.swift file. Right-click on the same Label object and drag it to a position just below the class declaration line in the Assistant Editor. Release the line and establish an outlet called latitude in the resulting connection dialog. Repeat these steps for the remaining labels, connecting them to properties named longitude, hAccuracy, altitude, vAccuracy and distance, respectively.
Stretch the distance label so that it is the same width until it is approximately half the overall width of the screen, then use the Attributes inspector to configure center alignment. Next, display the Resolve Auto Layout Issues menu and select the Reset to Suggested Constraints option under All Views in View Controller.
The final step of the user interface design process is to connect the button objects to action methods. Ctrl-click on the Reset Distance button object and drag the line to the area immediately beneath the viewDidLoad method in the Assistant Editor panel. Release the line and, within the resulting connection dialog, establish an Action method on the Touch Up Inside event configured to call a method named resetDistance. Repeat this step for the remaining buttons, establishing action connections to methods named startWhenInUse and startAlways, respectively.
Close the Assistant Editor and add a variable to the ViewController class to store the start location coordinates and the location manager object. Now is also an opportune time to import the CoreLocation framework and to declare the class as implementing the CLLocationManagerDelegate protocol:
import UIKit
import CoreLocation

class ViewController: UIViewController, CLLocationManagerDelegate {

    @IBOutlet weak var latitude: UILabel!
    @IBOutlet weak var longitude: UILabel!
    @IBOutlet weak var hAccuracy: UILabel!
    @IBOutlet weak var altitude: UILabel!
    @IBOutlet weak var vAccuracy: UILabel!
    @IBOutlet weak var distance: UILabel!

    var locationManager: CLLocationManager = CLLocationManager()
    var startLocation: CLLocation!
.
.
}Code language: Swift (swift)
Configuring the CLLocationManager Object
The next task is configuring the instance of the CLLocationManager class and ensuring that the app requests permission from the user to track the device’s current location. Since this needs to occur when the view loads, an ideal location is in the view controller’s viewDidLoad method in the ViewController.swift file:
override func viewDidLoad() {
    super.viewDidLoad()

    locationManager.desiredAccuracy = kCLLocationAccuracyBest
    locationManager.delegate = self
    startLocation = nil
}Code language: Swift (swift)
The above code changes configure the CLLocationManager object instance to use the “best accuracy” setting. The code then declares the view controller instance as the app delegate for the location manager object.
Setting up the Usage Description Keys
As explained in the previous chapter, the two mandatory usage description key-value pairs now need to be added to the Information Property List dictionary. To add this entry, select the Location entry at the top of the Project navigator panel and select the Info tab in the main panel. Next, click on the + button contained with the last line of properties in the Custom iOS Target Properties section. Then, select the Privacy – Location When in Use Usage Description item from the resulting menu. Once the key has been added, double-click in the corresponding value column and enter the following text:
The application uses this information to show you your locationCode language: plaintext (plaintext)On completion of this step, the entry should match that of Figure 67-2:

Repeat this step, this time adding a Privacy – Location Always and When In Use Usage Description key set to the following string value:
Always mode is recommended for this app for improved location tracking
On completion of these steps, the usage description keys should appear in the property editor as follows:

Implementing the startWhenInUse Method
This action method will request when in use permission from the user before starting location updates. Locate the method stub in the ViewController.swift file and modify it as follows:
@IBAction func startWhenInUse(_ sender: Any) {
    locationManager.requestWhenInUseAuthorization()
    locationManager.startUpdatingLocation()
}Code language: Swift (swift)
Implementing the startAlways Method
The startAlways method is intended to demonstrate the process of persuading the user to elevate location tracking to always mode after already granting when in use permission. In this method, the assumption is made that updates are already running, so the first step is to stop the updates. Once updates are stopped, the permission request is made before updates are restarted:
@IBAction func startAlways(_ sender: Any) {
    locationManager.stopUpdatingLocation()
    locationManager.requestAlwaysAuthorization()
    locationManager.startUpdatingLocation()
}Code language: Swift (swift)
Implementing the resetDistance Method
The button object in the user interface is connected to the resetDistance action method, so the next task is to implement that action. All this method needs to do is set the startLocation variable to nil:
@IBAction func resetDistance(_ sender: Any) {
    startLocation = nil
}Code language: Swift (swift)
Implementing the App Delegate Methods
When the location manager detects a location change, it calls the didUpdateLocations delegate method. Since the view controller was declared as the delegate for the location manager in the viewDidLoad method, it is necessary now to implement this method in the ViewController.swift file:
func locationManager(_ manager: CLLocationManager,
                     didUpdateLocations locations: [CLLocation]) {

    let latestLocation: CLLocation = locations[locations.count - 1]

    latitude.text = String(format: "%.4f",
                           latestLocation.coordinate.latitude)
    longitude.text = String(format: "%.4f",
                            latestLocation.coordinate.longitude)
    hAccuracy.text = String(format: "%.4f",
                                     latestLocation.horizontalAccuracy)
    altitude.text = String(format: "%.4f",
                           latestLocation.altitude)
    vAccuracy.text = String(format: "%.4f",
                                   latestLocation.verticalAccuracy)

    if startLocation == nil {
        startLocation = latestLocation
    }

    let distanceBetween: CLLocationDistance =
        latestLocation.distance(from: startLocation)

    distance.text = String(format: "%.2f", distanceBetween)
}Code language: Swift (swift)
When the delegate method is called, an array of location objects containing the latest updates is passed, with the last item in the array representing the most recent location information. To begin with, the delegate method extracts the last location object from the array and works through the data contained in the object. In each case, it creates a string containing the extracted value and displays it on the corresponding user interface label.
If this is the first time the method has been called either since the app was launched or the user last pressed the Reset Distance button, the startLocation variable is set to the current location. The distance(from:) method of the location object is then called, passing through the startLocation object as an argument to calculate the distance between the two points. The result is then displayed on the distance label in the user interface.
The didFailWithError delegate method is called when the location manager instance encounters an error. This method should also, therefore, be implemented:
func locationManager(_ manager: CLLocationManager,
                     didFailWithError error: Error) {
        print(error.localizedDescription)
}Code language: Swift (swift)
In this case, the error message is printed to the console. The action taken within this method is largely up to the app developer. The method, for example, might display an alert to notify the user of the error.
Building and Running the Location App
Select a suitable simulator and click on the run button located in the Xcode project window toolbar. Once the app has launched, click on the When in Use button, at which point the request dialog shown in Figure 67-4 will appear:
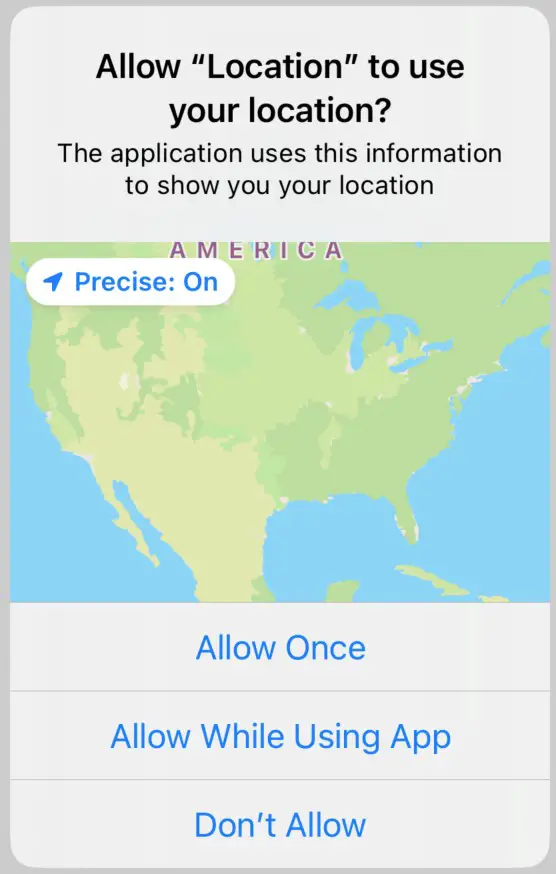
Note that this request uses the when in use description key and does not include the option to authorize always tracking. Click on the Allow While Using App button.
Once permission is granted, the app will begin tracking location information. By default, the iOS Simulator may be configured to have no current location causing the labels to remain unchanged. To simulate a location, select the iOS Simulator Features -> Location menu option and select either one of the pre-defined locations or journeys (such as City Bicycle Ride) or Custom Location… to enter a specific latitude and longitude. The following figure shows the app running in the iOS Simulator after the City Run location has been selected from the menu:
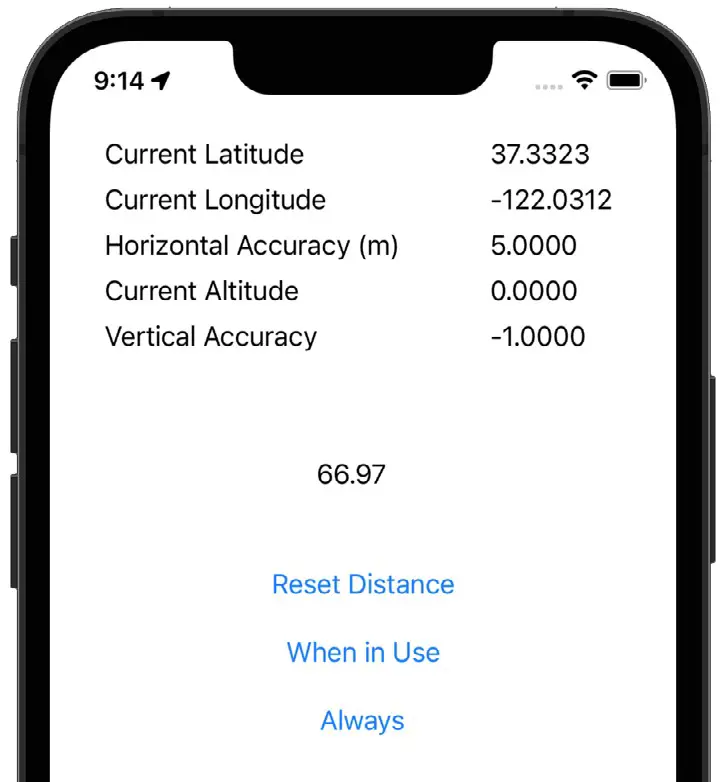
One point to note is that the distance data relates to the distance between two points, not the distance traveled. So, for example, if the device accompanies the user on a 10-mile trip that returns to the start location, the distance will be displayed as 0 (since the start and end points are the same).
Next, click on the Always button to display the permission request dialog. As shown in Figure 67-6, the request dialog will appear containing the second usage description key and options to retain the when in use setting or switch to Always mode.
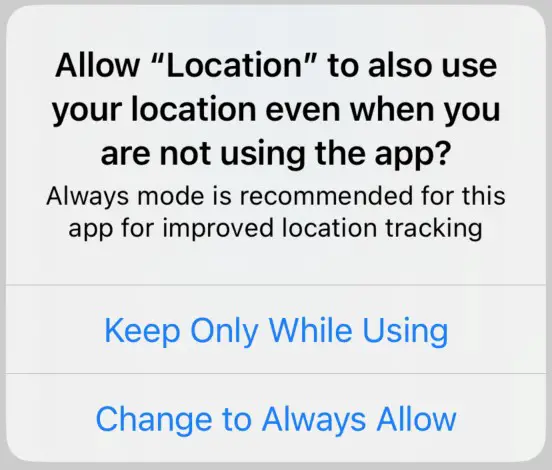
Click on the Change to Always Allow button and verify that the location data continues to update.
Adding Continuous Background Location Updates
The next step is to demonstrate continuous background location updates in action. Begin by modifying the didUpdateLocations delegate method to print the longitude and latitude value to the Xcode console. This will allow us to verify that updating continues after the app is suspended:
func locationManager(_ manager: CLLocationManager,
                     didUpdateLocations locations: [CLLocation]) {
.
.
    distance.text = String(format: "%.2f", distanceBetween)

    print("Latitude = \(latestLocation.coordinate.latitude)")
    print("Longitude = \(latestLocation.coordinate.longitude)")
}Code language: Swift (swift)
After making this change, run the app and click the When in Use button. If necessary, select the Freeway Drive option from the Features -> Location menu and verify that the latitude and longitude updates appear in the Xcode console panel. Click on the home button (or select the Device -> Home menu option) and note that the location updates no longer appear in the console.
Within the ViewController.swift file, edit the startWhenInUse and startAlways methods to enable continuous background updates:
@IBAction func startWhenInUse(_ sender: Any) {
    locationManager.requestWhenInUseAuthorization()
    locationManager.startUpdatingLocation()
    locationManager.allowsBackgroundLocationUpdates = true
    locationManager.pausesLocationUpdatesAutomatically = true
}

@IBAction func startAlways(_ sender: Any) {
    locationManager.stopUpdatingLocation()
    locationManager.requestAlwaysAuthorization()
    locationManager.startUpdatingLocation()
    locationManager.allowsBackgroundLocationUpdates = true
    locationManager.pausesLocationUpdatesAutomatically = true
}Code language: Swift (swift)
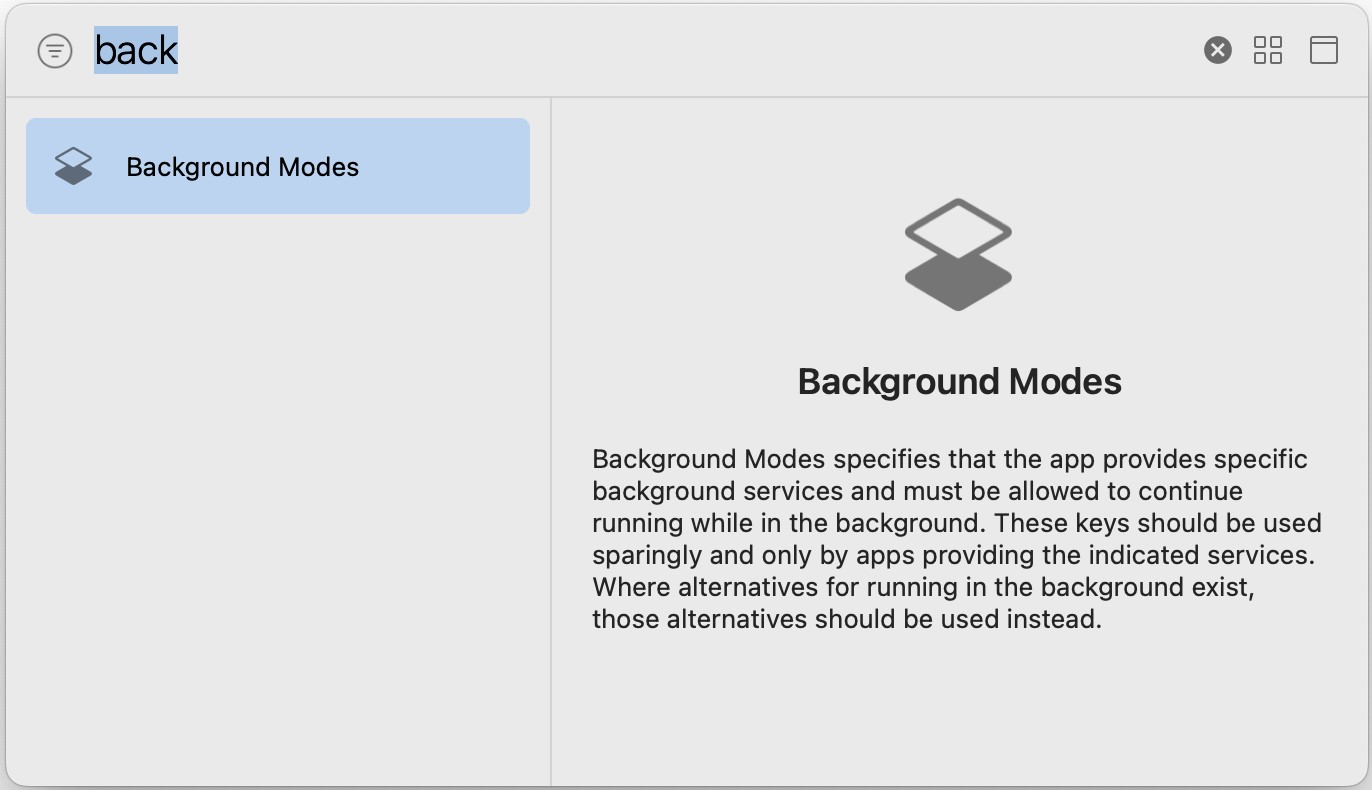
The project will also need to be configured to enable background location updates. First, select the Location target at the top of the project navigator panel, followed by the Signing & Capabilities tab in the main panel. Next, click the “+ Capability” button to display the dialog shown in Figure 67-7. Finally, enter “back” into the filter bar, select the result, and press the keyboard enter key to add the capability to the project:
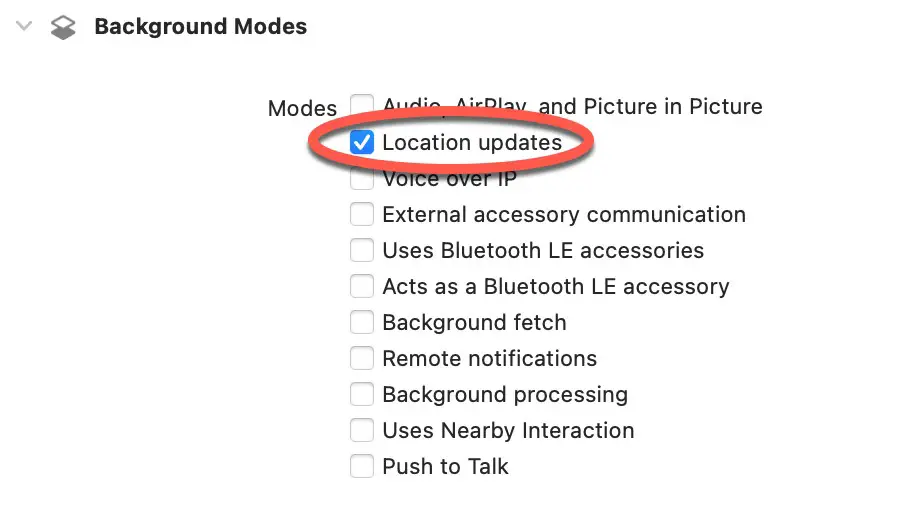
On returning to the capabilities screen, enable the checkbox for the Location updates in the Background modes section:
Re-run the app, and click on the Always button, followed by the Home button. Note that the location updates continue to appear in the Xcode console this time.
Summary
This chapter has made practical use of the features of the Core Location framework. Topics covered include the configuration of an app project to support core location updates, the differences between always and when in use location authorizations, and the code necessary to initiate and handle location update events. The chapter also included a demonstration of the use of continuous background location updates.

