Now that we have covered the basic concepts behind the handling of iOS user interaction with an iPhone or iPad touchscreen in the previous chapter, this chapter will work through a tutorial designed to highlight the handling of taps and touches. Topics covered in this chapter include the detection of single and multiple taps and touches, identifying whether a user single or double-tapped the device display and extracting information about a touch or tap from the corresponding event object.
The Example iOS Tap and Touch App
The example app created in this tutorial will consist of a view and some labels. The view object’s view controller will implement a number of the touch screen event methods outlined in An Overview of iOS 17 Multitouch, Taps, and Gestures and update the status labels to reflect the detected activity. The app will, for example, report the number of fingers touching the screen, the number of taps performed, and the most recent touch event that was triggered. In the next chapter, entitled Identifying Gestures using iOS 17 Gesture Recognizers, we will look more closely at detecting the motion of touches.
Creating the Example iOS Touch Project
Begin by launching Xcode and creating a new project using the iOS App template with the Swift and Storyboard options selected, entering Touch as the product name. When the main Xcode project screen appears, we are ready to start writing the code and designing our app.
Designing the User Interface
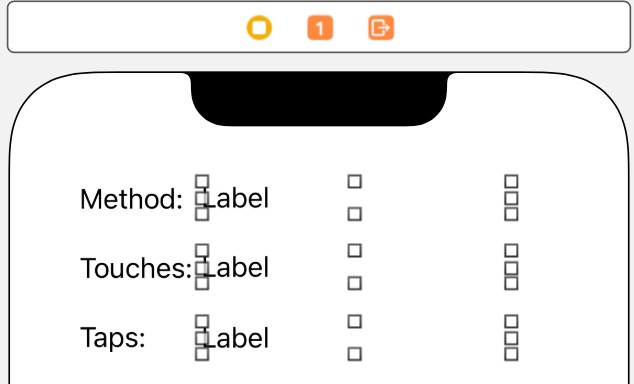
Load the storyboard by selecting the Main.storyboard file. Then, using Interface Builder, modify the user interface by adding label components from the Library and modifying properties until the view appears as outlined in Figure 53-1.
When adding the rightmost labels, stretch them so that the right-hand edges reach approximately three-quarters across the overall layout width.

Display the Resolve Auto Layout Issues menu and select the Reset to suggested constraints option listed under All Views in View Controller.
Select the label to the right of the “Method” label, display the Assistant Editor panel, and verify that the editor displays the contents of the ViewController.swift file. Ctrl-click on the same label object and drag it to a position just below the class declaration line in the Assistant Editor. Release the line, and in the resulting connection dialog, establish an outlet connection named methodStatus.
Repeat the above steps to establish outlet connections for the remaining label objects to properties named touchStatus and tapStatus. Finally, remove the text from the status labels, so they are blank.
Enabling Multitouch on the View
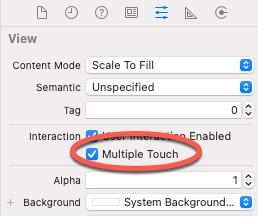
By default, views are configured to respond to only single touches (in other words, a single finger touching or tapping the screen at any one time). However, for this example, we plan to detect multiple touches. Therefore, to enable multitouch support, it is necessary to change an attribute of the view object. To achieve this, click on the background of the View window, display the Attributes Inspector (View -> Utilities -> Show Attributes Inspector), and make sure that the Multiple Touch option is selected in the Interaction section:

Implementing the touchesBegan Method
When the user touches the screen, the touchesBegan method of the first responder is called. We must implement this method in our view controller to capture these event types. In the Xcode project navigator, select the ViewController.swift file and add the touchesBegan method as follows:
override func touchesBegan(_ touches: Set<UITouch>, with event: UIEvent?) {
    let touchCount = touches.count
    if let touch = touches.first {
        let tapCount = touch.tapCount

        methodStatus.text = "touchesBegan"
        touchStatus.text = "\(touchCount) touches"
        tapStatus.text = "\(tapCount) taps"
    }
}Code language: Swift (swift)
This method obtains a count of the number of touch objects contained in the touches set (essentially the number of fingers touching the screen) and assigns it to a variable. It then gets the tap count from one of the touch objects. The code then updates the methodStatus label to indicate that the touchesBegan method has been triggered, constructs a string indicating the number of touches and taps detected, and displays the information on the touchStatus and tapStatus labels accordingly.
Implementing the touchesMoved Method
When the user moves one or more fingers currently in contact with the surface of the touch screen, the touchesMoved method is called repeatedly until the movement ceases. To capture these events, it is necessary to implement the touchesMoved method in our view controller class:
override func touchesMoved(_ touches: Set<UITouch>, with event: UIEvent?) {
    let touchCount = touches.count
    if let touch = touches.first {
        let tapCount = touch.tapCount

        methodStatus.text = "touchesMoved";
        touchStatus.text = "\(touchCount) touches"
        tapStatus.text = "\(tapCount) taps"
    }
}Code language: Swift (swift)
Once again, we report the number of touches and taps detected and indicate to the user that the touchesMoved method is being triggered this time.
Implementing the touchesEnded Method
When the user removes a finger from the screen, the touchesEnded method is called. We can, therefore, implement this method as follows:
override func touchesEnded(_ touches: Set<UITouch>, with event: UIEvent?) {
    let touchCount = touches.count
    if let touch = touches.first {
        let tapCount = touch.tapCount

        methodStatus.text = "touchesEnded";
        touchStatus.text = "\(touchCount) touches"
        tapStatus.text = "\(tapCount) taps"
    }
}Code language: Swift (swift)
Getting the Coordinates of a Touch
Although not part of this particular example, it is worth knowing that the location coordinates on the screen where a touch has been detected may be obtained in the form of a CGPoint structure by calling the location(in:) method of the touch object. For example:
let touch = touches.first
let point = touch.location(in: self.view)Code language: Swift (swift)
The X and Y coordinates may subsequently be extracted from the CGPoint structure by accessing the corresponding elements:
let pointX = point.x
let pointY = point.yCode language: Swift (swift)
Building and Running the Touch Example App
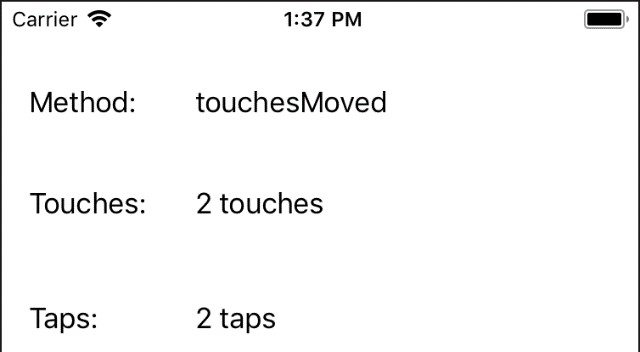
Build and run the app on a physical iOS device by clicking on the run button located in the toolbar of the main Xcode project window. With each tap and touch on the device screen, the status labels should update to reflect the interaction:

Note that when running within the iOS Simulator, multiple touches may be simulated by holding down the Option key while clicking in the simulator window.
Checking for Touch Predictions
Having implemented code to detect touches and touch motion on the screen, code will now be added to output to the console any touch predictions available within the UIEvent object passed to the touchesMoved method. Locate this method within the ViewController.swift file and modify it so that it now reads as follows:
override func touchesMoved(_ touches: Set<UITouch>, with event: UIEvent?) {
    let touchCount = touches.count
    if let touch = touches.first {
        let tapCount = touch.tapCount

        methodStatus.text = "touchesMoved";
        touchStatus.text = "\(touchCount) touches"
        tapStatus.text = "\(tapCount) taps"

        if let eventObj = event,
           let predictedTouches = eventObj.predictedTouches(for: touch) {
            for predictedTouch in predictedTouches {
                let point = predictedTouch.location(in: self.view)
                print("Predicted location X = \(point.x), Y = \(point.y)")
            }
            print("============")
        }
    }
}Code language: Swift (swift)
The added code begins by checking that an event object was passed to the method before calling the predictedTouches(for:) method of that object. Then, for each touch object within the returned array, the X and Y coordinates of the predicted touch location are output to the console.
Compile and run the app again and monitor the console as a touch moves around the display. When it can do so, UIKit will provide predictions on future touch locations. Note that this feature would only work on a physical iOS device at the time of writing.
Accessing Coalesced Touches
The final task in this tutorial is to display any coalesced touch information that might be available. Once again, modify the touchesMoved method, this time implementing code to display the location information for any coalesced touches:
override func touchesMoved(_ touches: Set<UITouch>, with event: UIEvent?) {
    let touchCount = touches.count
    if let touch = touches.first {
        let tapCount = touch.tapCount

        methodStatus.text = "touchesMoved";
        touchStatus.text = "\(touchCount) touches"
        tapStatus.text = "\(tapCount) taps"

        if let eventObj = event,
           let coalescedTocuhes = eventObj.coalescedTouches(for: touch) {
            for coalescedTouch in coalescedTocuhes {
                let point = coalescedTouch.location(in: self.view)
                print("Coalesced location X = \(point.x), Y = \(point.y)")
            }
            print("============")
        }
    }
}Code language: Swift (swift)
To test this functionality, running the app on a physical iPad Air 2 (or newer) device will be necessary. When run on such a device, moving a touch around the screen will cause the coordinates of the coalesced touches to be displayed to the Xcode console.
Summary
This chapter has created a simple example project designed to demonstrate the use of the touchesBegan, touchesMoved, and touchesEnded methods to obtain information about the touches occurring on the display of an iOS device. Using these methods, it is possible to detect when the screen is touched and released, the number of points of contact with the screen, and the number of taps being performed. Code was also added to detect and output information relating to touch predictions and coalesced touches.

