With the basics of the CloudKit Framework covered in the previous chapters, many of the concepts covered in those chapters will now be explored in greater detail by implementing an example iOS project. The app created in this chapter will demonstrate the use of the CloudKit Framework to create, update, query, and delete records in a private CloudKit database. In the next chapter, the project will be extended further to demonstrate the use of CloudKit subscriptions to notify users when new records are added to the app’s database.
About the Example CloudKit Project
The steps outlined in this chapter are intended to use several key features of the CloudKit framework. The example will take the form of the prototype for an app designed to appeal to users while looking for a new home. The app allows the users to store addresses, take photos and enter notes about properties visited. This information will be stored on iCloud using the CloudKit Framework and include the ability to save, delete, update, and search for records.
Before starting this project, remember that membership to the Apple Developer Program will be required as outlined in How to Join the Apple Developer Program.
Creating the CloudKit Example Project
Launch Xcode and create a new iOS App project named CloudKitDemo, with the programming language set to Swift.
Once the project has been created, the first step is to enable CloudKit entitlements for the app. Select the CloudKitDemo entry listed at the top of the project navigator panel and, in the main panel, click on the Signing & Capabilities tab. Next, click on the “+ Capability” button to display the dialog shown in Figure 51-1. Enter iCloud into the filter bar, select the result, and press the keyboard enter key to add the capability to the project:

If iCloud is not listed as an option, you will need to pay to join the Apple Developer program as outlined in the chapter entitled How to Join the Apple Developer Program. If you are already a member, use the steps outlined in the chapter entitled Installing Xcode 14 and the iOS 17 SDK to ensure you have created a Developer ID Application certificate.
Within the iCloud entitlement settings, make sure that the CloudKit service is enabled before clicking on the “+” button indicated by the arrow in Figure 51-2 below to add an iCloud container for the project:
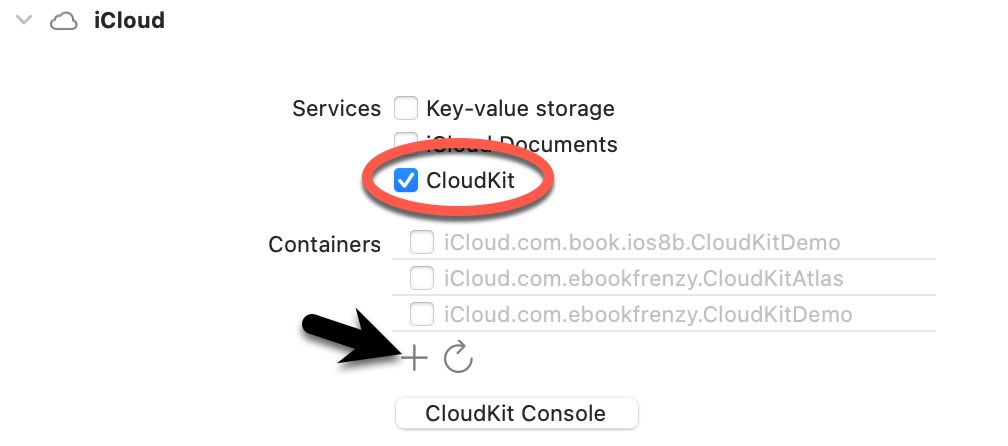
After clicking the “+” button, the dialog shown in Figure 51-3 will appear containing a text field into which you need to enter the container identifier. This entry should uniquely identify the container within the CloudKit ecosystem, generally includes your organization identifier (as defined when the project was created), and should be set to something similar to iCloud.com.yourcompany.CloudkitDemo.
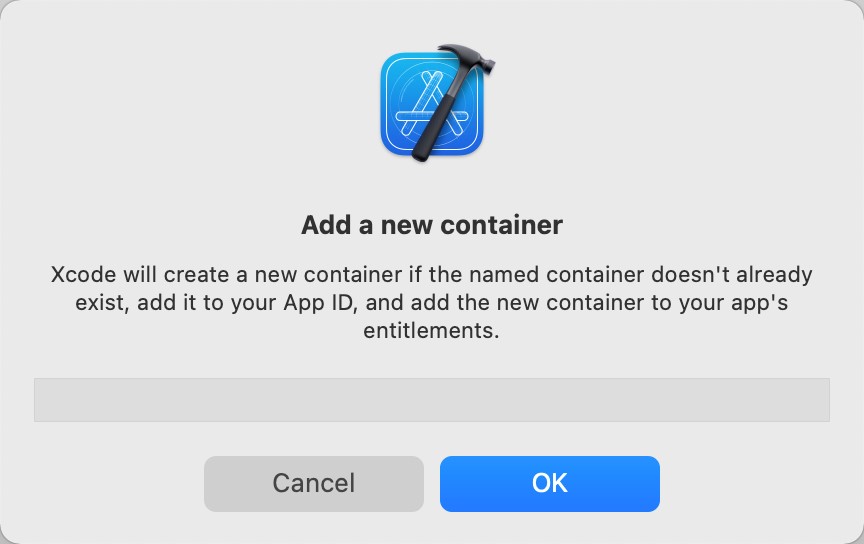
Once you have entered the container name, click the OK button to add it to the app entitlements. Then, returning to the Signing & Capabilities screen, make sure that the new container is selected:

Note that if you are using the pre-created project version from the book sample download, you must assign your own Apple Developer ID to the project. To achieve this, use the Team menu in the Signing section of the Signing & Capabilities screen to select or add your Apple Developer ID to the project.
Designing the User Interface
The user interface layout for this project will consist of a Text Field, Text View, Image View, and a Toolbar containing five Bar Button Items. First, begin the design process by selecting the Main.storyboard file in the project navigator panel so that the storyboard loads into the Interface Builder environment.
Drag and drop views from the Library panel onto the storyboard canvas and resize, position, and configure the views so that the layout resembles that outlined in Figure 51-5, making sure to stretch the views horizontally so that they align with the margins of the containing view (represented by the dotted blue lines that appear when resizing a view). After adding the Text View and before adding the Image View, select the Text View object, display the Auto Layout Add New Constraints menu, and add a Height constraint.
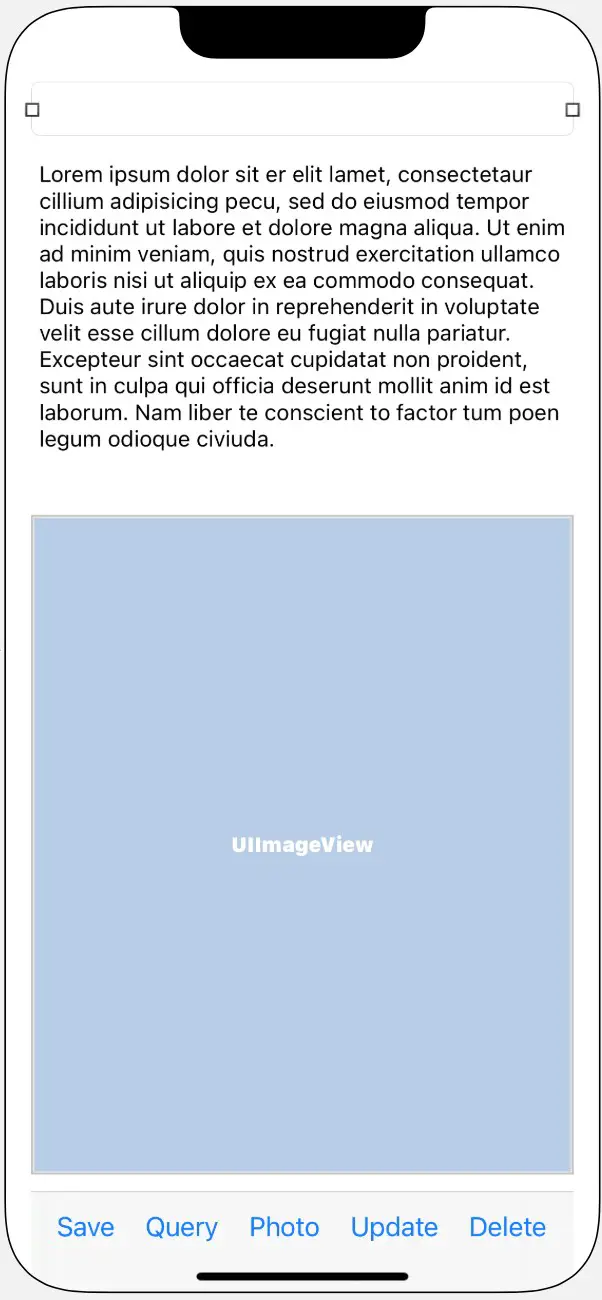
Select the Text Field view, display the Attributes Inspector, and enter Address into the Placeholder attribute field. Next, select the Image View and change the Content Mode attribute to Aspect Fit.
Click on the white background of the view controller layout so that none of the views in the layout are currently selected. Then, using the Resolve Auto Layout Issues menu located in the lower right-hand corner of the Interface Builder panel, select the Add Missing Constraints menu option.
With the Text View selected in the storyboard, display the Attributes Inspector in the Utilities panel and delete the example Latin text.
Establishing Outlets and Actions
Display the Assistant Editor, select the Text Field view in the storyboard and Ctrl-click, drag from the view to a position beneath the “class ViewController” declaration, and release the line. In the resulting connection panel, establish an outlet connection named addressField. Repeat these steps for the Text View and Image View, establishing Outlets named commentsField and imageView, respectively.
Using the same technique, establish Action connections from the five Bar Button Items to action methods named saveRecord, queryRecord, selectPhoto, updateRecord, and deleteRecord, respectively (note that when selecting a Bar Button Item, you will need to click on it multiple times because initial clicks typically only select the Toolbar parent). Once the connections have been established, the ViewController.swift file should read as follows:
import UIKit

class ViewController: UIViewController {

    @IBOutlet weak var addressField: UITextField!
    @IBOutlet weak var commentsField: UITextView!
    @IBOutlet weak var imageView: UIImageView!

    override func viewDidLoad() {
        super.viewDidLoad()
    }

    @IBAction func saveRecord(_ sender: Any) {
    }

    @IBAction func queryRecord(_ sender: Any) {
    }

    @IBAction func selectPhoto(_ sender: Any) {
    }

    @IBAction func updateRecord(_ sender: Any) {
    }

    @IBAction func deleteRecord(_ sender: Any) {
    }
}Code language: Swift (swift)
Implementing the notifyUser Method
The notifyUser method will display messages to the user and takes two string values representing a title and message as parameters. These strings are then used in the construction of an Alert View. Implement this method as follows:
func notifyUser(_ title: String, message: String) -> Void
{
    let alert = UIAlertController(title: title,
                                  message: message,
                                  preferredStyle: .alert)

    let cancelAction = UIAlertAction(title: "OK",
                                     style: .cancel, handler: nil)

    alert.addAction(cancelAction)
    DispatchQueue.main.async {
        self.present(alert, animated: true,
                     completion: nil)
    }
}Code language: Swift (swift)
Accessing the Private Database
Since the information entered into the app is only relevant to the current user, the data entered into the app will be stored on iCloud using the app’s private cloud database. Obtaining a reference to the private cloud database first involves gaining a reference to the app’s container. Within the ViewController.swift file, make the following additions, noting the inclusion of import statements for frameworks that will be needed later in the tutorial, together with variables to store the current database record, record zone, and photo image URL:
import UIKit
import CloudKit
import MobileCoreServices
import UniformTypeIdentifiers

class ViewController: UIViewController {

    @IBOutlet weak var addressField: UITextField!
    @IBOutlet weak var commentsField: UITextView!
    @IBOutlet weak var imageView: UIImageView!

    let container = CKContainer.default
    var privateDatabase: CKDatabase?
    var currentRecord: CKRecord?
    var photoURL: URL?
    var recordZone: CKRecordZone?

    override func viewDidLoad() {
        super.viewDidLoad()
        performSetup()
    }

    func performSetup() {
        privateDatabase = container().privateCloudDatabase

        recordZone = CKRecordZone(zoneName: "HouseZone")

        if let zone = recordZone {
            privateDatabase?.save(zone,
                  completionHandler: {(recordzone, error) in

                if (error != nil) {
                    self.notifyUser("Record Zone Error",
                                        message: error!.localizedDescription)
                } else {
                    print("Saved record zone")
                }
            })
        }
    }
.
.
}Code language: Swift (swift)
Note that the code added to the performSetup method also initializes the recordZone variable with a CKRecordZone object configured with the name “HouseZone” and saves it to the private database.
Hiding the Keyboard
It is important to include code to ensure the user can hide the keyboard after entering text into the two text areas in the user interface. Within the ViewController.swift file, override the touchesBegan method to hide the keyboard when the user taps the background view of the user interface:
override func touchesBegan(_ touches: Set<UITouch>,
                   with event: UIEvent?) {
    addressField.endEditing(true)
    commentsField.endEditing(true)
}Code language: Swift (swift)
Implementing the selectPhoto method
The purpose of the Photo button in the toolbar is to allow the user to include a photo in the database record. Begin by declaring that the View Controller class implements the UIImagePickerControllerDelegate and UINavigationControllerDelegate protocols, then locate the template selectPhoto action method within the ViewController.swift file and implement the code as follows:
class ViewController: UIViewController, UIImagePickerControllerDelegate,
       UINavigationControllerDelegate {
.
.
@IBAction func selectPhoto(_ sender: Any) {

    let imagePicker = UIImagePickerController()

    imagePicker.delegate = self
    imagePicker.sourceType =
           UIImagePickerController.SourceType.photoLibrary
    imagePicker.mediaTypes = [UTType.image.identifier]

    self.present(imagePicker, animated: true,
                     completion:nil)
}
.
.
}Code language: Swift (swift)
When executed, the code will cause the image picker view controller to be displayed, from which the user can select a photo from the photo library on the device to be stored along with the current record in the app’s private cloud database. The final step in the photo selection process is to implement the delegate methods, which will be called when the user has either made a photo selection or canceled the selection process:
func imagePickerController(_ picker: UIImagePickerController,
didFinishPickingMediaWithInfo info: [UIImagePickerController.InfoKey : Any]) {
    self.dismiss(animated: true, completion: nil)
    let image =
        info[UIImagePickerController.InfoKey.originalImage] as! UIImage
    imageView.image = image
    photoURL = saveImageToFile(image)
}

func imagePickerControllerDidCancel(_ picker: UIImagePickerController) {
    self.dismiss(animated: true, completion: nil)
}Code language: Swift (swift)
In both cases, the image picker view controller is dismissed from view. When a photo is selected, the image is displayed within the app via the Image View instance before being written to the device’s file system. The corresponding URL is stored in the photoURL variable for later reference. The code expects the image file writing to be performed by a method named saveImageToFile which must now be implemented:
func saveImageToFile(_ image: UIImage) -> URL
{
    let filemgr = FileManager.default

    let dirPaths = filemgr.urls(for: .documentDirectory,
                                in: .userDomainMask)

    let fileURL = dirPaths[0].appendingPathComponent("currentImage.jpg")

    if let renderedJPEGData =
        image.jpegData(compressionQuality: 0.5) {
        try! renderedJPEGData.write(to: fileURL)
    }

    return fileURL
}Code language: Swift (swift)
The method obtains a reference to the app’s Documents directory and constructs a path to an image file named currentImage.jpg. The image is then written to the file in JPEG format using a compression rate of 0.5 to reduce the amount of storage used from the app’s iCloud allowance. The resulting file URL is then returned to the calling method.
Saving a Record to the Cloud Database
When the user has entered an address and comments and selected a photo, the data is ready to be saved to the cloud database. This will require that code be added to the saveRecord method as follows:
@IBAction func saveRecord(_ sender: Any) {

    var asset: CKAsset?

    if (photoURL == nil) {
        notifyUser("No Photo",
          message: "Use the Photo option to choose a photo for the record")
        return
    } else {
        asset = CKAsset(fileURL: photoURL!)
    }

    if let zoneId = recordZone?.zoneID {

        let myRecord = CKRecord(recordType: "Houses",
                                recordID: CKRecord.ID(zoneID: zoneId))

        myRecord.setObject(addressField.text as CKRecordValue?,
                           forKey: "address")

        myRecord.setObject(commentsField.text as CKRecordValue?,
                           forKey: "comment")

        myRecord.setObject(asset, forKey: "photo")

        let modifyRecordsOperation = CKModifyRecordsOperation(
            recordsToSave: [myRecord],
            recordIDsToDelete: nil)

        let configuration = CKOperation.Configuration()

        configuration.timeoutIntervalForRequest =  10
        configuration.timeoutIntervalForResource = 10

        modifyRecordsOperation.configuration = configuration

        modifyRecordsOperation.modifyRecordsResultBlock = { result in
            switch result {

            case .success():
                self.notifyUser("Success", message: "Record saved successfully")
                self.currentRecord = myRecord
            case .failure(_):
                self.notifyUser("Save Error", message: "Failed to save record")

            }
        }
        privateDatabase?.add(modifyRecordsOperation)
    }
}Code language: Swift (swift)
The method begins by verifying that the user has selected a photo to include in the database record. If one has not yet been selected, the user is notified that a photo is required (the notifyUser method will be implemented in the next section).
Next, a new CKAsset object is created and initialized with the URL to the photo image previously selected by the user. A new CKRecord instance is created and assigned a record type of “Houses.” The record is then initialized with the Text Field and Text View content, the CKAsset object containing the photo image, and ID of the zone with which the record is to be associated.
Once the record is ready to be saved, a CKModifyRecordsOperation object is initialized with the record object and then executed against the user’s private database. A completion handler is used to report the success or otherwise of the save operation. Since this involves working with the user interface, it is dispatched to the main thread to prevent the app from locking up. The new record is then saved to the currentRecord variable, where it can be referenced should the user decide to update or delete it.
Testing the Record Saving Method
Compile and run the app on a device or simulator on which you are signed into iCloud using the Apple ID associated with your Apple Developer account. Next, enter text into the address and comments fields and select an image from the photo library.
Tap the Save button to save the record and wait for the alert to appear, indicating that the record has been saved successfully. Note that CloudKit operations are performed asynchronously, so the amount of time for a successful save to be reported will vary depending on the size of the saved record, network speed, and responsiveness of the iCloud servers.
Reviewing the Saved Data in the CloudKit Console
Once some product entries have been added to the database, return to the Signing & Capabilities screen for the project (Figure 51-2) and click on the CloudKit Console button. This will launch the default web browser on your system and load the CloudKit Dashboard portal. Enter your Apple developer login and password, and once the dashboard has loaded, the home screen will provide the range of options illustrated in Figure 51-6:

Select the CloudKit Database option and, on the resulting web page, select the container for your app from the drop-down menu (marked A in Figure 51-7 below). Since the app is still in development and has not been published to the App Store, make sure that menu B is set to Development and not Production:

Next, we can query the records stored in the app container’s private database. Set the row of menus (C) to Private Database, HouseZone, and Query Records, respectively. If HouseZone is not listed, make sure that the device or simulator on which the app is running is signed in using the same Apple ID used to log into the CloudKit Dashboard. Finally, set the Record Type menu to Houses and the Fields menu to All:

Clicking on the Query Records button should list any records saved in the database, as illustrated in Figure 51-9:
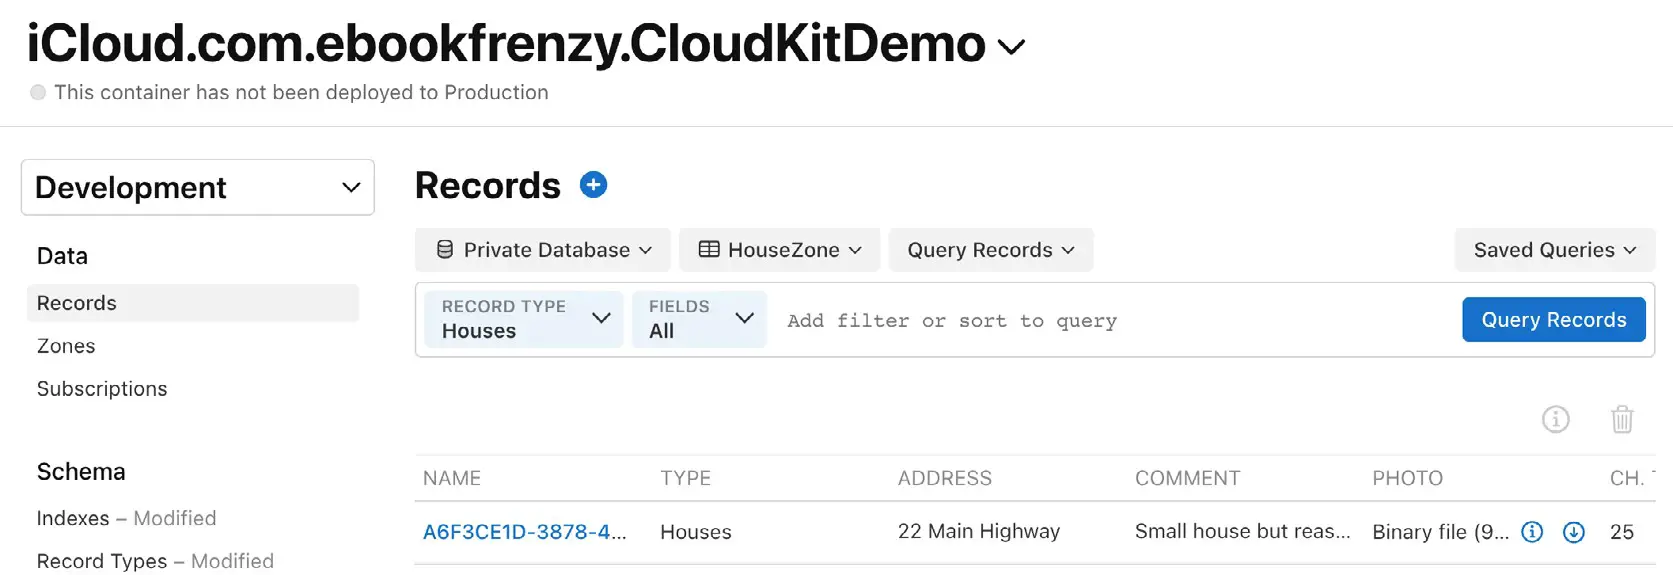
Within the records list, click on the record name to display the data and assets contained within that record. The information displayed in the Record Details panel (Figure 51-10) should match that entered within the CloudKitDemo app:
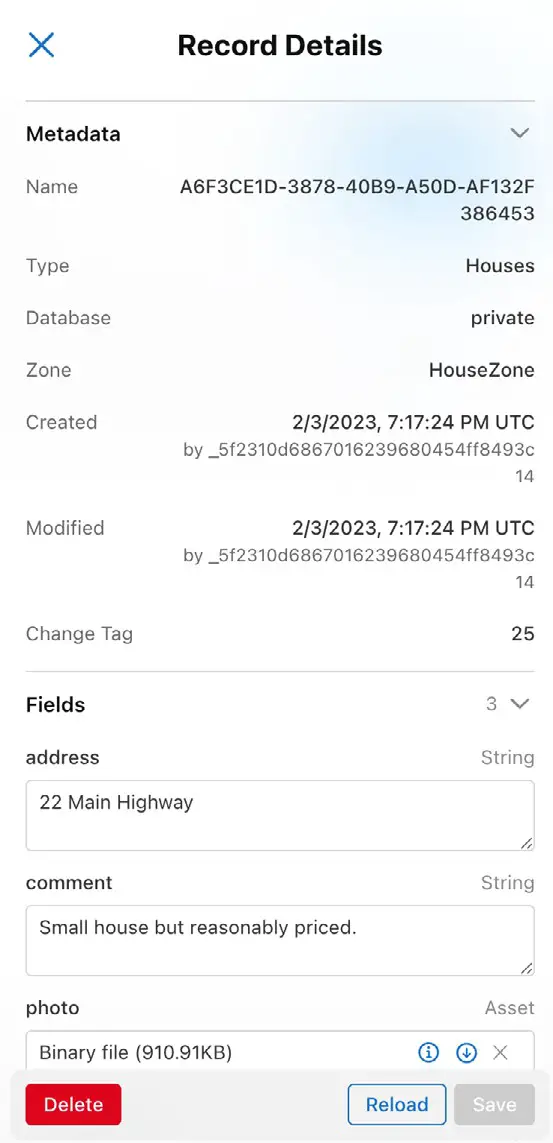
The next task is to implement the remaining action methods after verifying that the record was saved.
Searching for Cloud Database Records
The Query feature of the app allows a record matching a specified address to be retrieved and displayed to the user. Because a query operation can take some time to complete, it must be performed asynchronously from the main thread to prevent the app from freezing while awaiting a response from the CloudKit service. We will, therefore, perform query operations using Swift Concurrency, beginning with an async function that will perform the query. Within the ViewController.swift file, add a new method named asyncQuery as follows:
func asyncQuery(predicate: NSPredicate) async {

    let query = CKQuery(recordType: "Houses", predicate: predicate)

    do {
        let result = try await privateDatabase?.records(matching: query)

        if let records = result?.matchResults.compactMap({ try? $0.1.get() }) {

            if records.count > 0 {
                let record = records[0]
                self.currentRecord = record
                self.commentsField.text = record.object(forKey: "comment")
                                                                   as? String
                let photo = record.object(forKey: "photo") as! CKAsset

                let image = UIImage(contentsOfFile:
                                        photo.fileURL?.path ?? "")

                if let img = image {
                    self.imageView.image = img
                    self.photoURL = self.saveImageToFile(img)
                }
            } else {
                self.notifyUser("No Match Found",
                        message: "No record matching the address was found")
            }
        }
    } catch {
        self.notifyUser("Error", message: "Unable to perform query")
    }
}Code language: Swift (swift)
This method is passed an NSPredicate, which it uses to create a CKQuery object. This query object is then passed to the records() method of the private database, and the results are assigned to a constant using try await. The code then transforms the results into an array of records via a call to the Swift compactMap() method. Next, the first matching record is accessed, and the data and image contained therein are displayed to the user via the user interface outlet connections.
Next, edit the template queryRecord method in the ViewController.swift file and implement the body of the method to perform the query operation:
@IBAction func queryRecord(_ sender: Any) {

    if let text = addressField.text {
        let predicate = NSPredicate(format: "address = %@", text)
        Task.init {
            await asyncQuery(predicate: predicate)
        }
    }
}Code language: Swift (swift)
This method extracts the address and uses it to create the predicate object, which is then passed to the asyncQuery() method. Since it is not possible to call async functions from within an IBAction function, we need to make this call using the Swift Concurrency Task.init construct.
Compile and run the app, enter the address used when the record was saved in the previous section, and tap the Query button. After a short delay, the display should update with the record’s content.
Updating Cloud Database Records
When updating existing records in a cloud database, the ID of the record to be updated must be referenced since this is the only way to identify one record uniquely from another. In addition, in the case of the CloudKitDemo app, the record must already have been loaded into the app and assigned to the currentRecord variable, thereby allowing the recordID to be obtained and used for the update operation. With these requirements in mind, implement the code in the stub updateRecord method as follows:
@IBAction func updateRecord(_ sender: Any) {
    if let record = currentRecord, let url = photoURL {

         let asset = CKAsset(fileURL: url)

         record.setObject(addressField.text as CKRecordValue?,
                          forKey: "address")
         record.setObject(commentsField.text as CKRecordValue?,
                          forKey: "comment")
         record.setObject(asset, forKey: "photo")

         privateDatabase?.save(record, completionHandler:
             ({returnRecord, error in
                 if let err = error {
                     self.notifyUser("Update Error",
                                     message: err.localizedDescription)
                 } else {
                     self.notifyUser("Success", message:
                         "Record updated successfully")

                 }
             }))
     } else {
         notifyUser("No Record Selected", message:
             "Use Query to select a record to update")
     }
}Code language: Swift (swift)
This method performs similar tasks to the saveRecord method. This time, however, instead of creating a new CKRecord instance, the existing record assigned to the currentRecord variable is updated with the latest text and photo content entered by the user. When the save operation is performed, CloudKit will identify that the record has an ID that matches an existing record in the database and update that matching record with the latest data provided by the user.
Deleting a Cloud Record
CloudKit record deletions can be achieved by calling the deleteRecordWithID method of the CKDatabase instance, passing through as arguments the ID of the record to be deleted and a completion handler to be executed when the deletion operation returns. As with the updateRecord method, a deletion can only be performed when the record to be deleted has already been selected within the app and assigned to the currentRecord variable:
@IBAction func deleteRecord(_ sender: Any) {
    if let record = currentRecord {

        privateDatabase?.delete(withRecordID: record.recordID,
                completionHandler: ({returnRecord, error in
            if let err = error {
                self.notifyUser("Delete Error", message:
                                 err.localizedDescription)
            } else {
                self.notifyUser("Success", message:
                       "Record deleted successfully")
            }
        }))
    } else {
        notifyUser("No Record Selected", message:
                        "Use Query to select a record to delete")
    }
}Code language: Swift (swift)
Testing the App
With the app’s basic functionality implemented, compile and run it on a device or simulator instance and add, query, update and delete records to verify that the app functions as intended.
Summary
CloudKit provides an easy way to implement the storage and retrieval of iCloud-based database records from within iOS apps. The objective of this chapter has been to demonstrate in practical terms the techniques available to save, search, update, and delete database records stored in an iCloud database using the CloudKit convenience API.

